I have a lot of content on this site and when I redesigned it in 2014, I made an attempt to organize the info so that everything was easy to find. However, I understand that people just starting out may still find this site difficult to navigate and not know where to begin. Even the software I use isn’t abundantly clear because half of my tutorials use Kerkythea while the other half uses V-Ray. This post is long over due and will be my attempt to provide some clarification on a lot of questions that I get. It is also help those just starting out to know which techniques to focus on and how to most efficiently use their time learning arch viz.
These steps are ordered in such a way as to get you creating the best images in the fastest time possible. If you were looking to do this professionally or churn out really high end images, I would shuffle some of these steps around and put a higher priority on 3D model texture and render settings. However, this website is widely used by students and architects who don’t do this professionally and are looking for speed and simplicity. These steps are more or less how I started out and what I believe is the best path for most.
1. Fundamentals:
The barrier to entry for Photoshop is much less than that of render software. You can iterate and experiment at a much faster rate which is crucial to successful viz. With rendering software, it is too easy to get sucked into the endless search for perfect render settings and waiting hours for images to kick out. Below is what I suggest starting out with:
1.1 Photoshop Layer Management
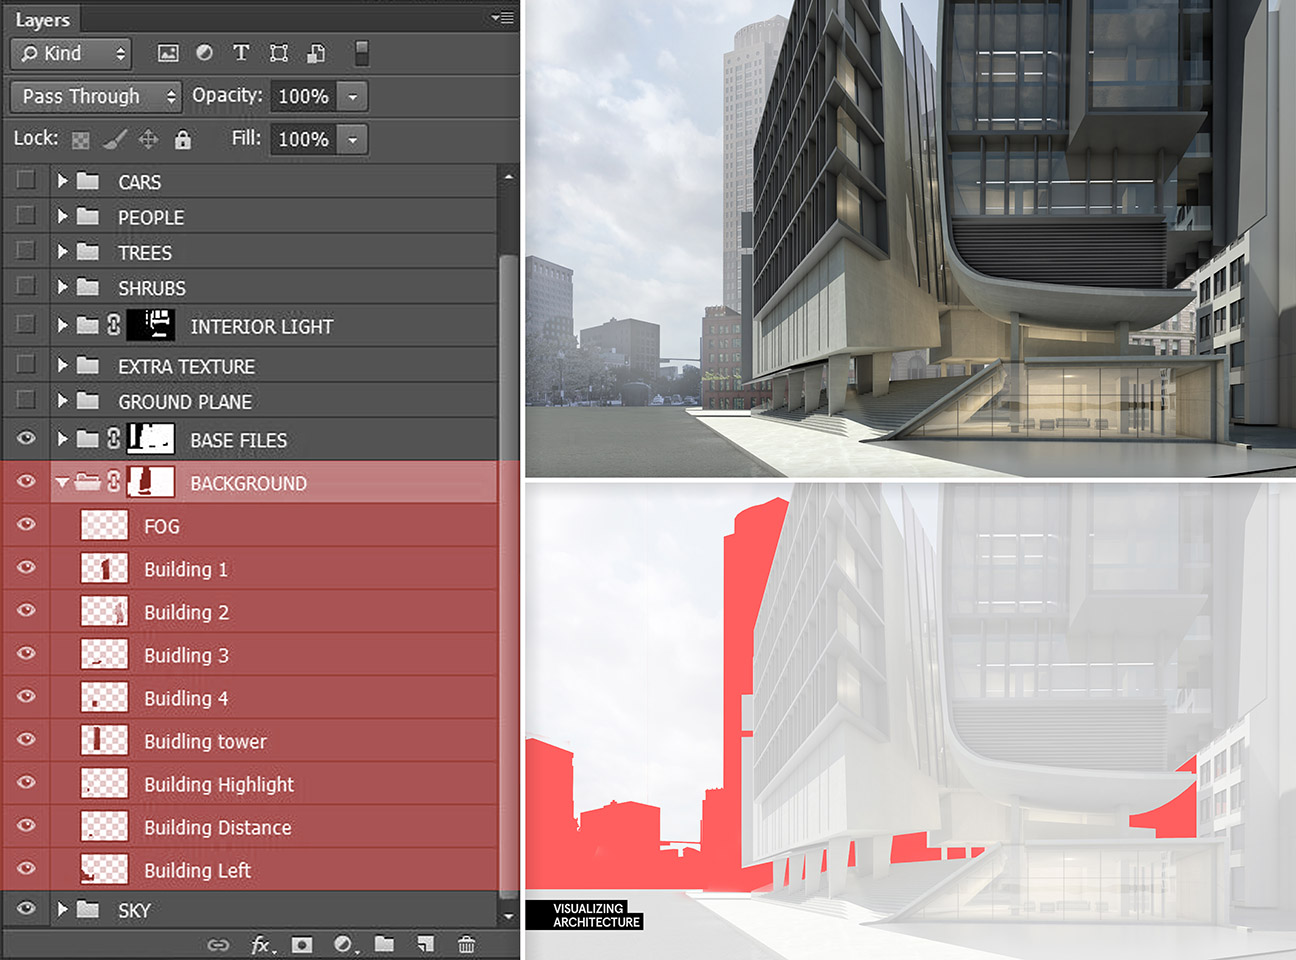
Before starting anything, get a basic idea of how to setup a Photoshop file. This will save you a lot of headaches later on when files start to get big and complex
1.2 Landscape/vegetation
Landscape and vegetation are some of the trickiest things to get right in arch viz. This area has taken me the longest to get right and I am still experimenting with techniques.
1.3 People
Almost every arch viz image will have people in the illustration and this is one thing that 3D software still does not do well. Therefore, it is important to master adding people in Photoshop and knowing how to handle the different lighting situations.
People Shadows and Lighting Tutorial
1.4 Skies
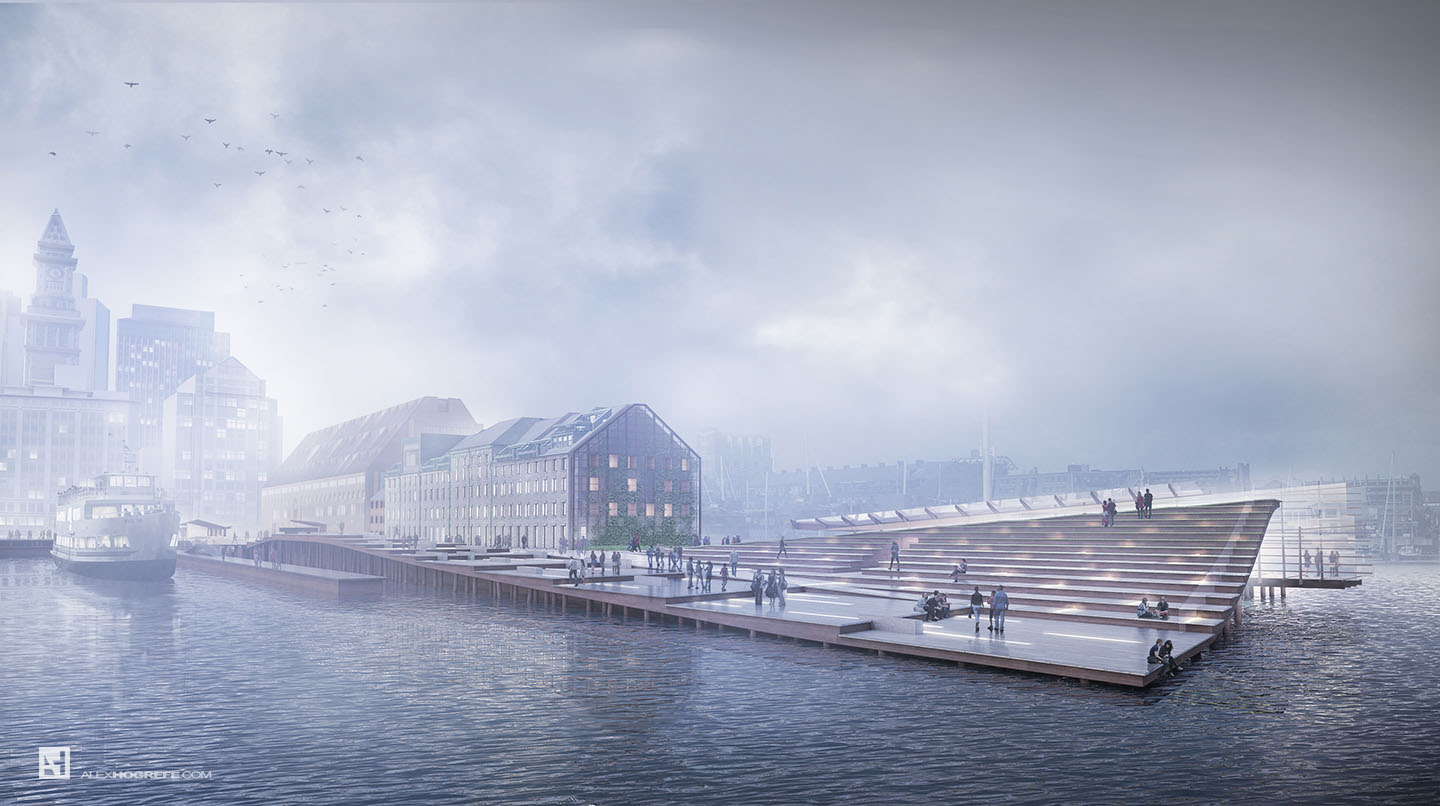
Skies often take up a large portion of the image and set the tone early on. Make sure to get these right.
2. Atmosphere:
Once you have a good grasp of the Photoshop fundamentals, atmosphere then becomes a priority. The next series of tutorials are simple in technique and very fast to implement. As simple as they are, they go a long way into giving life to the image.
2.1 Color Overlay
I use color overlays on almost every image I work on. The tutorial uses an extreme amount of color but even a small amount goes a long way to setting the mood of the image.
2.2 Atmospheric Fog
This is something I see may people ignore and is something I lean on a lot to get the mood of the image just right. This very quick technique also gives an image a ton of depth.
2.3 Adjusting the levels
Sometimes, all an image is missing is for the levels to be adjusted. This is similar to adjusting the contrast, but gives more control.
2.4 Image Softening
If after going through the steps above, the image is still lacking something, give this technique a try. It only takes a few seconds and could be what your looking for.
3. 3D Rendering:
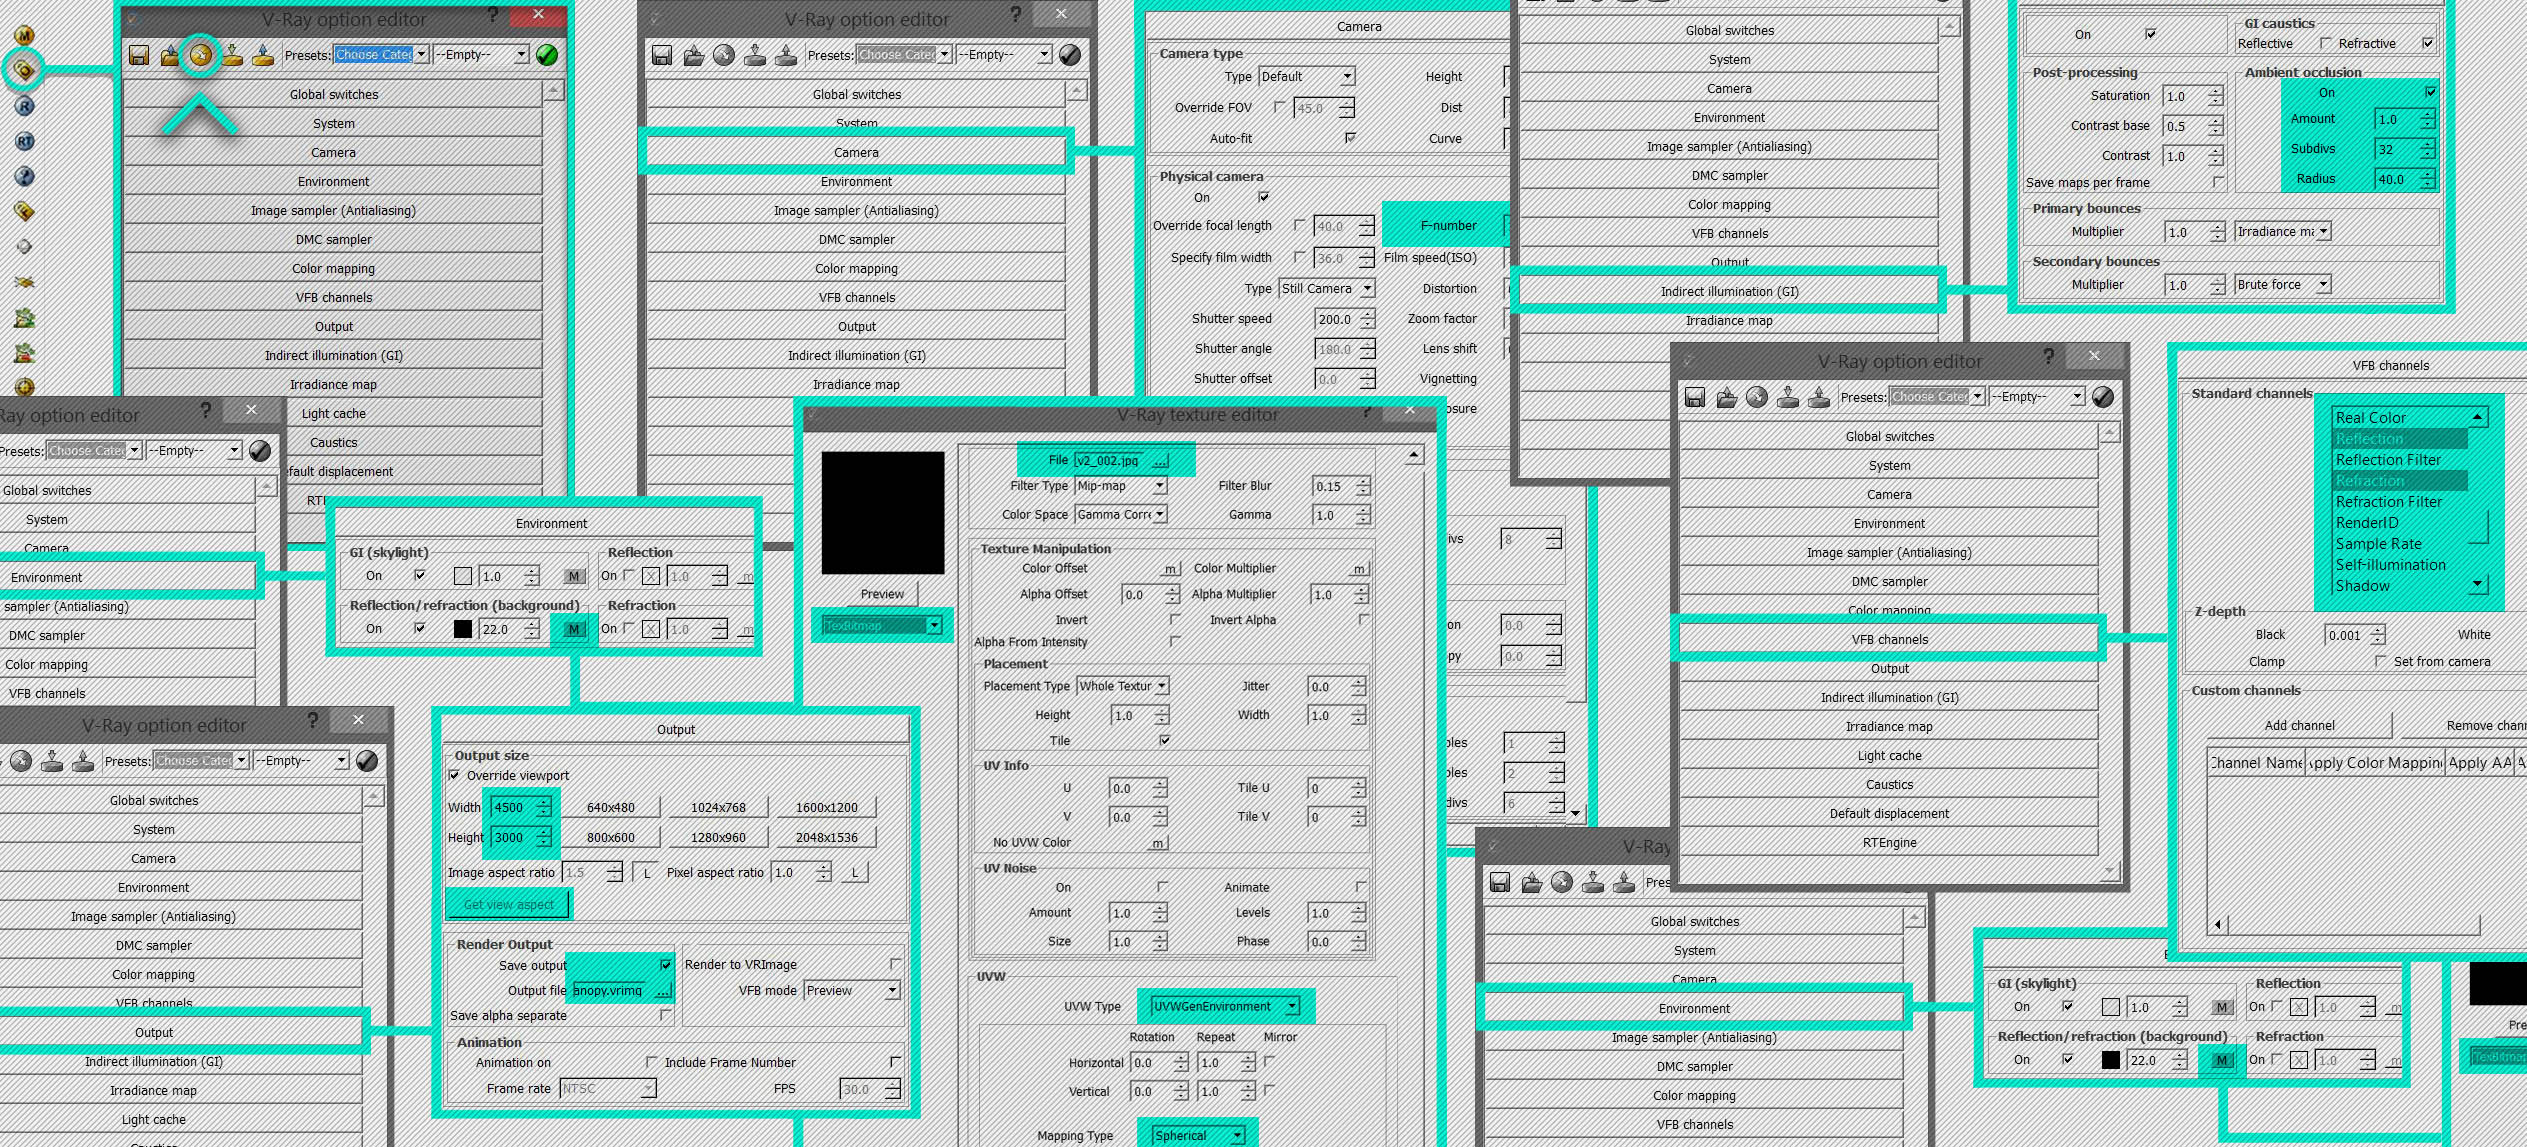
To get to the next level of visualization, you need to learn some rendering basics. Rendering software like V-Ray and Kerkythea take 3D models and bounces light around them to generate more realistic lighting conditions. However, early on, it is not necessary to know everything about rendering software. Instead, I think of it as just trying to generate a decent base image so that I can get into Photoshop as fast as possible. Later on when you decide to do this professionally, you can dive deep into the settings. For now, it’s about learning how to create a few different lighting conditions such as interior scenes, exterior scenes, dusk/night scenes, and cloudy day scenes. One last note, I have tutorials on both V-Ray and Kerkythea. Kerkythea is free and works well with Sketchup. V-Ray is a much more robust program that is somewhat expensive, but works inside of the Sketchup interface and can produce professional results. I currently use V-Ray for all of my renderings.
3.1 Clay Model
This is the most basic of renderings. A clay model rendering is a rendering with no materials. I use clay model renderings all the time because they are fast (no materials to render) and are great to diagram with. Most rendering software has an option called “material override” that will allow you to replace all materials with a simple grey texture.
V-Ray Basic Settings (Global Settings Tab)
3.2 Simple Base Renderings: V-Ray
As I said above, this is my rendering software of choice. It’s simple to use right out of the box and has many advanced features that integrate perfectly with Sketchup.
3.3 Simple Base Renderings: Kerkythea
If you are looking for a free rendering program, go with Kerkythea. It integrates well with Sketchup and is easy to use.
Kerkythea Interior Night Rendering
4. Controlling Light Manually with Photoshop:
There will be many times when you can’t get rendering software to do what you want it to do and you have to figure it out in Photoshop. It is really valuable information to have and will get you out of many jams, especially with presentations the next day.
4.1 PS Ambient Occlusion
Simply put, this term refers to adding shadows in corners where geometry meets. By understanding this concept, you can add depth and realism to an image that is lacking both. It can also be used on diagrams or model image exports that haven’t been rendered.
4.2 PS Window Light
It can consume a lot of resources to add a ton of lights in a rendering program. Often, it can be faster just to paint in the light in Photoshop.
Quick Facts:
For clarification (because I get these questions a lot) here are some quick facts about my workflow and software that I use:
Modeling: Sketchup.
I use Sketchup for all of my modeling. I have used Rhino, 3D Studio Max, Revit, Form Z, but have always come back to Sketchup. I prefer it because of its speed. No other software allows me to model as fast as I can in Sketchup. It also seems to be a universal software known by everyone. The majority of clients I’ve worked with, not only in the U.S. but also worldwide, either work with Sketchup or are familiar with the program.
Rendering: V-Ray.
While I was in school, I used Kerkythea and created several tutorials during this time. It was a free program and was easily accessible to anyone who visited my site. Last year, I switched to V-Ray because I needed more features and a higher quality output. V-Ray is not free but is still a valuable program if you can afford it. V-Ray works within Sketchup and isn’t a stand alone program like Kerkythea.
Post Processing: Photoshop.
For all editing and post processing, I use Photoshop. There is free software like Gimp and Photoshop Express that you can use as a replacement, but nothing beats the real thing.
Resolution:
This can range based on the needs and how it will be viewed. In school, most of my illustrations were about 2,000 px wide but this was several years ago. Times have changed and so has hardware. Today, I am now rendering at 4,500 px to 5,500 px wide. I think for students, because of hardware limitations, 3,000 px to 4,000 px would be a good size to aim for. All images made for my website in the past year were rendered at 4,500 px or higher on my laptop.
Time:
I try to keep rendering times to about 3 to 4 hours (using my laptop). This is easy to accomplish if you are not using displacement maps and really high render settings. Once in Photoshop, I typically spend between 4 to 6 hours. This includes adding people, trees, ground plane, skies, and lighting effects.
If there is anything that I missed or any questions you have, send me an email through my about me page or leave a comment. I see this as an evolving document that will grow and change over time, especially in the quick facts section.


Awesome stuff! Cheers alex
While working on Photoshop which colour mode do u use?
CMYK or RBG .an arch visual is something which needs to be printed and sometimes shown in screens. So which colour mode should I use while starting and how should I make a image without losing colours while manipulating modes ?ARCH VIZ CMYK OR RBG
Thanks for the compiling article, been following you for a few years now. Great stuff!
Thanks so much for all your tutorials over the years.. always fantastic.
Thank you Alex!
Absolutely astounding. I believe there is no better resource for students and practicing professionals in learning how to produce amazing architectural visualizations that have a common vein of spirit and vision.
Thank you for all of your hard work and selfless approach to create visual communication as well as a down-to-earth teaching techniques.
I appreciate you, Alex!
Alex,
Thanks, very useful. A couple of questions:
Do you use SketchUp from scratch for your projects to create architectural plans, sections, etc. with it, or is it just for rendering?
What do you do if one of your clients only have their project in Revit?
Mario, I only use sketchup for 3d modeling, and then use CAD or Revit for the plans and sections. Our office often receives Revit files that we then import into Sketchup. Revit imports pretty cleanly into sketchup as a DWG.
Thank you so much Alex!
Your work is incredibly useful, it will help me to compete on the market.
I watch you not long ago, but now always.
Your experience is invaluable, but you already know this.
very important post. Often I digged in your site to study again something I read in the past: this index helps to go straight to the point.
Thanks again, Professor! 🙂
Hi Alex.I’m a landscape architecture student from China.Recently I found your blog by chance and learned a lot from it,especially skills without rendering engine.Thanks so much and I‘m looking forward more awesome tutorials!:)
Alex
Great tutorial. I am following your all works. Your style is impressive
Can same output of visualization be reached with Rhino for modelling and rhino vray for rendering, also do you clean up revit plans and sections to reach this quality in them?
Alex, long time follower – first time posting. This is really fantastic and helpful for those of us trying to make our way through the tutorials in a more linear order. thank you very much for your work!
What si your workstation specifications? Ram, hdd, …..
Thank you for sharing this. Love your blog and hope to spend some time following some of these tutorials.
You’ve done a tutorial named “Rhino Grasshopper: site study with forces and attractors” several years ago. Is there any way you could share the ghx file? I’ve tried multiple times to get similar outcomes but nothing works.
Thank you for your time
Well, thanks a lot for your effort. You are a kind of GURU for me!
I would like to know your opinion regarding programs like LUMION, UNITY or UNREAL ENGINE. Have you ever used any of them? Whats for you the best?
Greetings!
D
If speed is important to you… maybe look at Corona Render when it becomes available for Sketchup. It is already available for Cinema4D.
I used to use Vray for SU and moved to 3Ds Max. Corona colour mapping is better than Vray (in my opinion) and there is no tweaking. They also have a material converter. It just cuts all the hassle out of rendering and produces very high quality, fast renders.
I will share this information with my friends and they will certainly love to read thisVery informative, I’ll definitely give these 5 stars.I enjoyed reading each and every line of your post.
http://www.blitz3ddesign.com
thanks a lot man, learned heaps from your site 😀
Thanks for your tutorials, really awesome work and kind of you to share, I actually used some techniques in my thesis project.
Hope to see more of your posts on the year coming.
Thank you for your works. I learnt a lot from you ^^
Mister Alex, you are a lifesaver.
This Blog is very great, also for us architecture student, I hope you will help a lot for young inspiring architects in the future. 🙂
Hi Alex,
Thank you very much for sharing all of this free! I also would like to ask you something. Have you ever tried Lumion? What do you think about this software?
You are great
Thank you for everything! Please keep up your amazing works and relentless generosity!
Long Live Alex Hogrefe !!!
Yeah Awesome piece of work.
I’m so grateful for this information
Thanks a lot
Dear sir! I am a novice at all of this, but I have this vision in my head of a housing community that I want to get out so I can see. I would love to be able to do a basic design on my own but I don’t know where to start. Can you point me in the right direction. Again I am a novice and don’t draw very well. I have a vision!
Thank you very much for such great blog!
Awesome – and thanks a lot!
That is very helpful for increasing my knowledge in this field
I really like what you describe, good to know such things.
This was a great post! I’m just a beginner and finding this information has been extremely difficult, thanks for breaking it down! I want to focus simply on creating photo-realistic interior spaces for interior designers, home furnishing companies, and real estate brokers. Most often they will give me an image to work from. Then I will clear out the space and add the redesign. This workflow helps me understand the software process a bit better. Any suggestion on online training for my goals?
Love U , U R so excellent
hello can you make a tutorial about diagram ideas and how to edit them in photoshop? this would help me with my projects cuz Im a bit lost 🙁 thank you!
Liked your renders the moment I saw them. Just a quick question, do you use Autodesk Revit also? I feel I’m more fluent in Revit as compared to SketchUp and have just been using the basic renders that Revit provides and I feel they lack everything. Any tips for Revit users to get somewhat good renders as compared to Sketchup?