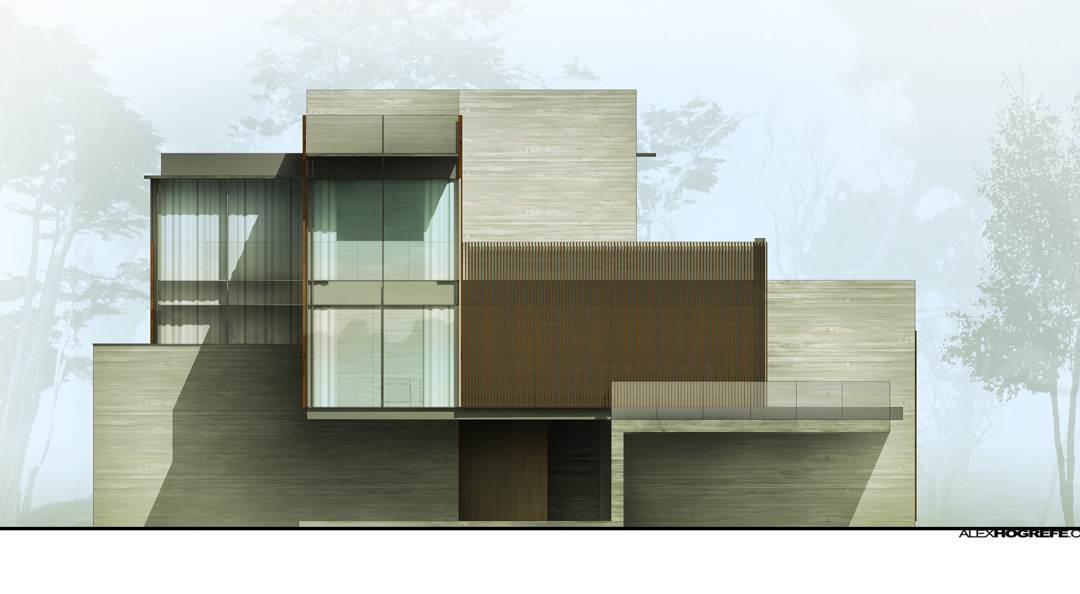
I have posted in the past on how to create interior elevations/sections by only using Photoshop, but I never posted on exterior elevations. The workflow that I use for exterior elevations really isn’t much different than the workflow that I use for interior elevations. The only change is with the shadows. In my interior elevations tutorial, I gave depth to the illustration by selecting certain surfaces and painting in shadows and highlights. However, with exterior elevations, I streamline the process by exporting a shadows layer from Sketchup. With this shadows layer, there is a key move that I use which quickly and easily gives depth and clarity by utilizing the Burn tool. While I don’t go into a great amount of detail in this post, the process of using the burn tool is more thoroughly explained in my “Ambient Occlusion” video tutorial. I would also suggest taking a second look at my “Interior Elevation” tutorial since the overall workflow of that video is similar to what I used for the above exterior elevations.
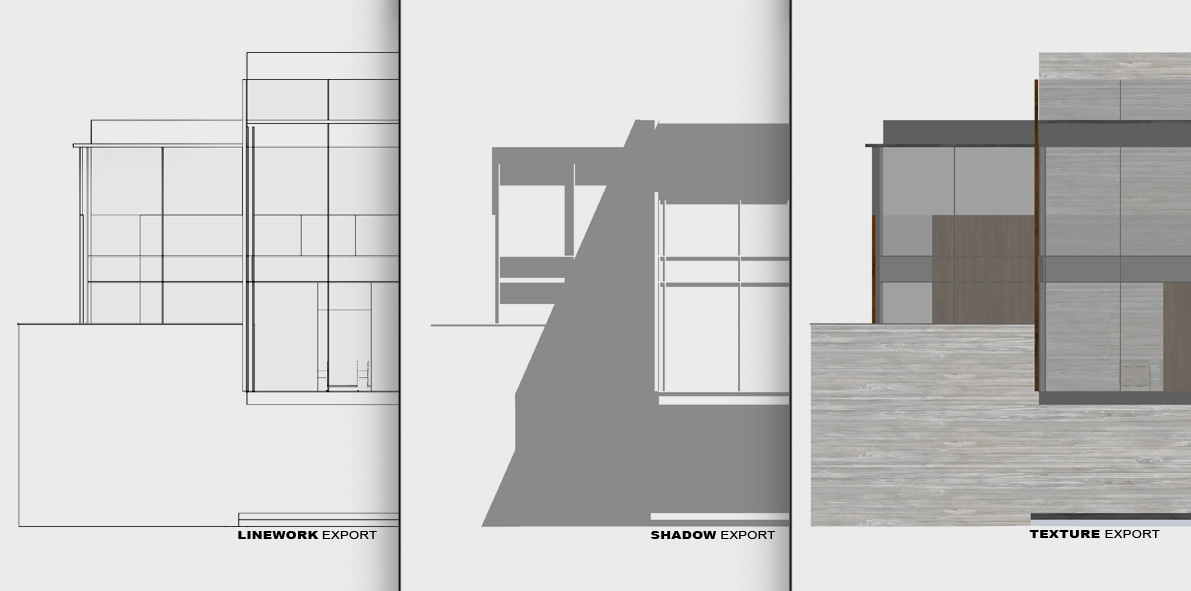
1. I began by exporting 3 images from my Sketchup Model: 1) Just the line work with the shadows turned off and the face style set to “Hidden Line”. 2) Just the shadows with everything else turned off. 3) Just the textures with line work and shadows turned off.
With those three images, layer them in Photoshop so that the linework is the top layer with the blend mode set to “Multiply”. The second layer should be the shadow image with the blend mode again set to “Multiply”. Finally, the textures layer should be the bottom most layer and the blend mode set to “Normal”.
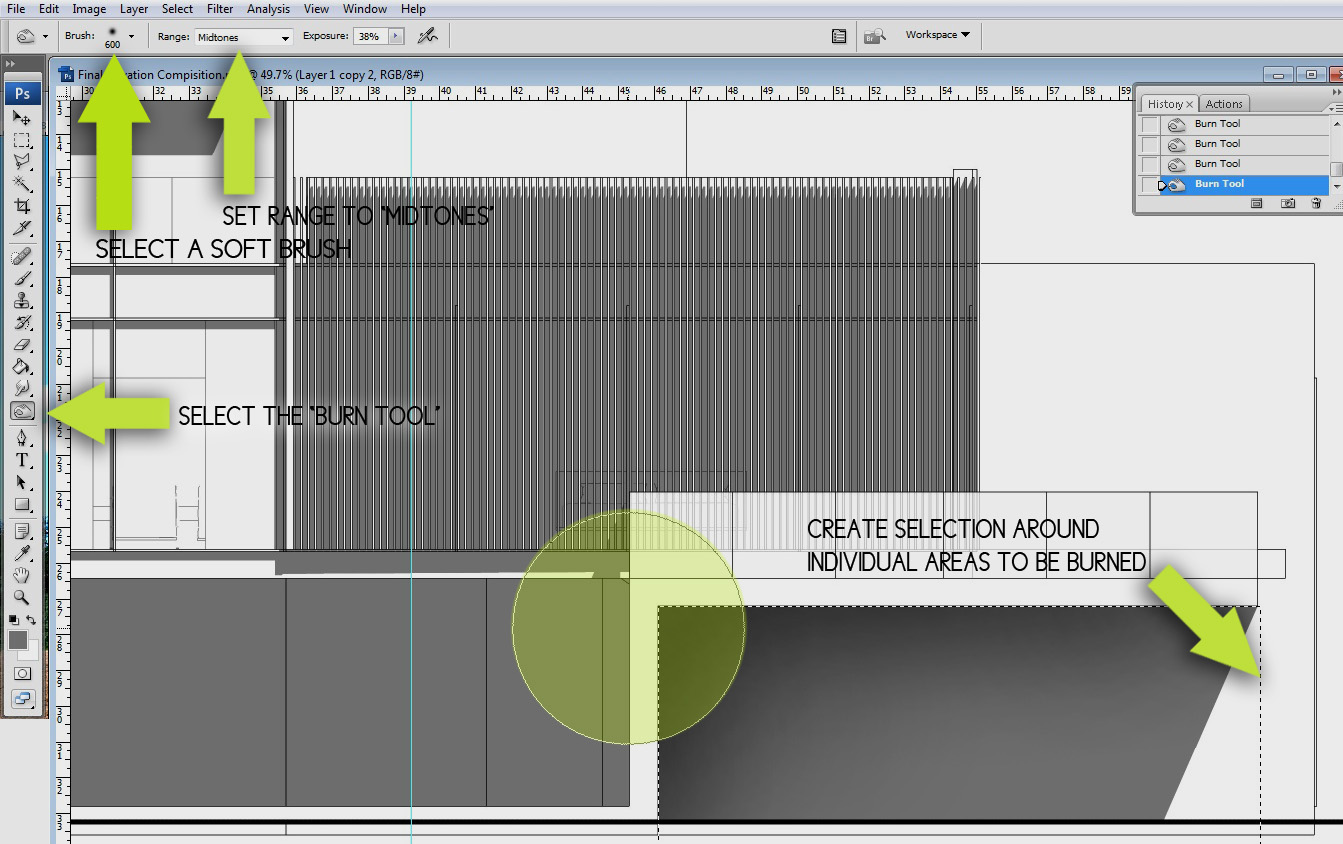
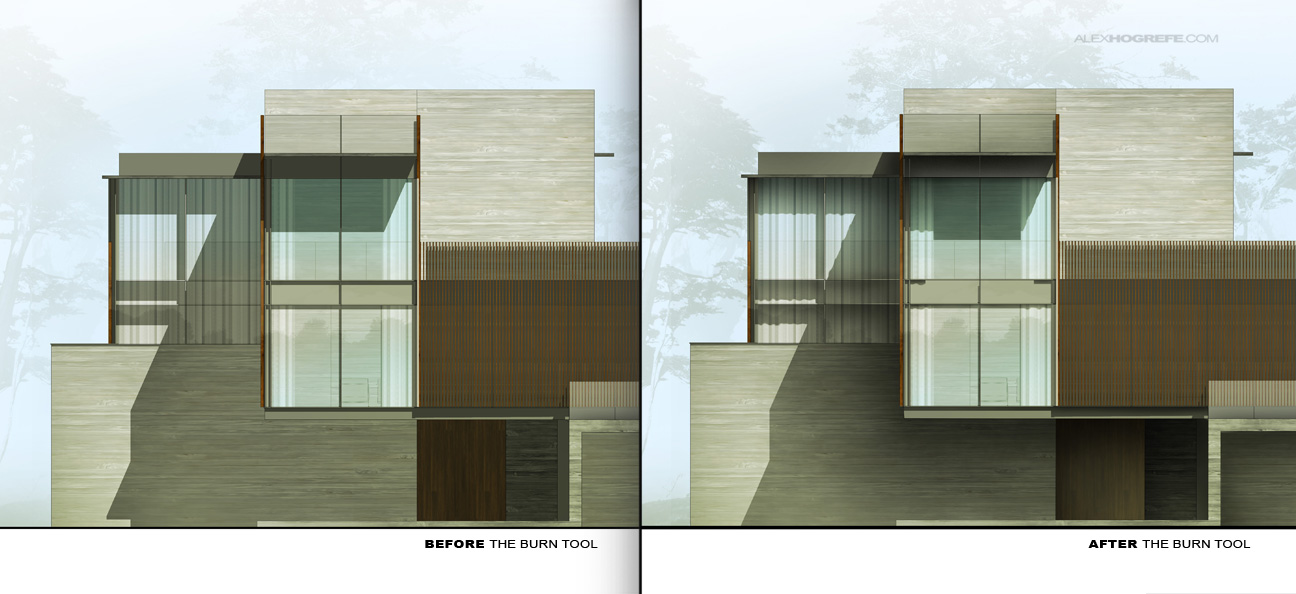
2. The next step was to take the shadows layer and began using the burn tool to create depth in the image. Like I mentioned above, I created a video tutorial a while ago that more clearly explains how this process works. To summarize, I selected individual areas of the shadow with the polygonal tool (you could also turn on the line work layer and use that layer to make selections with the “Magic Wand Tool”). With a selection in place, choose the “Burn Tool” and set the “Range” to “Midtones.” Then, using a soft brush with 0% hardness, begin burning the shadow with the darkest areas closest to the object that is casting the shadow. The shadow should get lighter in tone as it moves further from the object casting the shadow. Another way to look at it is to burn a darker shadow wherever you see corners or where there is a change in depth.
You can see in the comparison below that the before and after shows a dramatic change in the quality of shadow. Even without the textures and background, there is a much clearer reading of the geometry.
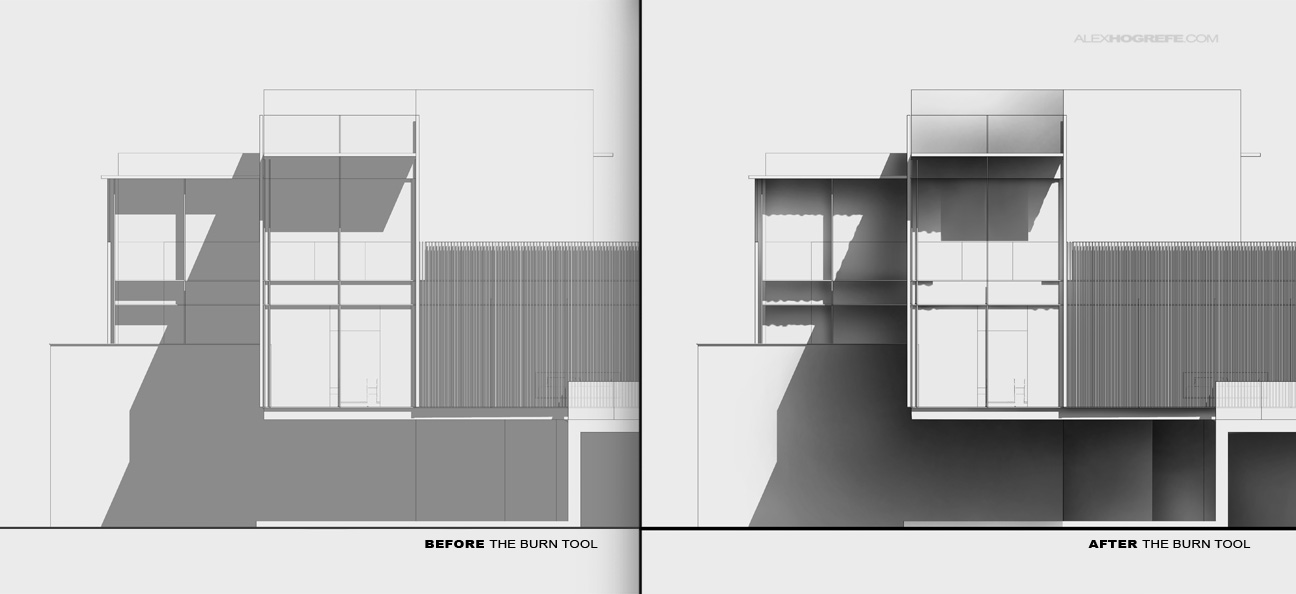
I also did a quick comparison between the two different shadow options with the textures and background elements inserted. Again, there is much more depth and 3-dimensionality just by spending a little time with the burn tool.
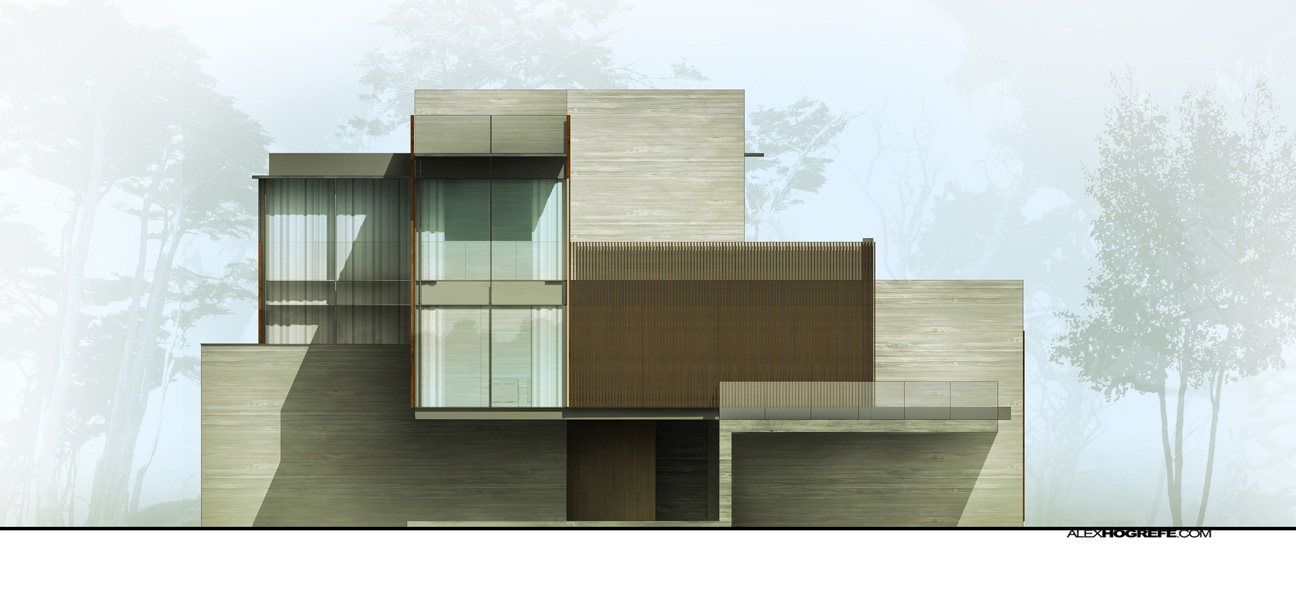
3. After the burning was complete, I selected the texture layer and cut out the background using the “Polygonal Tool” then quickly dropped in some blue tone and faded out trees. Each elevation took about 2 hours to put together. The shadow burning, textures, and background elements took no time at all. Most of my time was actually spent experimenting with the glass. I have yet to come up with a good look for glass in exterior elevations. I ultimately chose to add a small reflection and curtains along with a slight blue tint. I will have to revisit this area later on with a better solution.


More good stuff! Please keep up the great work.
Great, great work!!!!!
please make tutorials 3ds max to ps
Very convincing elevations, good illusion of depth. Glass is difficult material to render because it's composed of at least 4 layers: 1) The interior environment, whether it be curtains as in Alex's example or a room with furniture, people, and illumination. 2) The actual color or tint of the glass. 3) Any shadows cast on the glass. 4) The reflection of the surrounding built context, landscape, and sky. Number 2 & 3 are easy and a lot of people will stop there. But to take it all the way you have to address the interior environment and external reflections.
Another nice BLOG addition, Alex. Maybe you have answered this question in previous comment sections, but where do you get most of your textures? i.e. trees, skys, grunge, grass. I have fairly good luck acquiring them myself through various free websites, but I couldn't help notice the background trees in this post. Trees with that kind of "character" are hard to find by simply searching the web.
Hello, thank you very much for the compliment. For the trees, search under yo mudder vagina long suk me huaan lee kuan yewwwww
Is this a mistake?
plz make some tutorials védio….ans thx for every things
@Michael, I agree with everything you said. I used the curtains to "Hide" what was happening in the interior as well as give a surface to cast shadows on. I am still experimenting with different ideas to bring out detail from and the interior exported images behind the glass that isn't too labor intensive. Im also searching for a good reflection technique but as you pointed out, that depends on what is in the surrounding context.
@Aaron, check out my info page on the right side (you need to scroll down a little). I have a list of links to some good texture sites. I have been building up my own library slowly from hundreds of google searches but I also like to visit cg textures every so often. The trees in the illustration above were just a simple google image that I manipulated to get the final look by fading them out and adding a blue tint overlay.
Awesome tutorial!
Good morning Alex,
Great elevation rederings and work flow as usual! I have an inquiry regarding the shadows export you are discussing. In several tutorials you mention exporting shadows only. When using Sketchup, I've tried doing so in the past and it's never worked because the shadows disappear when i turn the objects off.
Thanks in advance for your help. Og
I have the same issue of disappearing shadows
Hey I figured it out. You duplicate the hidden line style and I renamed the new style ‘shadows’, and you uncheck edges and profiles etc. so no line work shoes up
I think they have been very welll produced – but a little cartoony for my tastes. Reminds me of student work.
This is good tutorial for a beginner. We better know the proper techniques in designing house from the help of the professionals. Because sometimes we think that our creations are good enough.
Maybe you should learn English before you insult people's work – especially work that is amazing.
In my opinion, you are a genius!! I really appreciate your great blog, and hope you will never close it!! It's an ocean for inspiration for me!!! Love your work!!!!
Hey Alex, those elevations looks fantastic. Often you export your linework, which makes me wonder what do you do when the picture exceeds the pixel limit. My computer crash if i try to export png linework over 2500px. Is there a better way, for instance eps or how would the workflow be. A tutorial on this would be great, thank you so much 🙂
Excellent work as always!! would it be possible for you to make a video about this one like the others that you have done? If not it's still pretty amazing! keep up the good work!
I'd just like to thank you heaps dude! I've got folio due tomorrow, and all these presentation ideas are fantastic to have! Thanks so much!
I've always had a problem mimicking reflections on glass in photoshop.
I usually give glass surfaces a transparent grey color, for a start. It gives it a feel of depth, particularly as there's spaces behind it.
Hey Alex, awesome man, your work is magnificent. I am learning a lot from your blog, hopefully I can perfect the craft I'm learning in the study of Architecture and Design.
Hi Alex, how did you make so fantastic glass and reflection. Looks great !!!
Cheers
HOLA
PARCE
ME PARECE QUE CONCEPTUALMENTE ESTAS FACHADAS, SON DE LOS MEJORES TRABAJOS QUE TE HE VISTO ALEX. ME ENCANTA EL CONTRASTE QUE LOGRAS Y LA PROFUNDIDAD QUE ADQUIEREN LOS DIVERSOS PLANOS DE LAS FACHADAS
IVAN RECALDE
Hey Alex,
For 'daytime' glass, I usually just grab an image off the net, or one I've taken on site, preferably with a blue sky, some trees (similar to the ones I'm putting in) then create a layer mask, with just the window apertures able to let the image through. I'll then locate this image so that I can place it in just the right area.
I'll then duplicate this image, shift it over slightly, desaturate it just a touch, and add a Gaussian blur of 1 or 2 pixels. This gives the illusion of double glazing. I don't usually bother with interiors, this approach eliminates the need & thus saves loads of time. Give it a shot, see what you think. NB take care with the sun position/direction of light. Simple to fix, just flip it, but it'll look off if overlooked. 🙂
How can I create a shadows file with everything else turned off?
Your site is so helpful! But i do have a couple quick questions:
1.) Do you bring curtains in to your Sketchup model, or do you add them in photoshop?
2.) Do you add any sort of blue tint to your glass, or is that color only achieved in photoshop?
@Sheila,
For both questions, you could achieve it in both Sketchup or Photoshop. In this case, I added both the curtains and blue tint in Photoshop
Bravo! Quick, simple, rich and communicative. Excelente!
great work!!!!!,
but how to do it from 3dsMax to Ps
thanks
Thank you for the great & easy & fast tips!!!
hi alex, i love your work. I was wondering if you have a tutorial of the backgrouds you made in this elevations.
Ragard and thanks
@ Blas,
I do not have a tutorial for the background. It is simply some cutout trees with the "Hue/Saturation" set to pure black. I then lowered their opacity and added a soft blue color using the paint brush with also a very low opacity.
Thanks you alex
Very helpful.
Great Tutorial Alex! Can you please provide the steps you used to export the linework, shadow and textures individually from Sketchup for those of us who just began to get familiar with S.U?
Hey Alex,
Your website is a valuable tool. Thanks. In sketchup, how do you isolate just the shadows to export? Im trying to hide the objects edge style to show only the shadows, but I cant find the setting. Can you help?
Hey I figured it out. You duplicate the hidden line style and I renamed the new style ‘shadows’, and you uncheck edges and profiles etc. so no line work shoes up
Hi Alex
I’m an argentine architect living in Australia for the last 30 years.
I’m 68 y/old learning what is almost “natural” for you young people. I admire your creativity as an architect and your skills. I’m learning a lot from you.
My website is “under” reconstruction.
May God bless you in everything that you do and keep that flame alive.
Regards
William Vazquez
How can I create a shadows file with everything else turned off?
Hi, Alex. I would like to ask if you have a tutorial on how to make or design a kiosk on Google Sketchup? Thank you.
Awesome