Architecture visualization is notorious for producing complex and messy PSD files. Sometimes, it’s the little things that can make a big difference and in my opinion, layer management is one of those little things that many people don’t put enough emphasis on. Properly managing your layers in Photoshop can lead to better efficiency, a more editable file, and in many cases better looking illustrations. Over the years, I have moved toward a system of building up Photoshop files. This system may not be perfect for everyone but has streamlined my workflow and has lead to cleaner looking illustrations.
The problem with PSD files is that they can quickly get out of hand. Many of my Photoshop files that I work on easily exceed several hundred layers. Being careless about naming files or not properly grouping them may save a little time in the beginning. However, once you are several hours into Photoshop, the time wasted trying to find the right layers or make changes far exceeds the time saved at the beginning. Not only that, the image itself will start to get messy and unrefined since it becomes difficult to mask layers and control lighting.
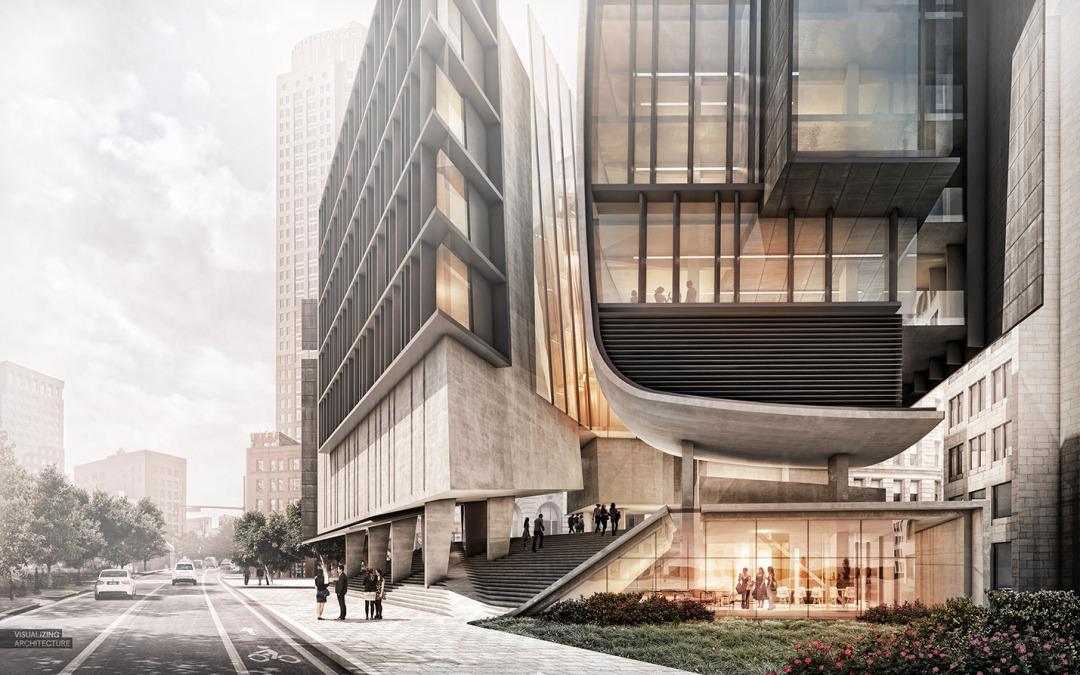
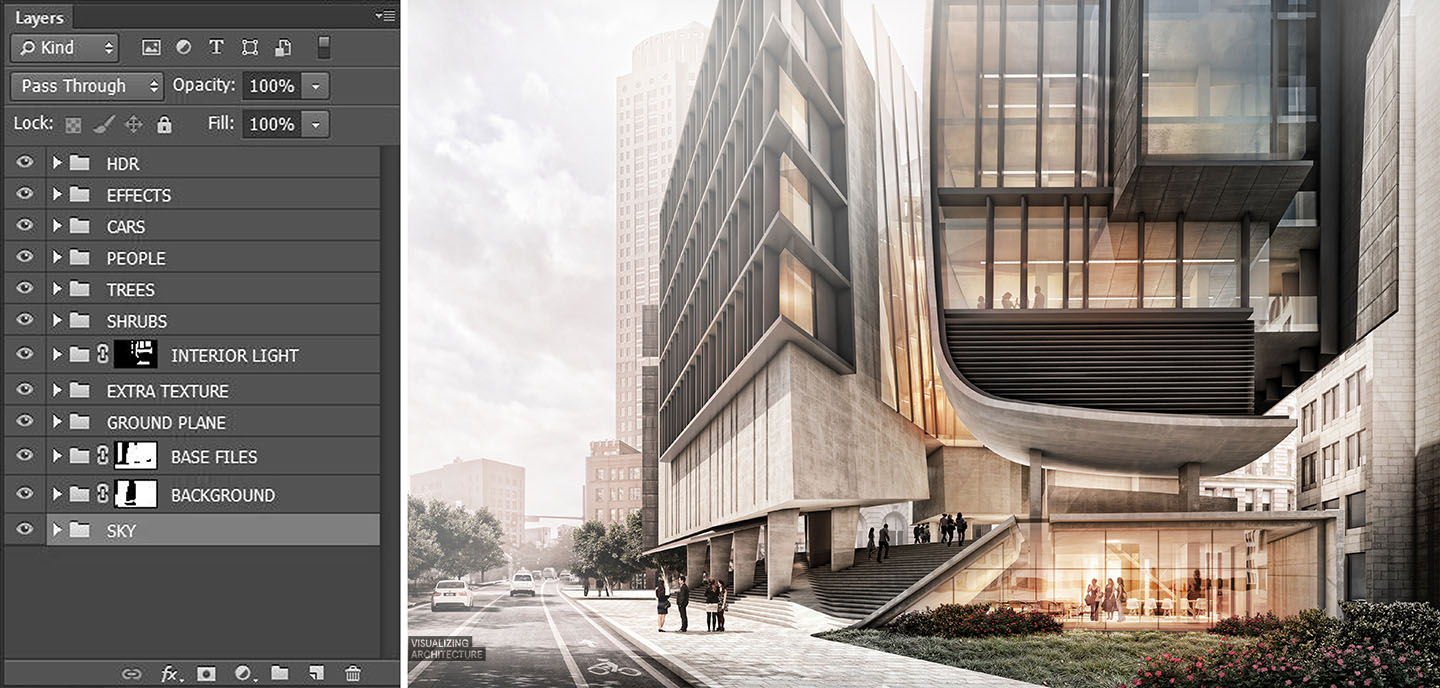
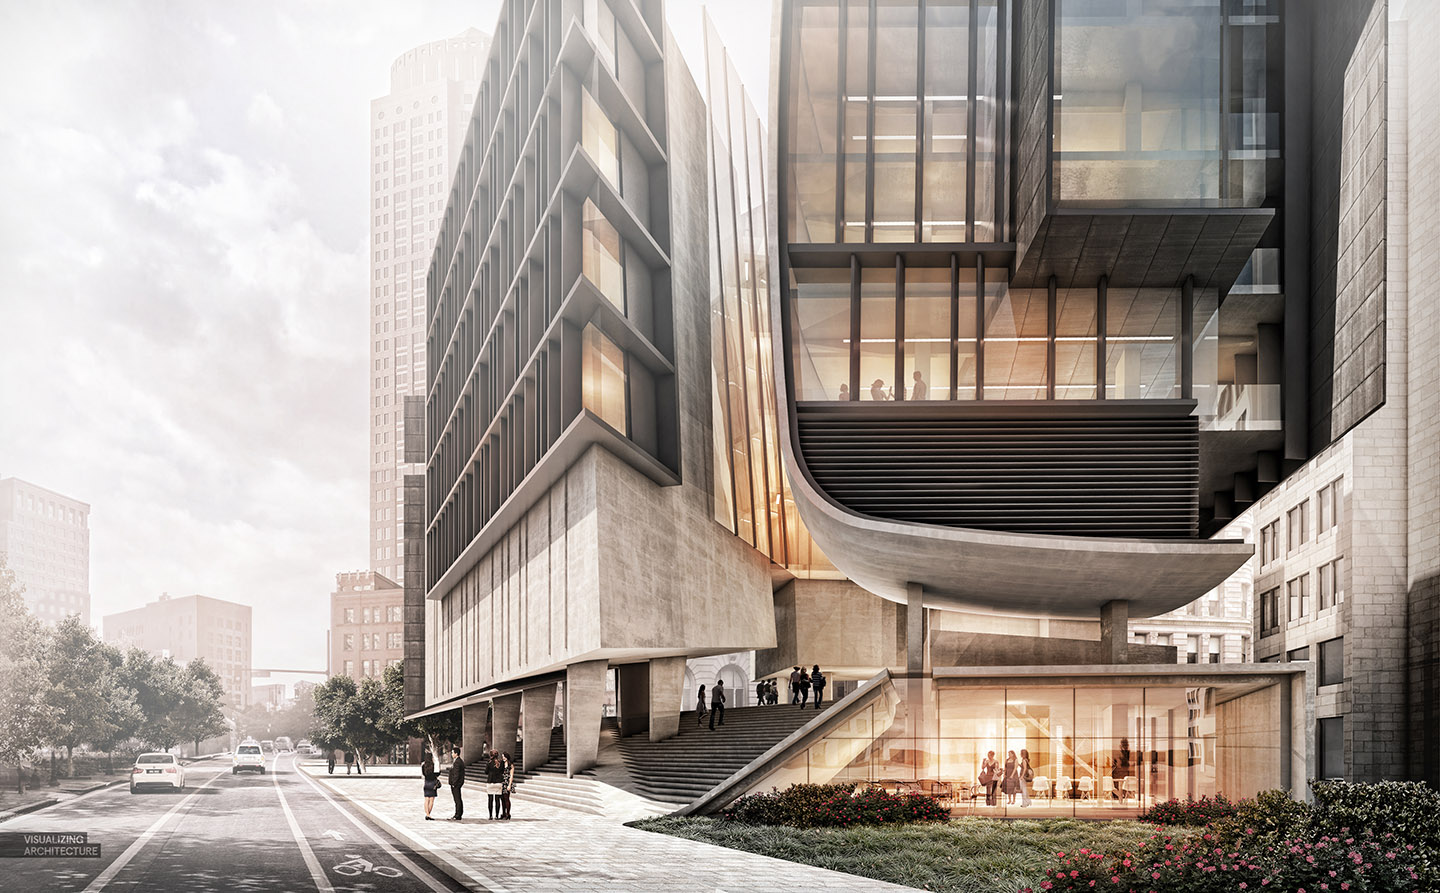
I put together an illustration that takes into account a lot of the different types of groups that I typically use in my PSD files. Obviously, the specific groups change from illustration to illustration depending on the type of image, but for the most part, the overall structure remains consistent.
One other note, I am in no way saying this is the “right” way to organize PSD files. I am sure there are other ways and even better ways to do this. However, this system works well for me and provides a good amount of flexibility depending on the type of illustration I am working on.
Groups, Masks, and Adjustment Layers
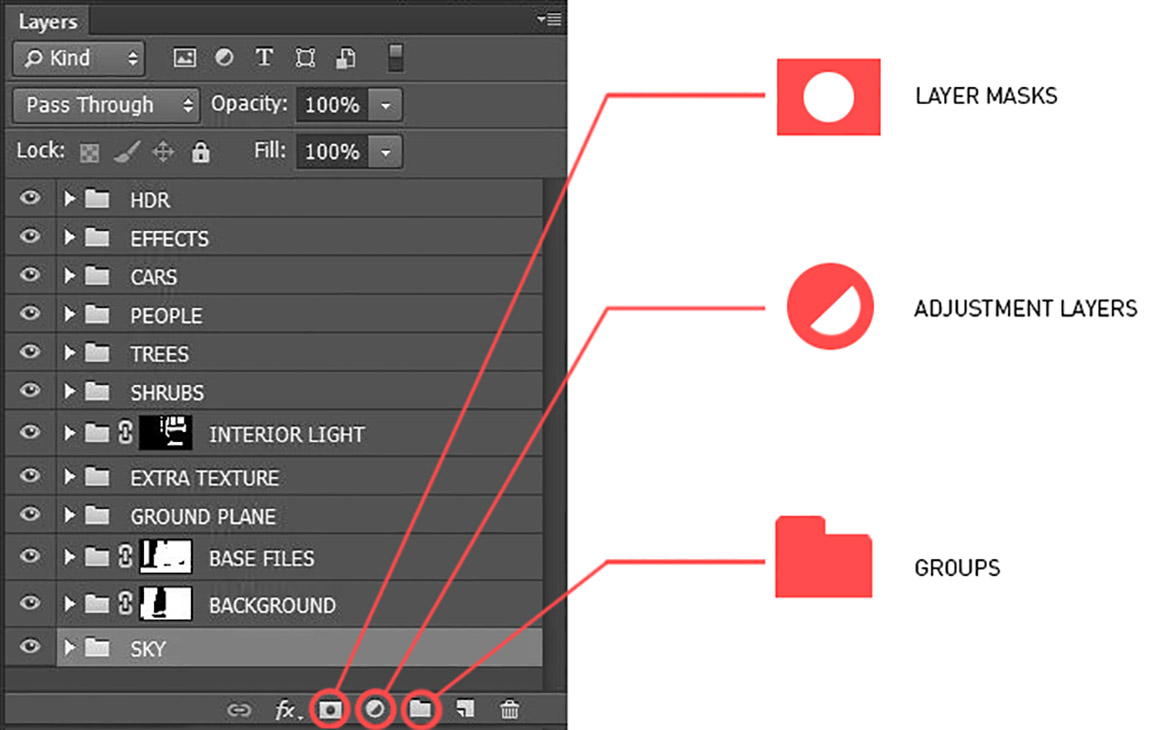
Groups
One of the keys to a clean Photoshop file are groups. Groups are folders in the layers palette that contain one or more layers. Groups allow you to collapse many layers down to a single line allowing you to navigate between several hundred layers quickly. One more big advantage is that you can apply masks to groups which is useful for editing. A group can be created by clicking the folder icon at the bottom of the layers palette. Layers can then be dragged into the folder one at a time or several at a time.
Masks
A big part of working efficiently and keeping your files extremely editable is by using “nondestructive” methods to edit your layers. The idea is to edit the illustration in a way where changes can be reversed later on down the road.
If you’re not using them already, masks are essential for nondestructive editing. I have talked about masks on this site only a few times because they can be difficult to understand at first. However, they are a life saver when it comes to cutting out backgrounds or removing parts of layers. Masks are exactly as they sound allowing you to mask or hide parts of the layer similar to erasing. The difference being the mask can be removed later to bring back the area of the layer that was erased. I talked about masks more in-depth in my Hatch Patterns Post about midway through.
Adjustment Layers
Just like masks, adjustment layers are nondestructive and allow you to adjust things like levels, contrast, hue, etc. to several layers at once and also reverse the adjustment at any time later on down the road. Adjustment layers act like real layers allowing one to adjust the strength through opacity or even apply a mask to the adjustment. I don’t use these too much but have found them really useful from time to time.
Organizing the Layers
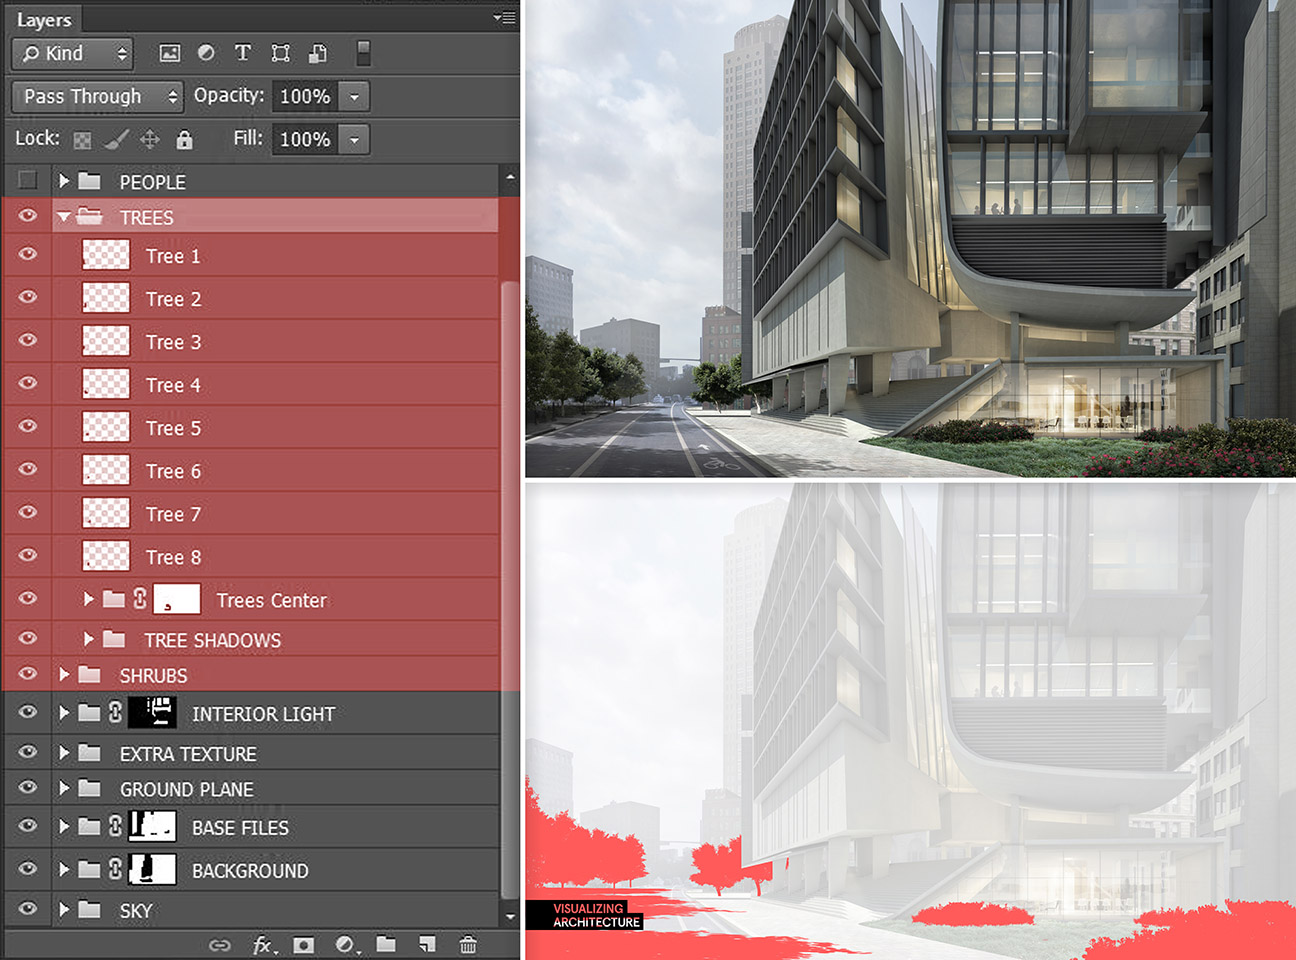
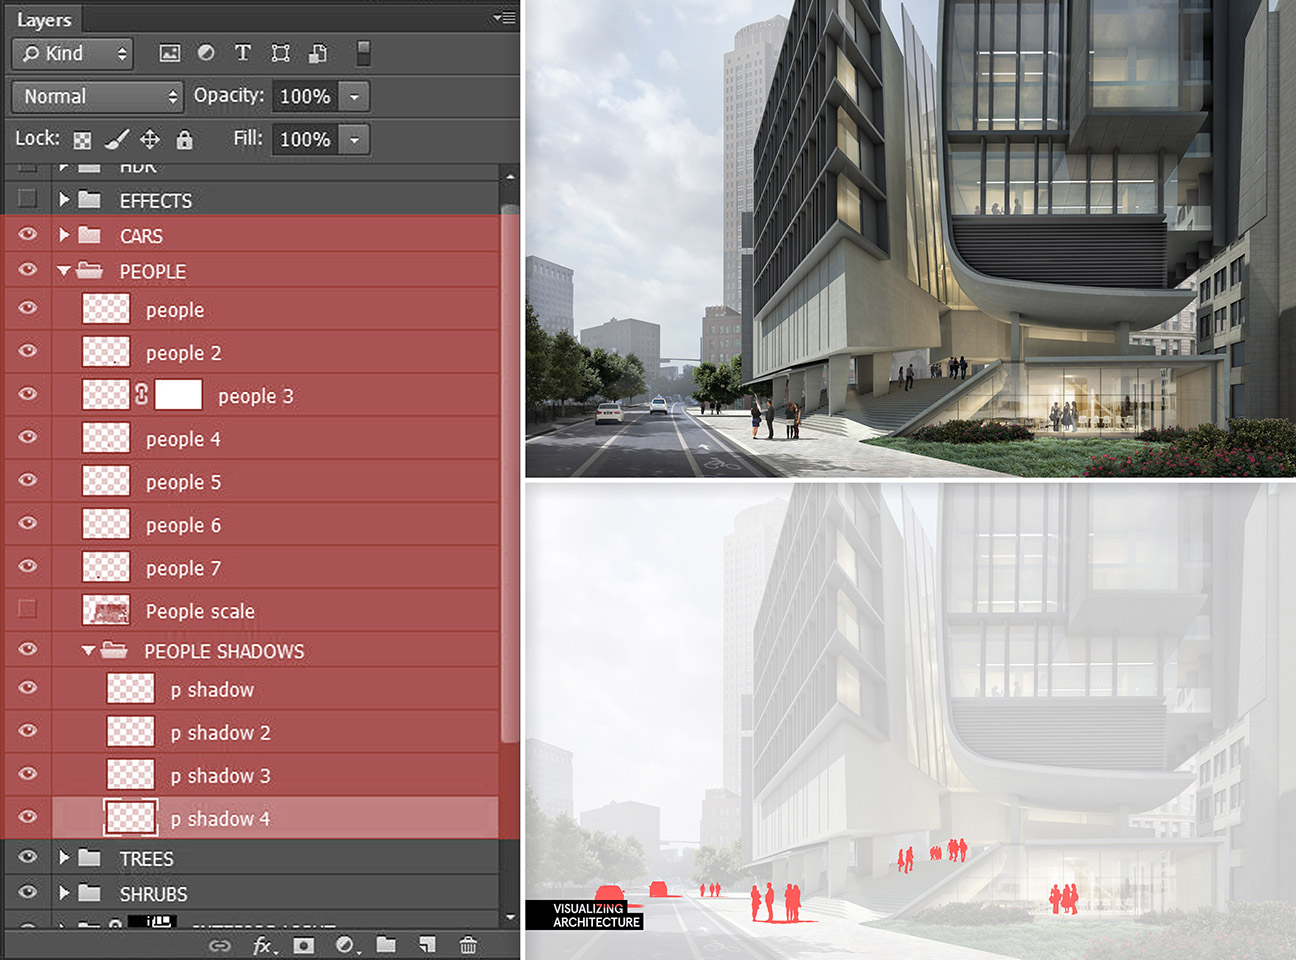
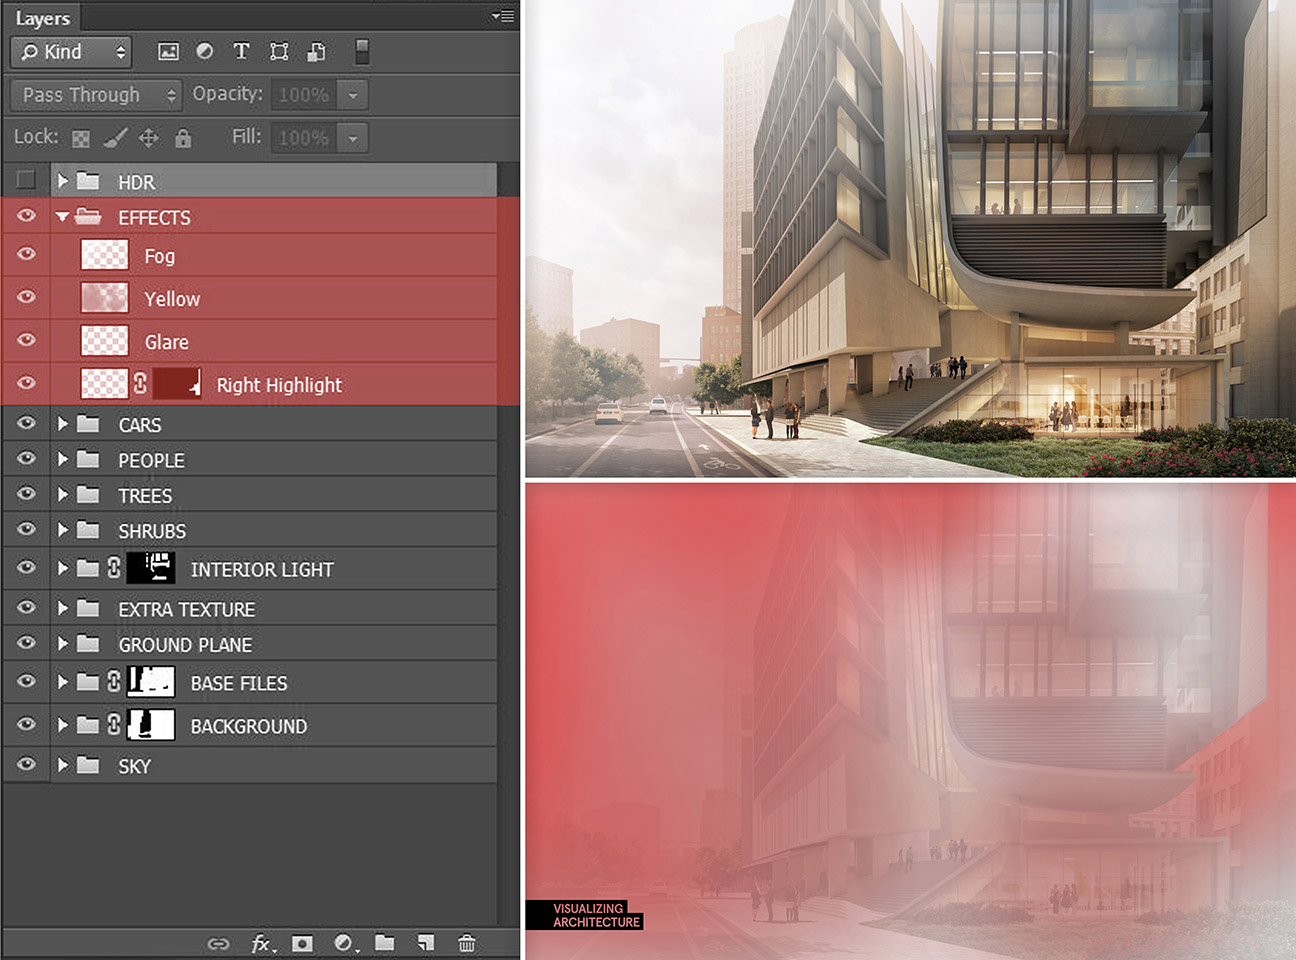
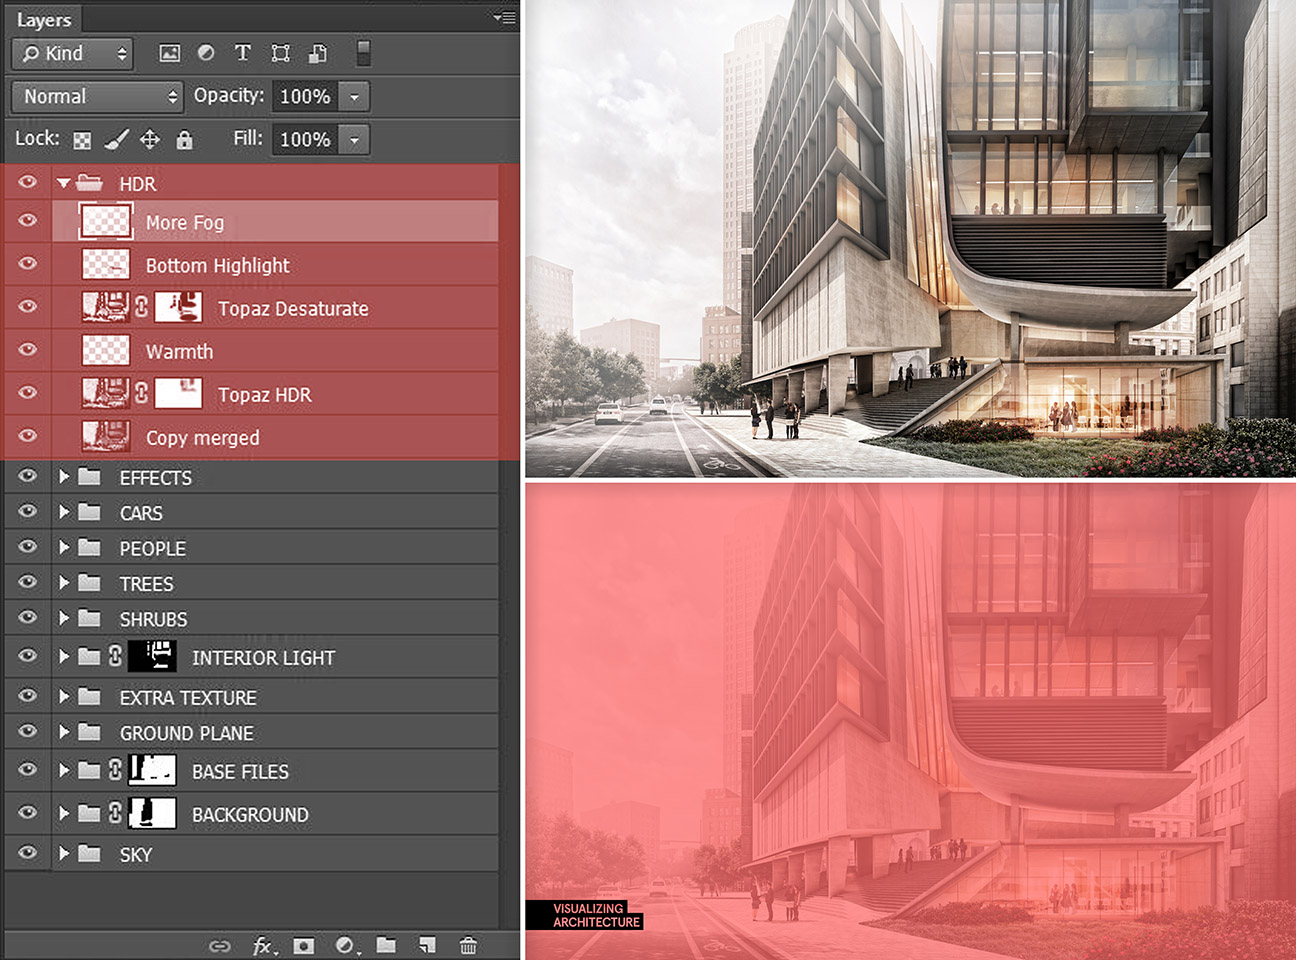
Above is a screenshot of the layers palette for this illustration. You will quickly notice that everything is grouped. Having everything grouped allows me to collapse all layers and move around the palette more easily. It also forces me to really think about the best place to locate layers so that finding them later won’t be so time consuming.
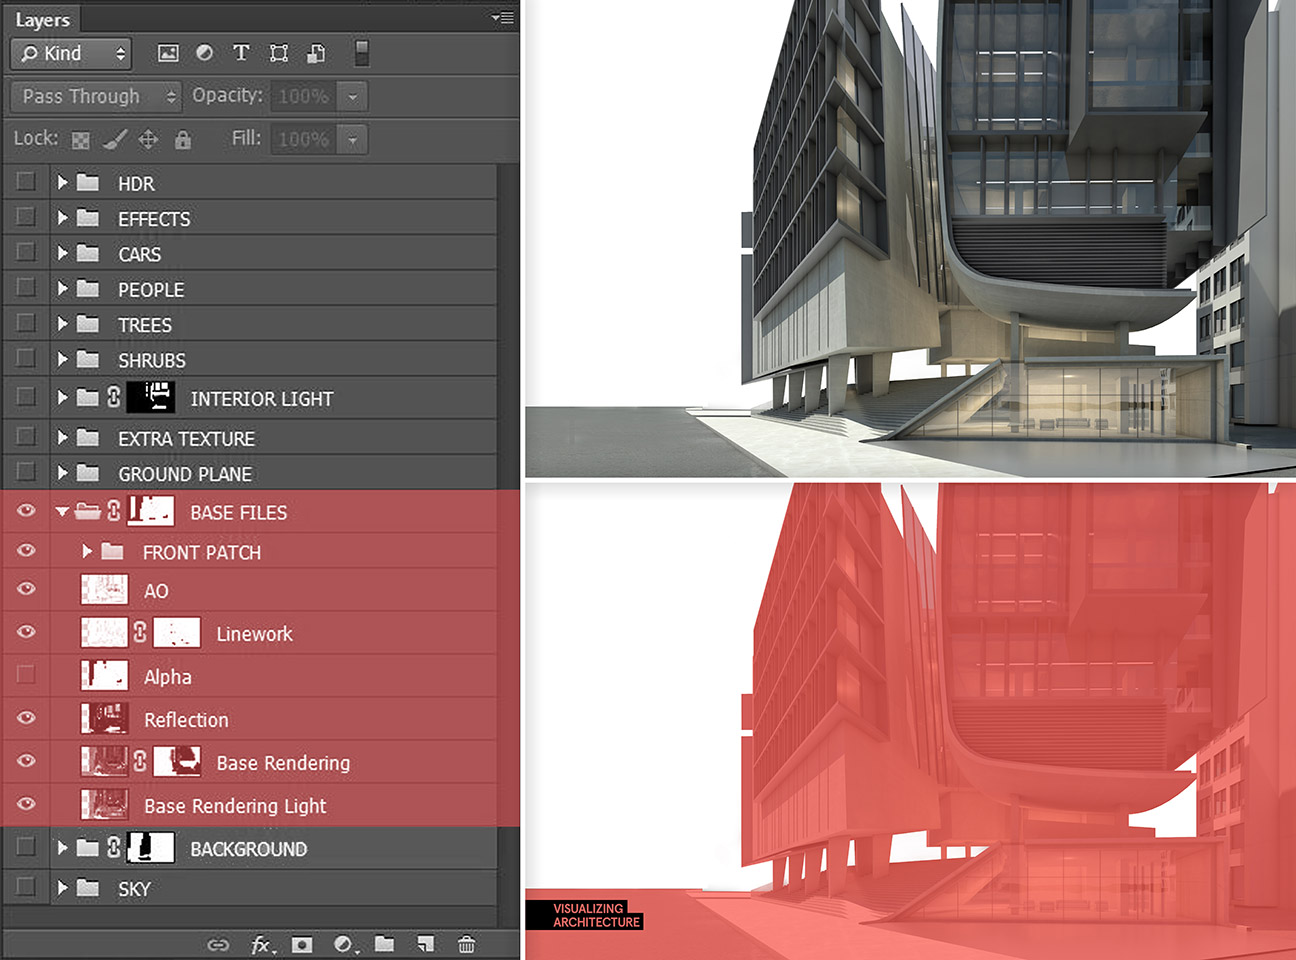
1. Base Files Group
The Photoshop process begins with several images exported from both Sketchup and a render engine such as V-Ray. These images often include the base rendering, a reflections export, refraction export, line work, ambient occlusion pass, z-depth, Alpha, among others. All of these layers are placed in the “BASE FILE” group. These layers represent the core layers from which everything else in the Photoshop file builds off of. Once these layers are compiled, a mask is applied to the group to remove the sky and background elements using the Alpha layer.
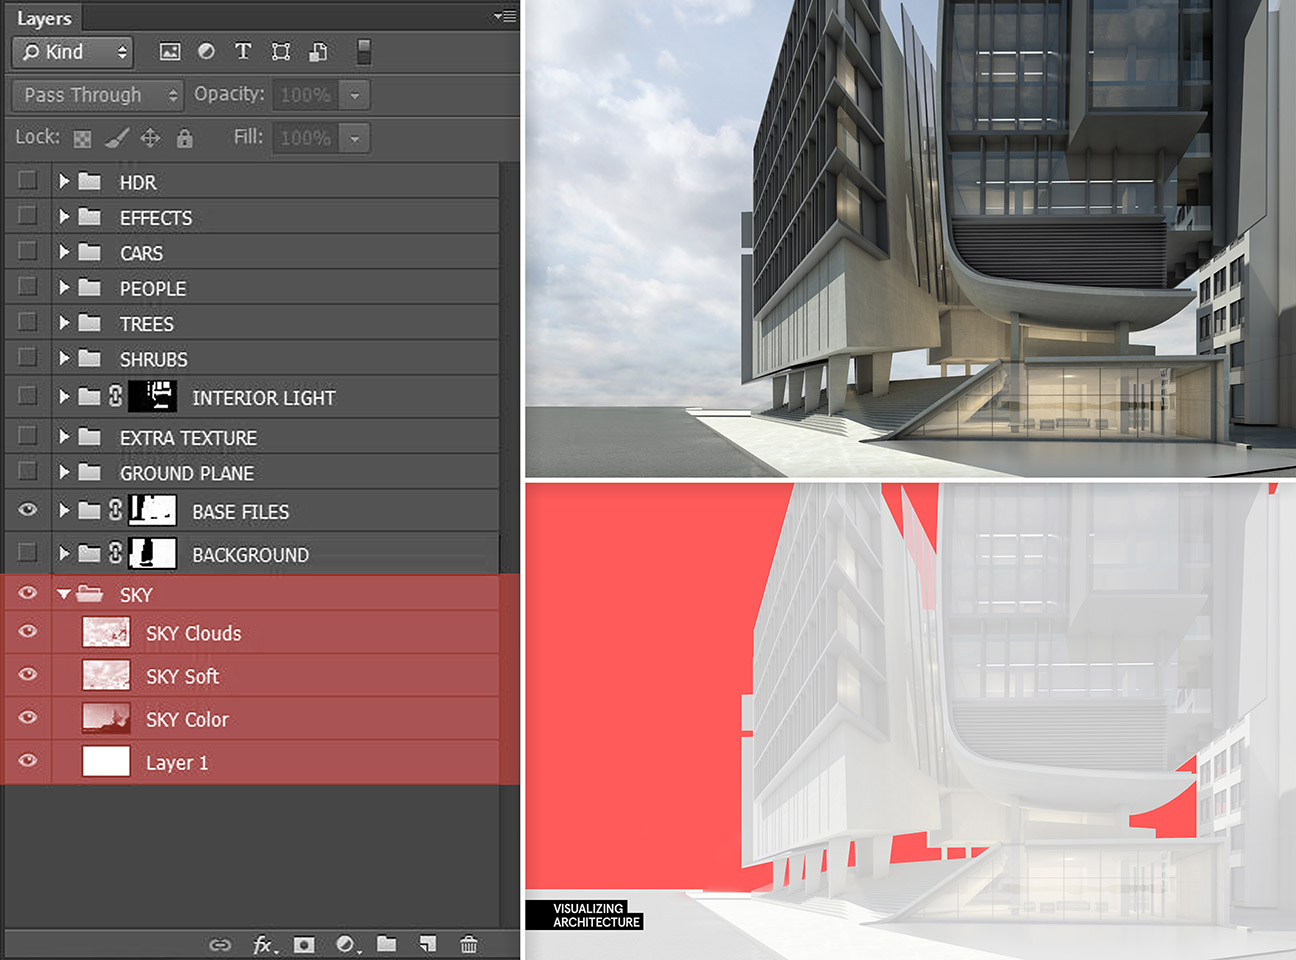
2. Sky Group (Below the Base Files Group)
After compiling the base files, I bring in the sky. I like to do this early on because the sky plays a big role in setting the tone of the image. It can impact the coloring and mood so figuring this out first gives the image good momentum. I will often combine several sky images to get the exact look I am going for. Because I masked out the BASE FILES group, I can simply drag the SKY group below the BASE FILES group and shift and scale the location until I get something that looks good.
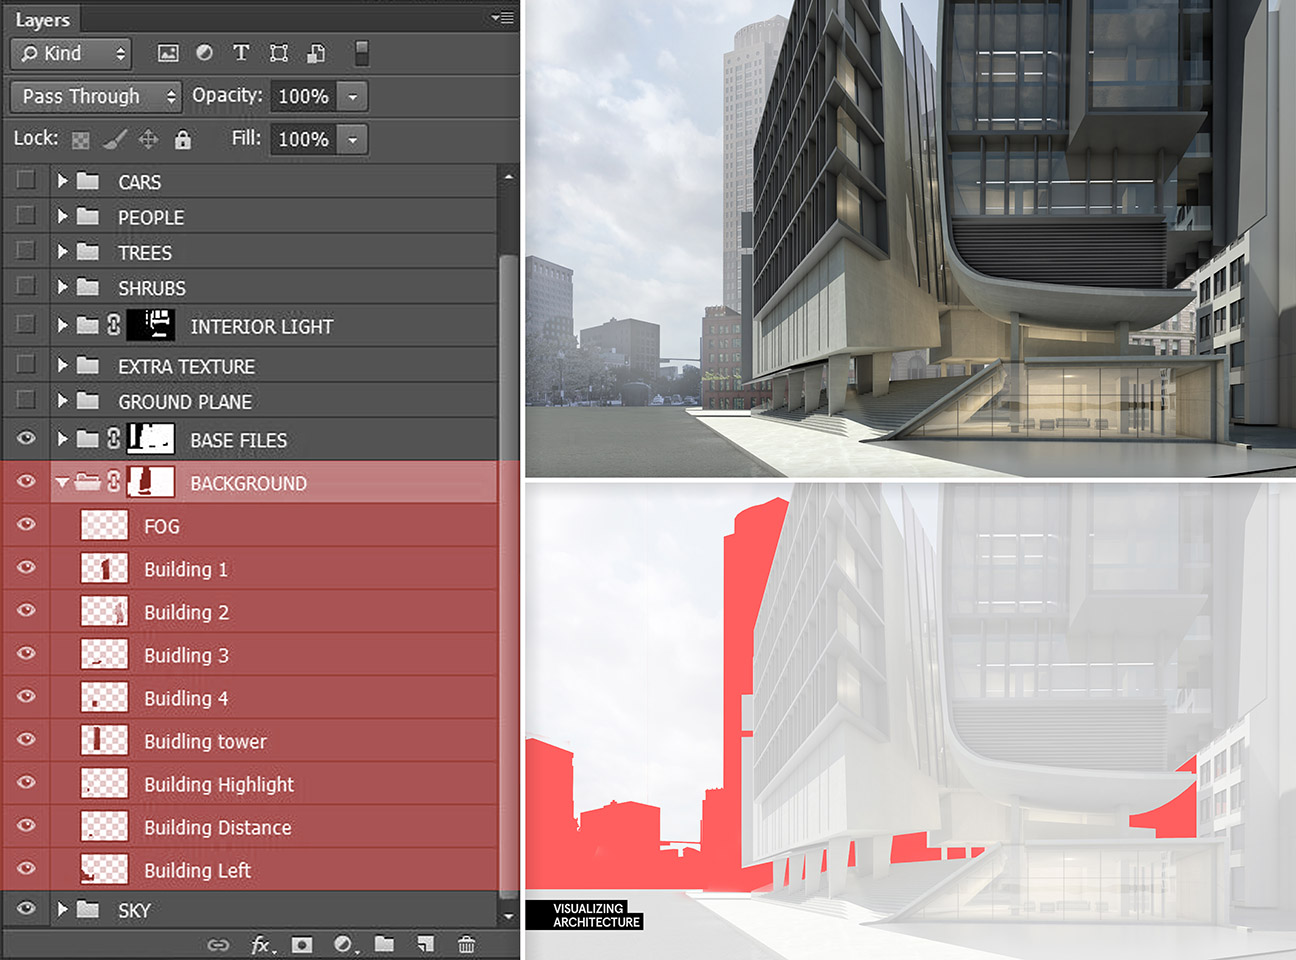
3. Background Group (Below the Base Files Group and above the Sky Group)
Along with the sky, I bring in the background elements which includes the surrounding site buildings and landscape not modeled or rendered. The background information comes from many places such as the client, Google image search, or Google street view.
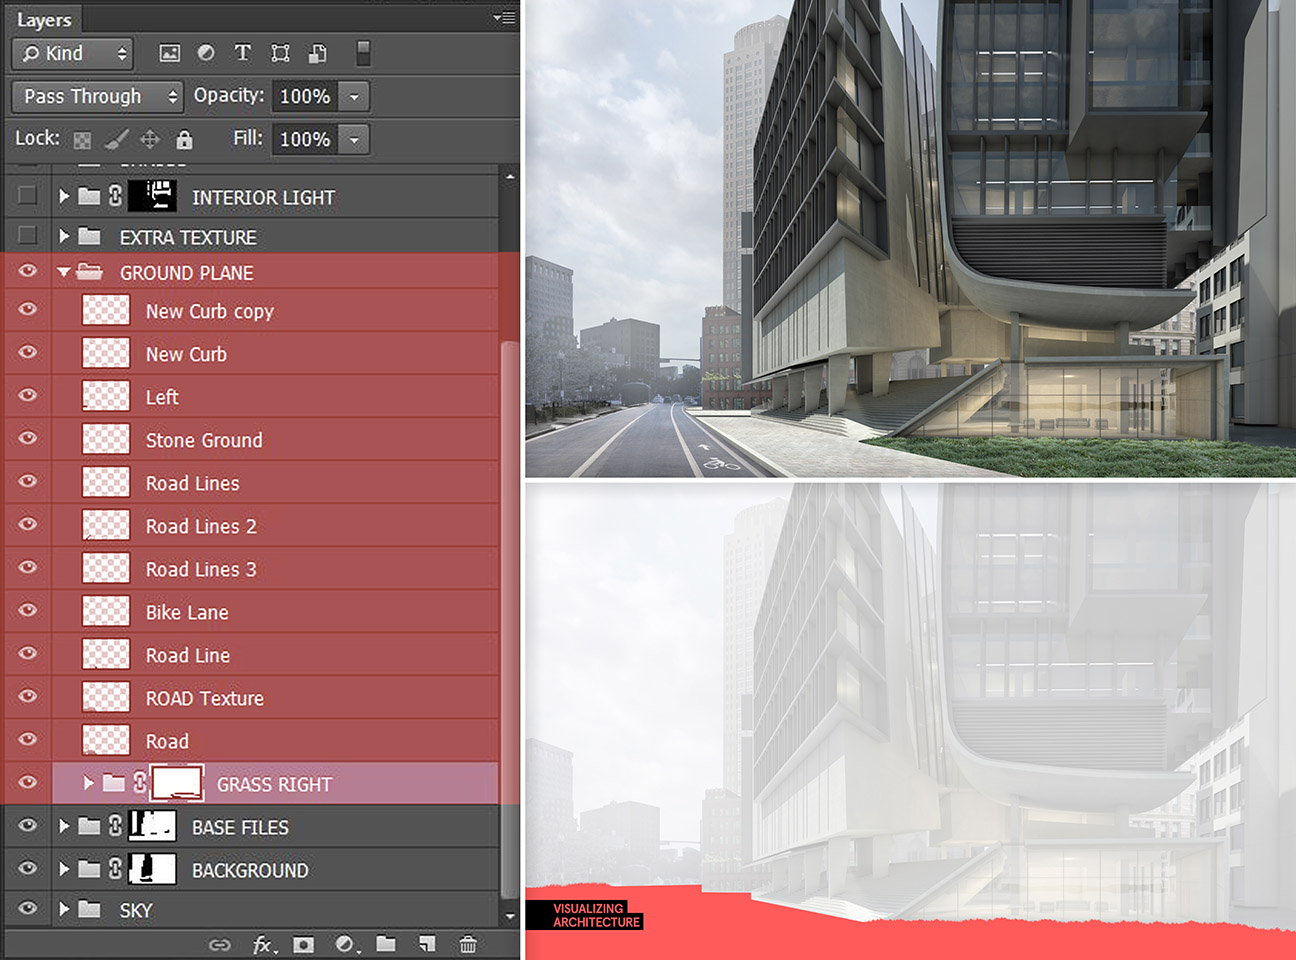
4. Ground Plane Group
The ground plane consists of road textures, sidewalk textures, and green areas such as grass. At this point, the entire image has been tweaked and a good base is in place. From here, there will be a lot of detailing with light, cars, people, and trees.
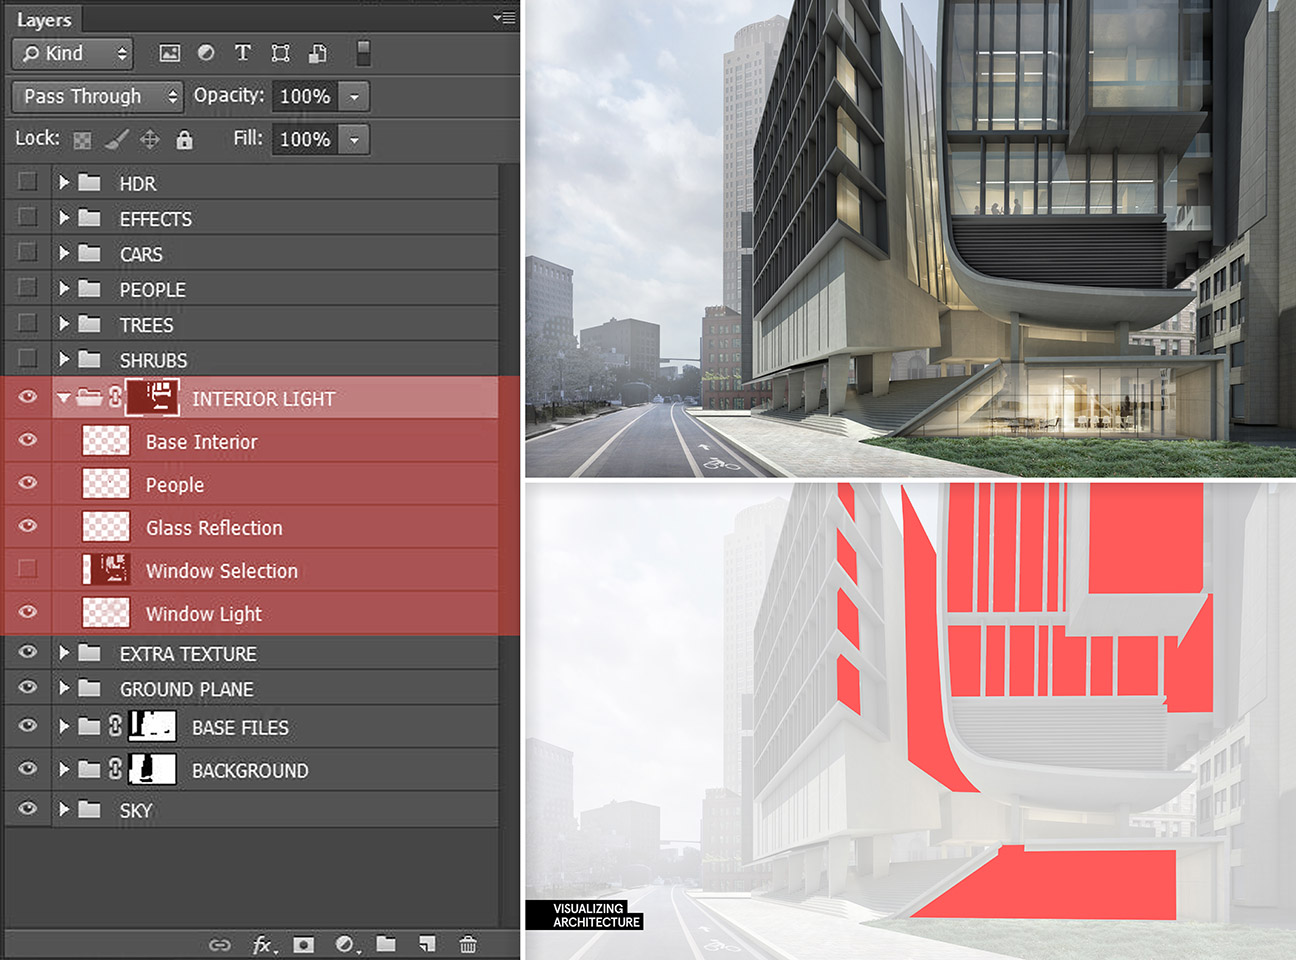
5. Interior Group
In the case of this illustration, there is a lot of glass and interior information. I like to keep this a separate group instead of making these adjustments with the BASE FILES group. The reason being that this group houses all things interior including people, furniture, and lights which can sometimes add up to a ton of layers. The advantage of keeping all of these layers in one group is that I can use one master mask to cut out mullions and define the windows.
6. Tree, People, and Car Groups
Now that there is a good base, sky, and ground plane, I begin inserting, trees, cars and people. Each category gets its own group folder. Within each one of these groups, there is a subgroup for shadows. I place all of the shadows in a subgroup so that I can control the opacity of all of the shadows at once instead of dealing with opacity individually. This is also important when two shadows overlap. Since it is the group controlling the opacity, shadows overlapping inside the group will blend together instead of overlaying on top of one another.
In many situations, I will have multiple groups of trees and people. Sometimes there are trees in the foreground covering everything and sometimes there are trees in the background behind buildings. This requires separate groups to avoid complicated masking placed in different areas of the layers palette.
7. Effects Group
This group is always at the top of the layers palette and contains layers such as color overlays, sun glare, fog, and overall adjustments. Introduction of this group varies, it sometimes happens early on in the process or not until the very end. However, this group is one of the most important in giving the illustration character and atmosphere.
9. HDR/Plugins Group
Occasionally, I will tweak the final illustration using some plugins/filters like Topaz Labs Adjust to bring out some detail and refine the coloring. This involves copying and merging all of the layers (ctrl+alt+shift+e) to get a single layer that the plugin can be applied to. I keep this group at the top so that I can lower the opacity and lessen the effects of the plugin if needed.
To clarify, most of my illustrations follow this structure with some minor deviation depending on the illustration type. For the purpose of this tutorial, I carefully named every layer but in the heat of the moment it is not always possible to take the time to perfectly name everything. I do however make a point to thoroughly name groups in all caps no matter how bad the time crunch. The point is to have a solid system in place that ultimately leads to a more efficient workflow and that produces cleaner work.


amazing~!
very nice way to approach managing the layers, would be nice to go over the 12 groups of layer and how to manage to do them!
Agree, this render, step by step, would be the perfect tutorial
Possibly later on down the road. That would be a large undertaking and I try to focus each post on a single concept, in this case layer management. A breakdown of each group has largely already been talked about in past tutorials.
really hope you can give us a rendering tutorial because I always have the difficulties to mimic the light you have in the modeling and the material you got on the buildings, plz give us some tips on that
it’s realy amazing tutorial))) i really waiting for tutorial in which you’ll show us how to do such picture step by step)))
Hi Alex. How you choose whats the render engine you will use? Sometimes is Vray, sometimes is Kerkythea… But always seems like you look for different results according to the chosen one.
I mostly use V-ray now. It has more features and works within Sketchup vs exporting to an external engine like Kerkythea. The advantage of Kerkythea is that it is free and easy to use.
wow very impressive
Hi alex, love your work. Could you possibly do a similar post to this one but showing how you manage a sketchup model? it would be great.
Sorry if i misspelled something, english is not my native language
Check out this time lapse I did a while back: https://visualizingarchitecture.com/sketchup-timelapse/ . I typically manage may Sketchup models using only groups and keeping everything on layer 0.
thats a very important post! It really annoys me when colleagues continue working on the renderings and deleting information instead of just masking them out. NEVER DELETE something in photoshop!
That is way beyond my imagination!amazing job!
Superb!
I’m visiting ur site each day in hope to see new works)
what serves as your inspiration? Are there any other architects working in a similar technique?
That render is unreal man, looks so amazing – well done.
wow! hdr + color ajustements makes huge difference!!
awesome !!
Am really shocked with the simplecity of this tutorial..but can we get it as videos tutoral ? So we can apply it while watching and learn ^_^
Awesome post!! I have a question, where can I get the buildings that are used in the background? Tanks 🙂
such post are as like as gold mine to me..thanks for this precious post.
HI Alex, I have tried to mimick your tutorial above and my results are pretty decent.The only hard park is the final HDR part/layer, can show us how you use topaz lab pluggins, I have Topaz adjust, denoise and detail (very powerful pluggins I have to say). But can’t quite get the same result as your final image. Will be appreciated a lot.
HI Alex, I have tried to mimick your tutorial above and my results are pretty decent.The only hard park is the final HDR part/layer, can show us how you use topaz lab pluggins, I have Topaz adjust, denoise and detail (very powerful pluggins I have to say). But can’t quite get the same result as your final image. My details are not as clear, nor is it as sharp(very noisey).Will be appreciated a lot.
Very nice. But I want video tutorial 😀
Brilliantly done.
BIG TIME !
thank you, this is amazing workflow
Wow, just couldn’t stop saying “GREAT!” Thanks so much for great tutorial! Also learned something valuable about instructional diagram from this~!
I love this site amazingggggggggg <3 <3 <3 thanks a lot …
Amazing!!
Alex, could you do this tutorial step by step please?
Sorry my english
Superb! I am big fan of you Alex. Can we get your psd file for further study?
I love you Alex!!!!!!
And why there’s no 8.
Amazing tutorial
Can you post the base Image of the render , so we can try to replicate the tutorial?
great..
This looks great. Really good intro. Is it possible for you to upload or email me the base images used? Just so I can go ahead and repeat as per the instructions? That would be amazing! Thanks.
Hi, I’m from Peru! I love your site and how well explained it’s everything. I always take a lot of time searching for good pictures for the sky, materials, and ground, what sites would you recommend that have good quality pictures and if its posible that are free? Thanks for every of your posts!
Hi Adriana, WOW!! I am from Peru too, Work in US as an Architect, I have some other websites that are very good and can share with you. right me back at h.burrell@pgnarchitects.com
Hi Alex
I usually end up messing up groups because in a situation that a tree in the “Tree” group is foreground and should be over a person(layer) in “people” group , and another tree is behind the same person(layer), I have to move out the layers out their group.
What do you do in this kind of situations? Do you use mask to hide the parts of an object that should be behind another object, but in the layers it’s above it?
Thanks for your great website!
Wow! This was simply amazing
Merci !
Thanks
Thank you Alex
Alex, could you possibly do a tutorial on how to apply textures to your renderings? For example, the side walk and road textures, but also other things like road lines. Thanks!
-Ryan
Thanks for making this happen ….u put lot of to clearly explaining things….I am a great fan of you … keep inspring more
that’s amazing !
thank you Alex :))
Great job Alex and appreciate you for your so altruistic desire to help anyone!
But what’s about V-Ray 2.0 in SketchUp? Can you prepare a step-by-step basic tutorial of it? I dream learning it but i find it so complicated with so many new lighting concepts.
Thank you!!
Great tutorial! 🙂
Bring life to your amazing renders with our people cutout collections
sellfy.com/cutout
can you download ur psd file pls
upload i mean
IMPRESSIVE! I LOVE IT!
Wow! best strategy to combine photoshop and 3D. I’m trying to combine the two but never think to this level… Thanks for this tutorial… 🙂
I think is perfect tutorial.
This it’s keep inspiration for me.
sorry about my English.
Actually wonderful ! thank you so much.
This is a really helpful tutorial. Thank you
please what do you mean by reflections export, refraction export and z- depth?
I really aprechiate so much your contribution thank you so much!
this is really helpful for me to start. Thanks you.
Thank you so much, you are the BEST!! 🙂
Thanks for sharing your valuable post for us i enjoy this website – its so useful and helpful.
Nice and helpful information shared by this article with us and I hope that we will also get more new information regarding this post as soon as. This information is valuable for most of the users.
Get Intuit QuickBooks Point Of Sale 1 User, QuickBooks POS 2 User, Point Of Sale Multi-User at Discounted Price, Contact Now