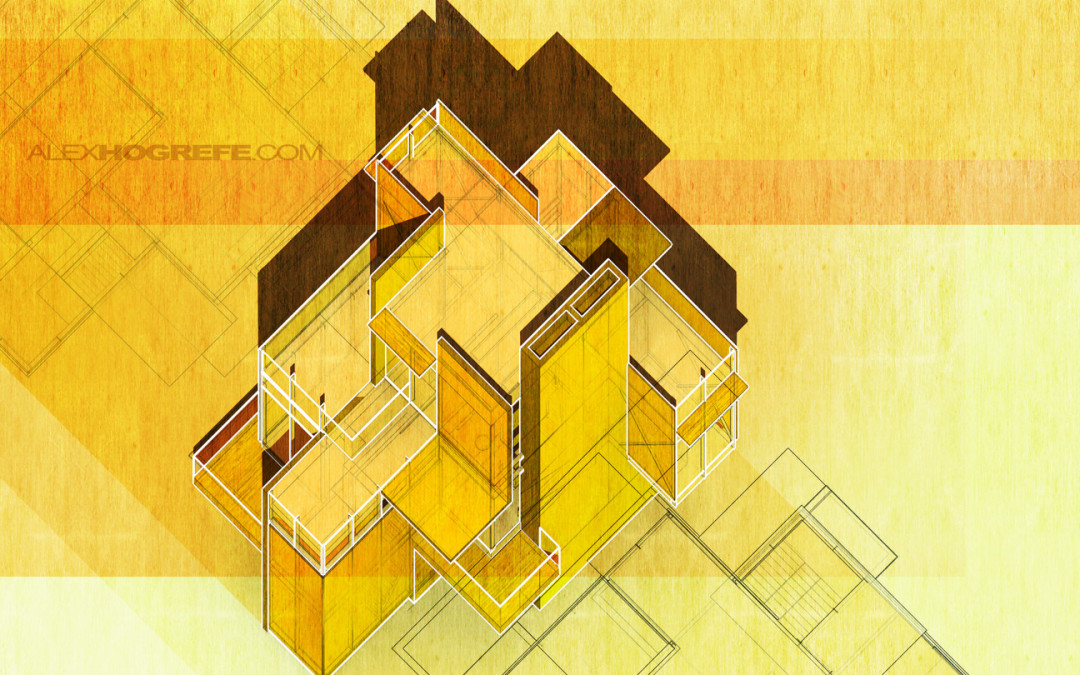
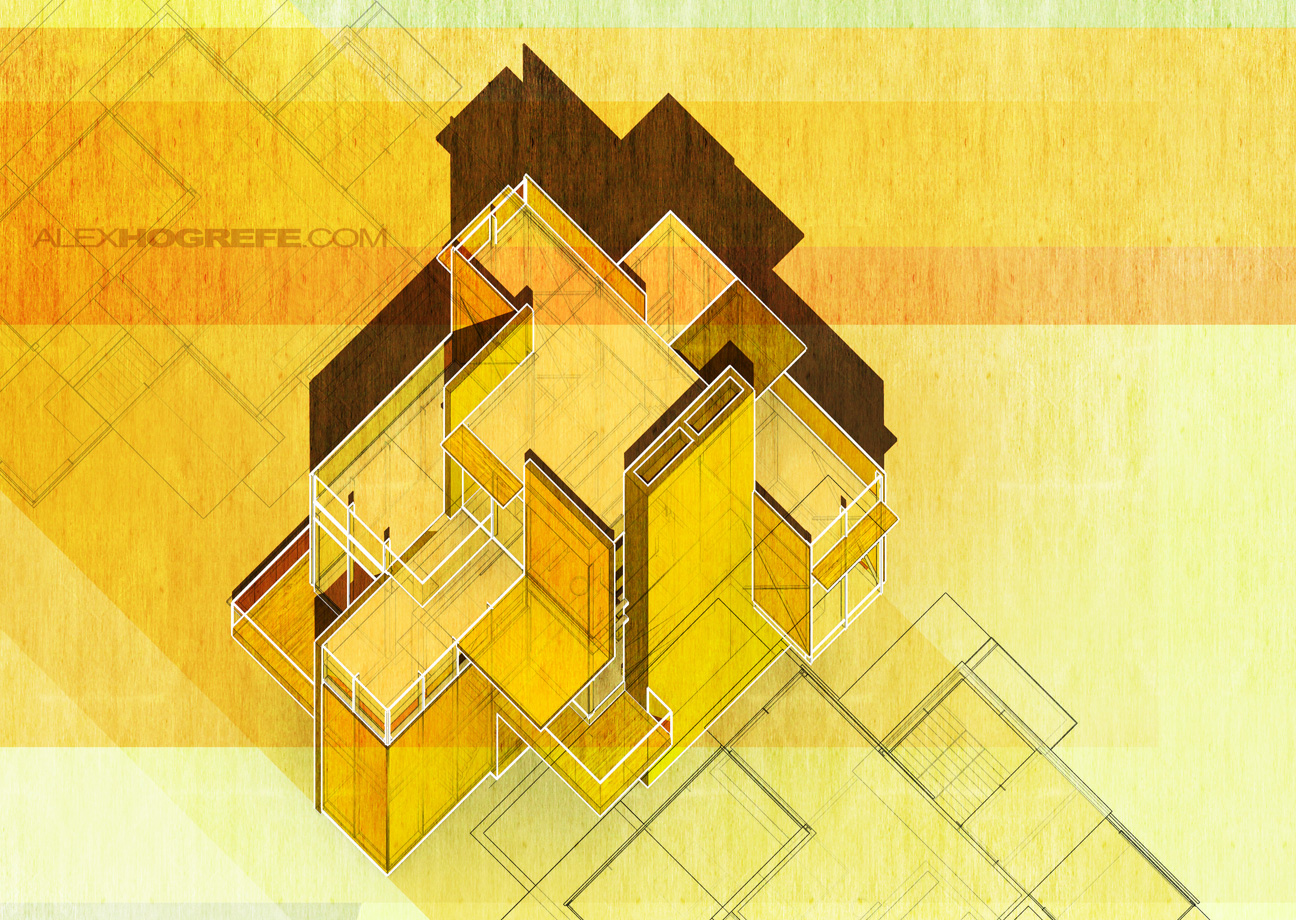
Last week I described the work flow of generating a plan oblique illustration from a Sketchup model. This week, I wanted to follow that up with how I added color and texture to the SU exports to achieve the image above. The steps to create the above image are not a science, and certain moves can and should be changed, removed, tweaked, and experimented with. I have been in this phase lately where I have been pushing illustrations with bright, extremely saturated colors which may not be ideal for every presentation.
Be sure to check out last weeks post for a little background on this image and to get more explanation on how to generate these views.
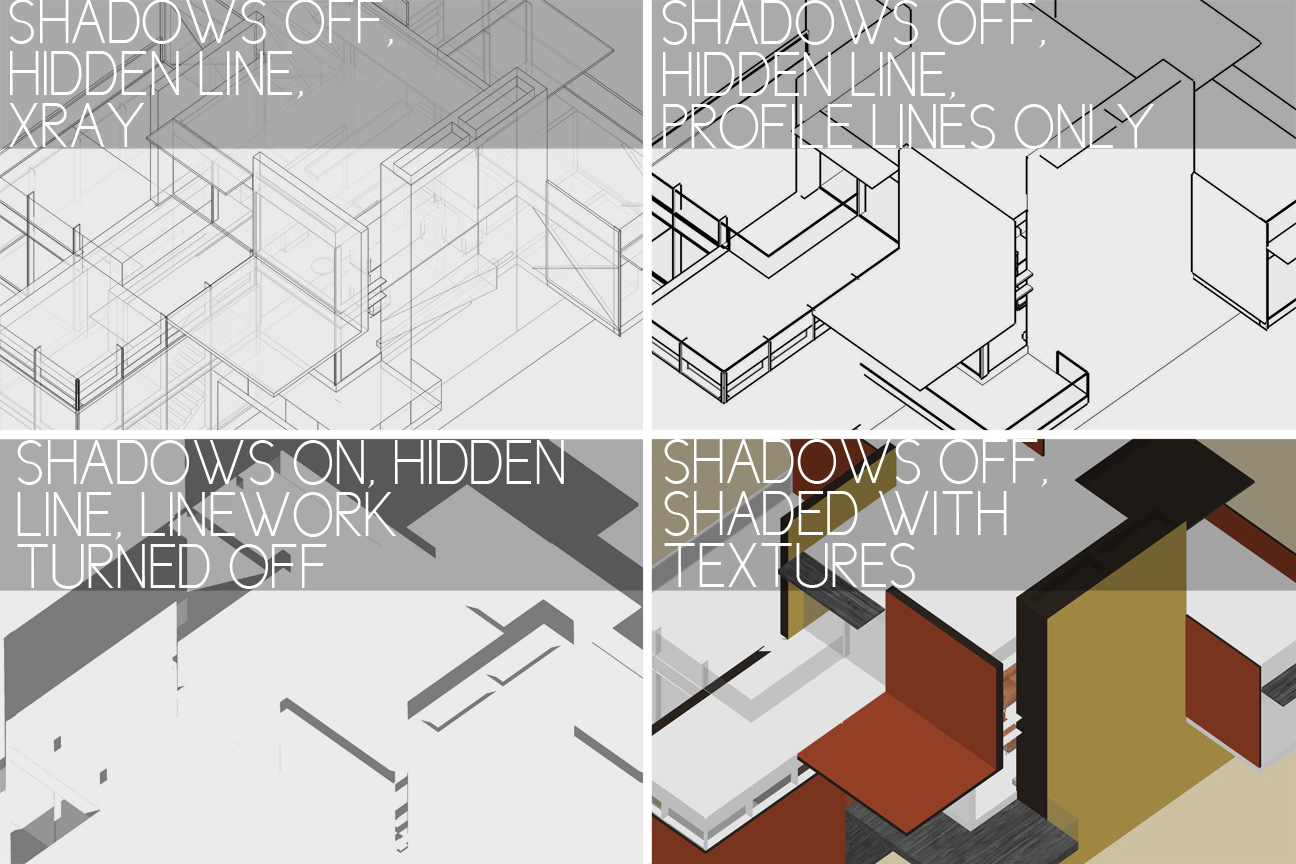
1) To begin, export the 4 images below from Sketchup.
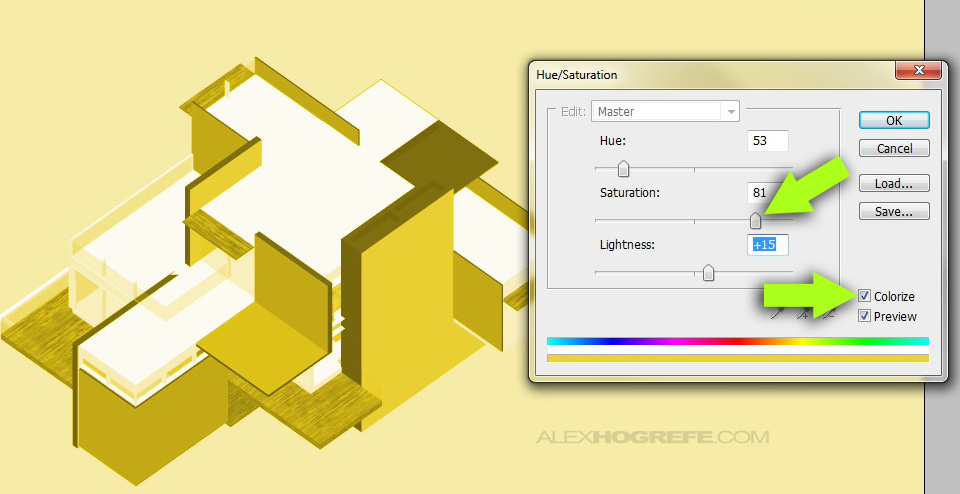
2. Open the Sketchup “shaded with textures” exported image in Photoshop. Go to “Image>Adjustments>Hue/ Saturation”. In the dialogue box, check “Colorize”. Increase the saturation and adjust the hue to get the tone that you want.
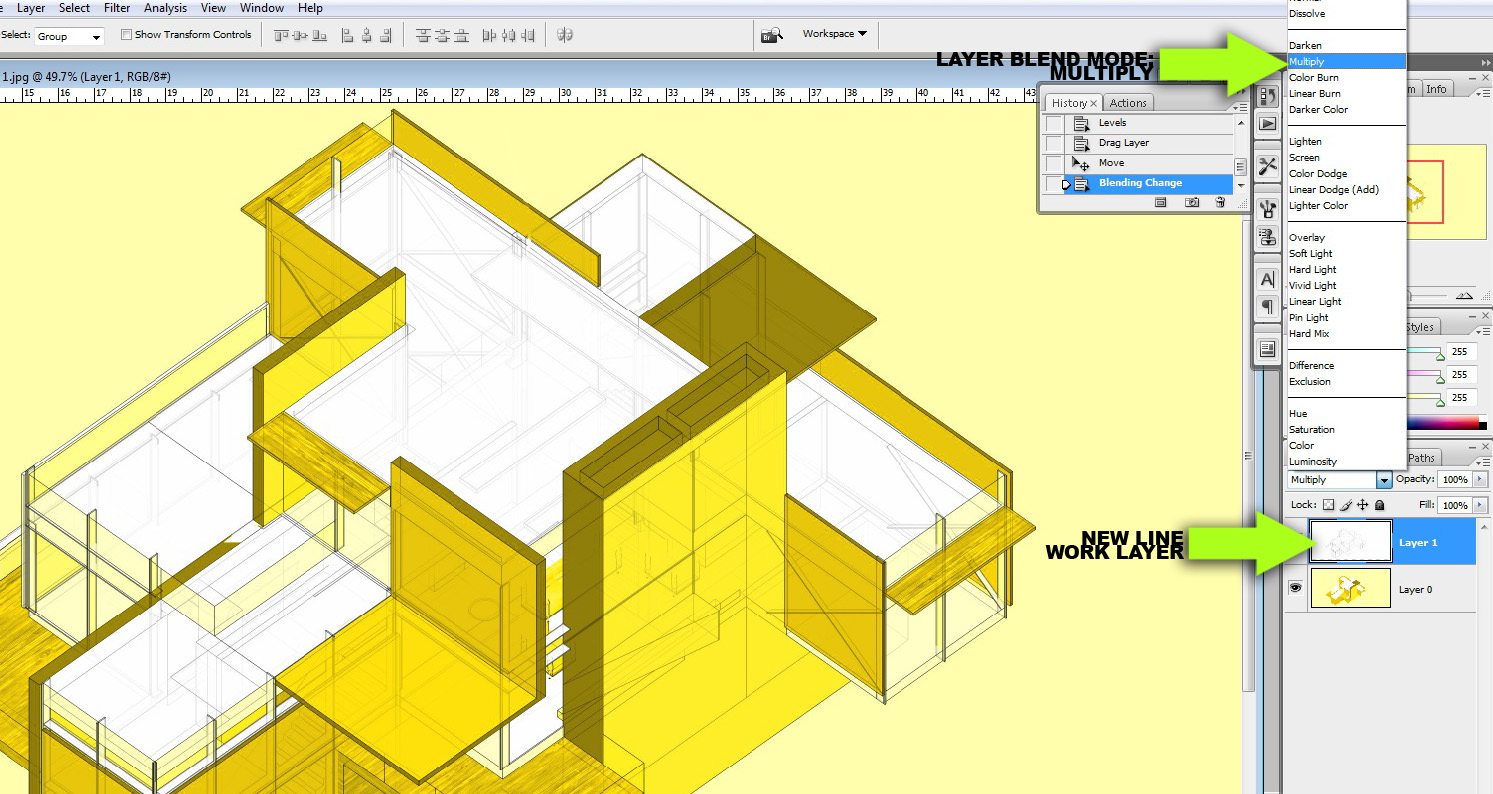
3. Next, open the Sketchup “x-ray” exported image and align it above the previous layer. Set the blend mode of the x-ray image to “Multiply”.
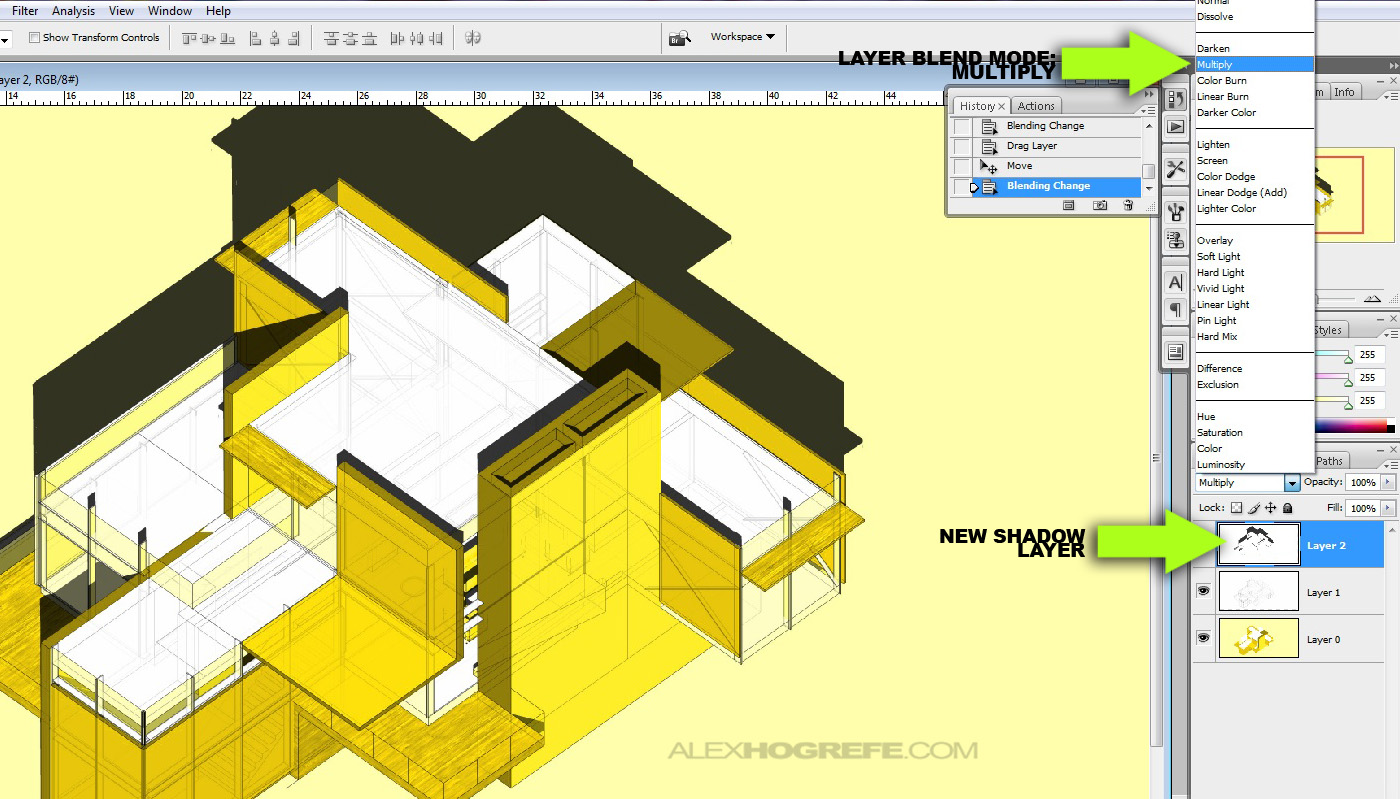
4. Open the Sketchup “shadows” exported image and align it above the previous to images. Set the layer blend mode of the shadows layer to “Multiply”.
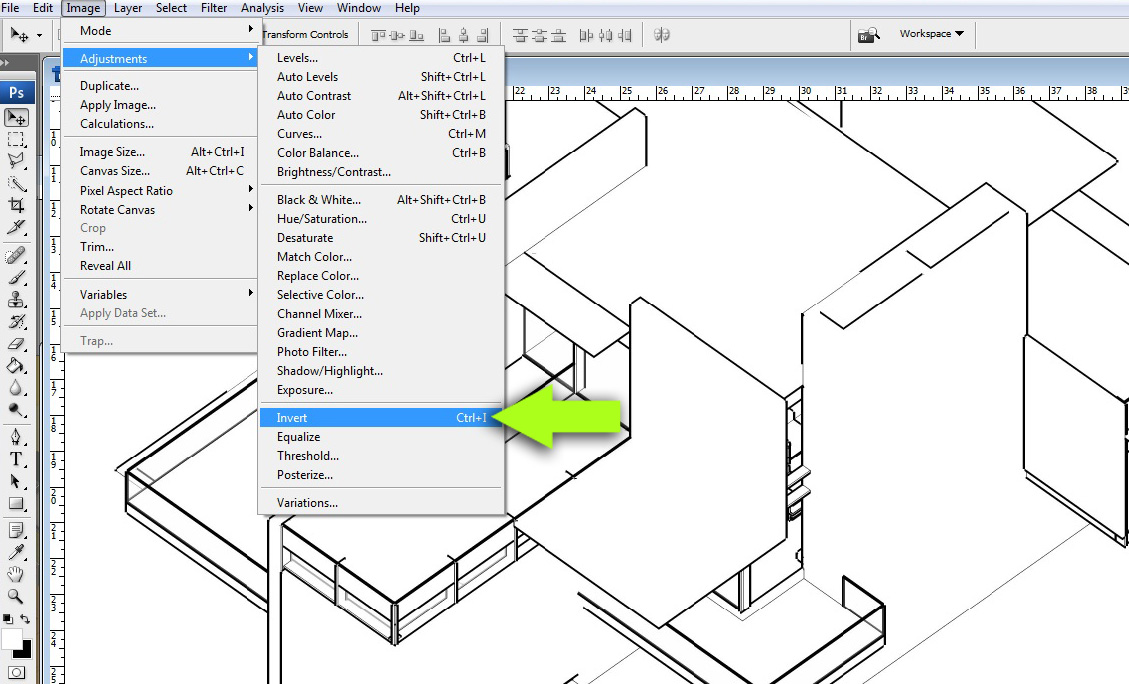
5. Open the Sketchup “Profile” exported image in Photoshop and align it above the previous 3 layers. Go to “Image>Invert”.
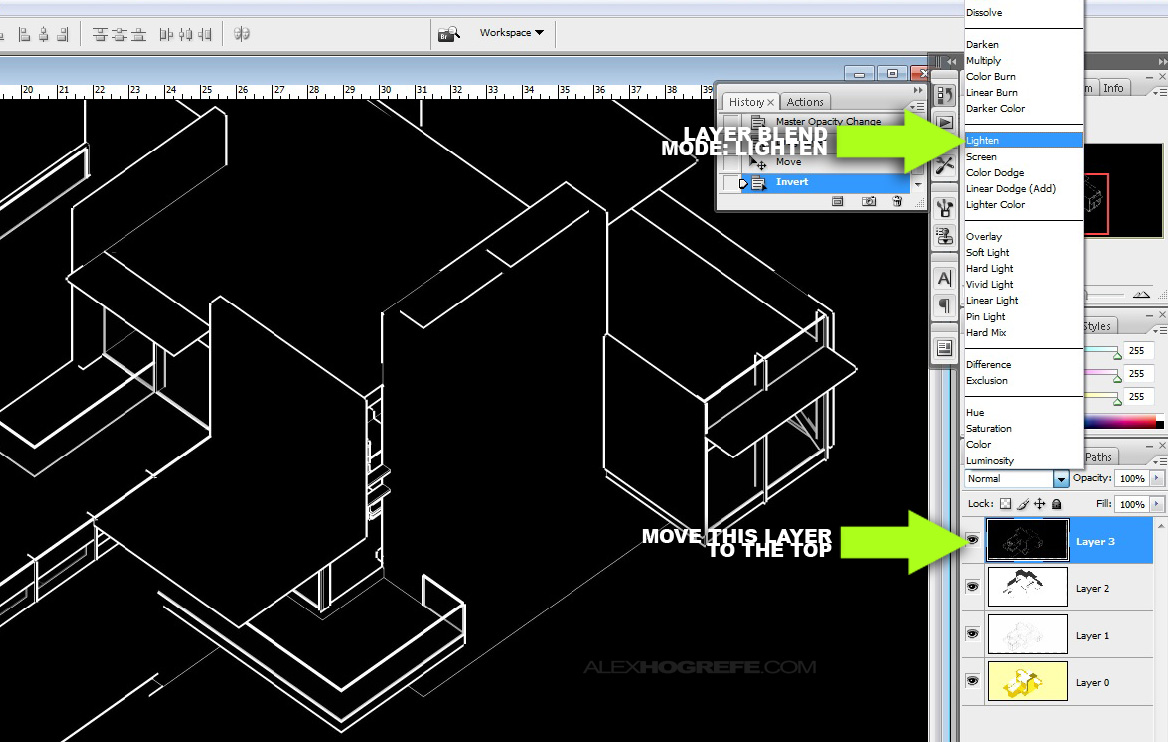
6. Set the layer blend mode of the profile image to “Lighten”.
7. This next step may not be necessary for everyone, but I created a quick clay rendering in Kerkythea to add a little depth to the image. A tutorial on how to create a clay rendering can be found HERE.
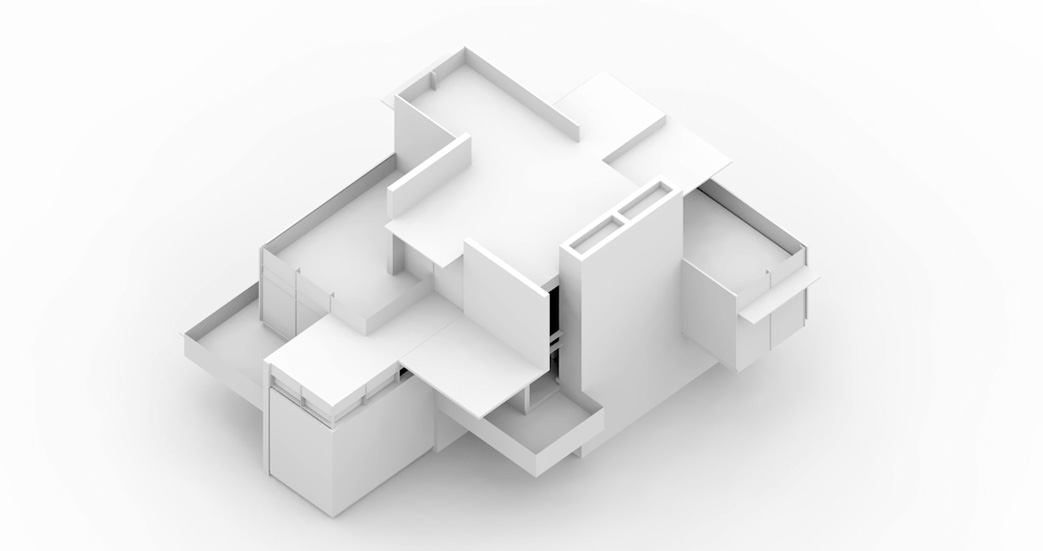
8. Bring the clay rendering into Photoshop and set it as the top layer. Set the layer blend mode to “Multiply”. At this stage, the illustration looks like the image below. Still not looking that great.
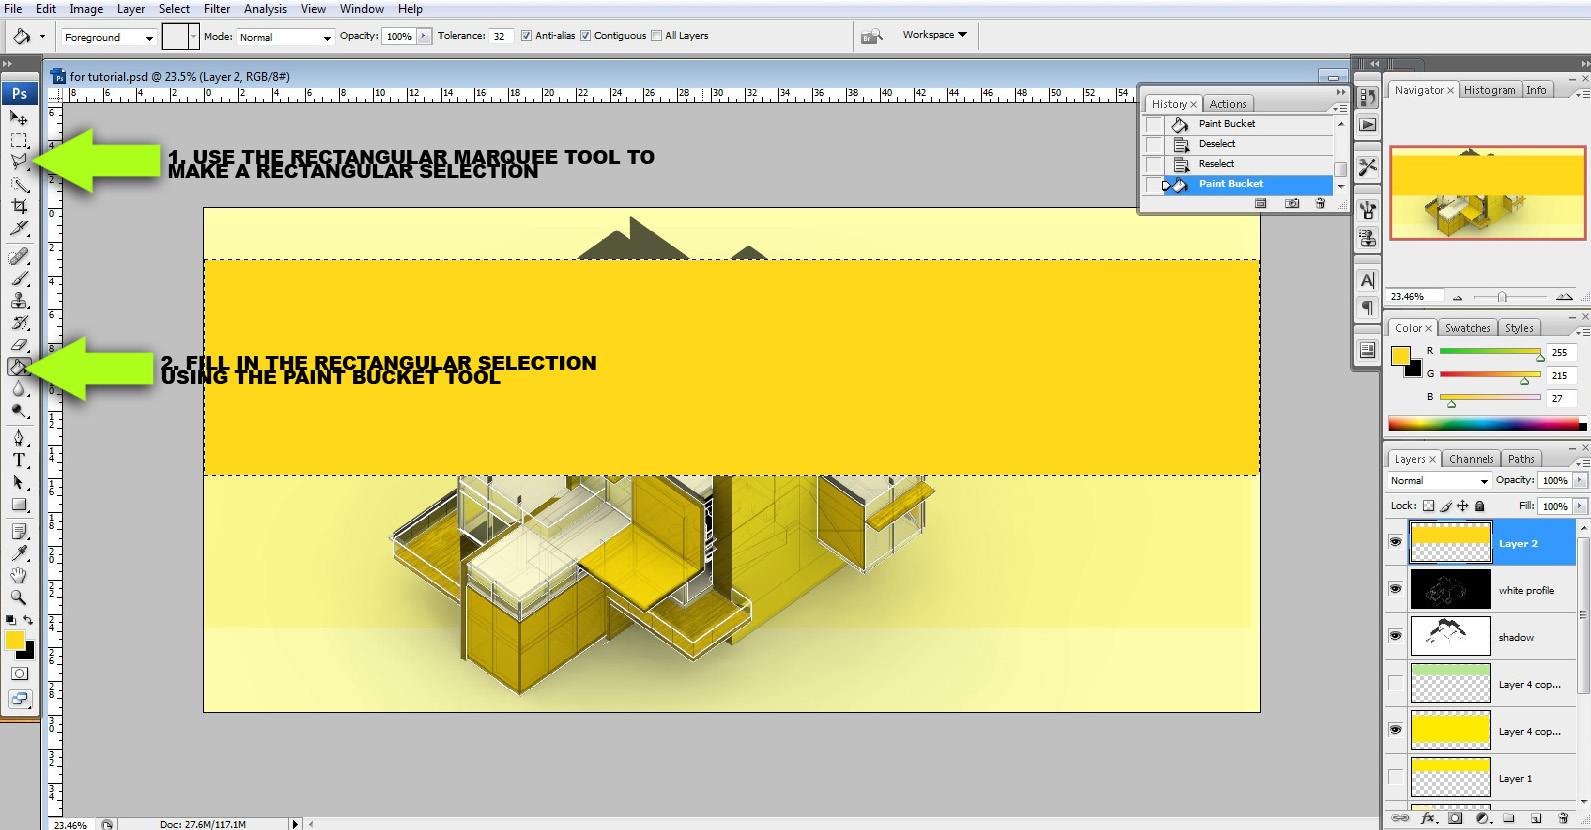
9. Next, I threw in some color stripes to break up the monotonous background. Create a new layer, then choose the “Rectangular Marquee Tool” and draw a rectangular selection. With the “Paint Bucket Tool”, fill in the selection.
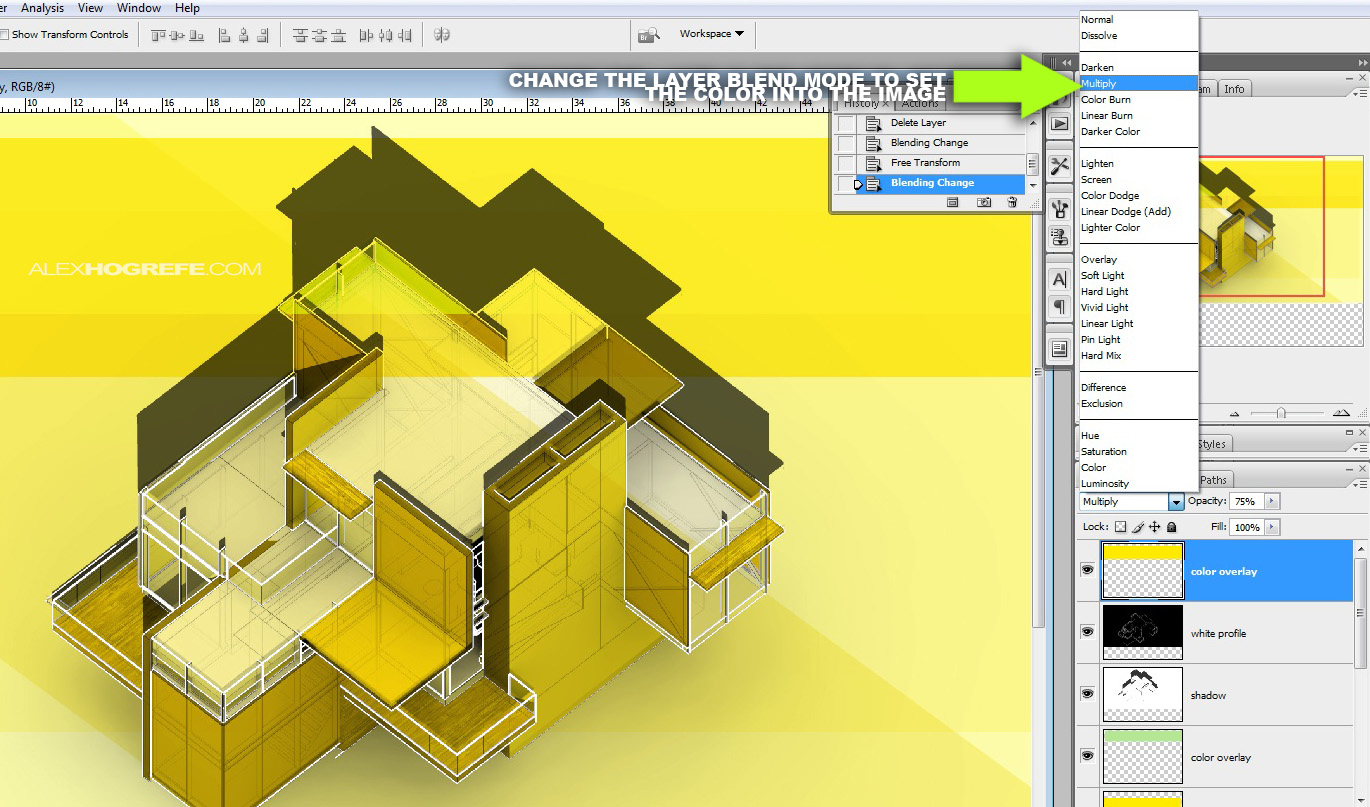
10. Set the layer blend mode of the stripe layers to “Overlay”. In certain situations, different blend modes may work better than others, so test out other options before defaulting to overlay.
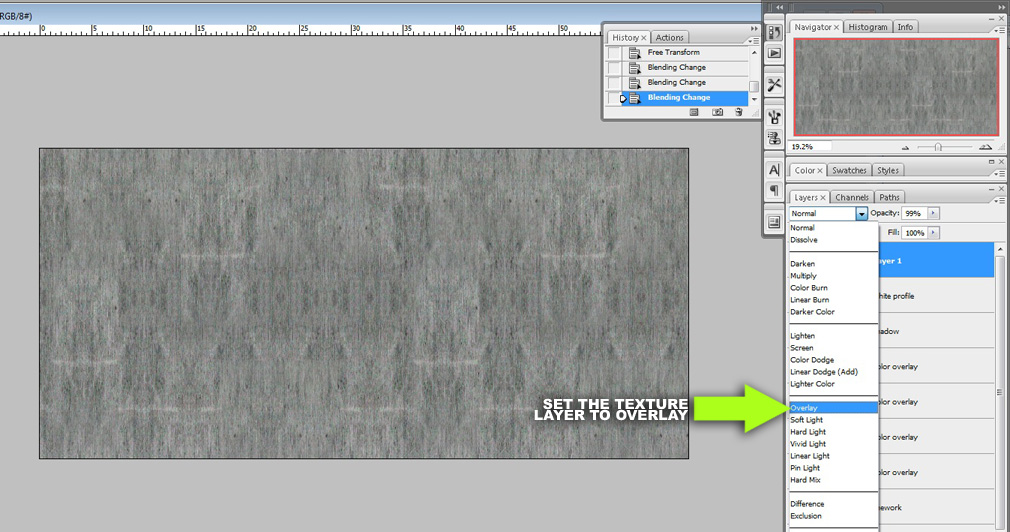
11. I typically prefer a little texture in my illustrations so I am going to add a sketch overlay. Bring in the texture to Photoshop (just Google “grunge texture”, there are tons of them), move it to the top layer and set the layer blend mode to “Overlay”.
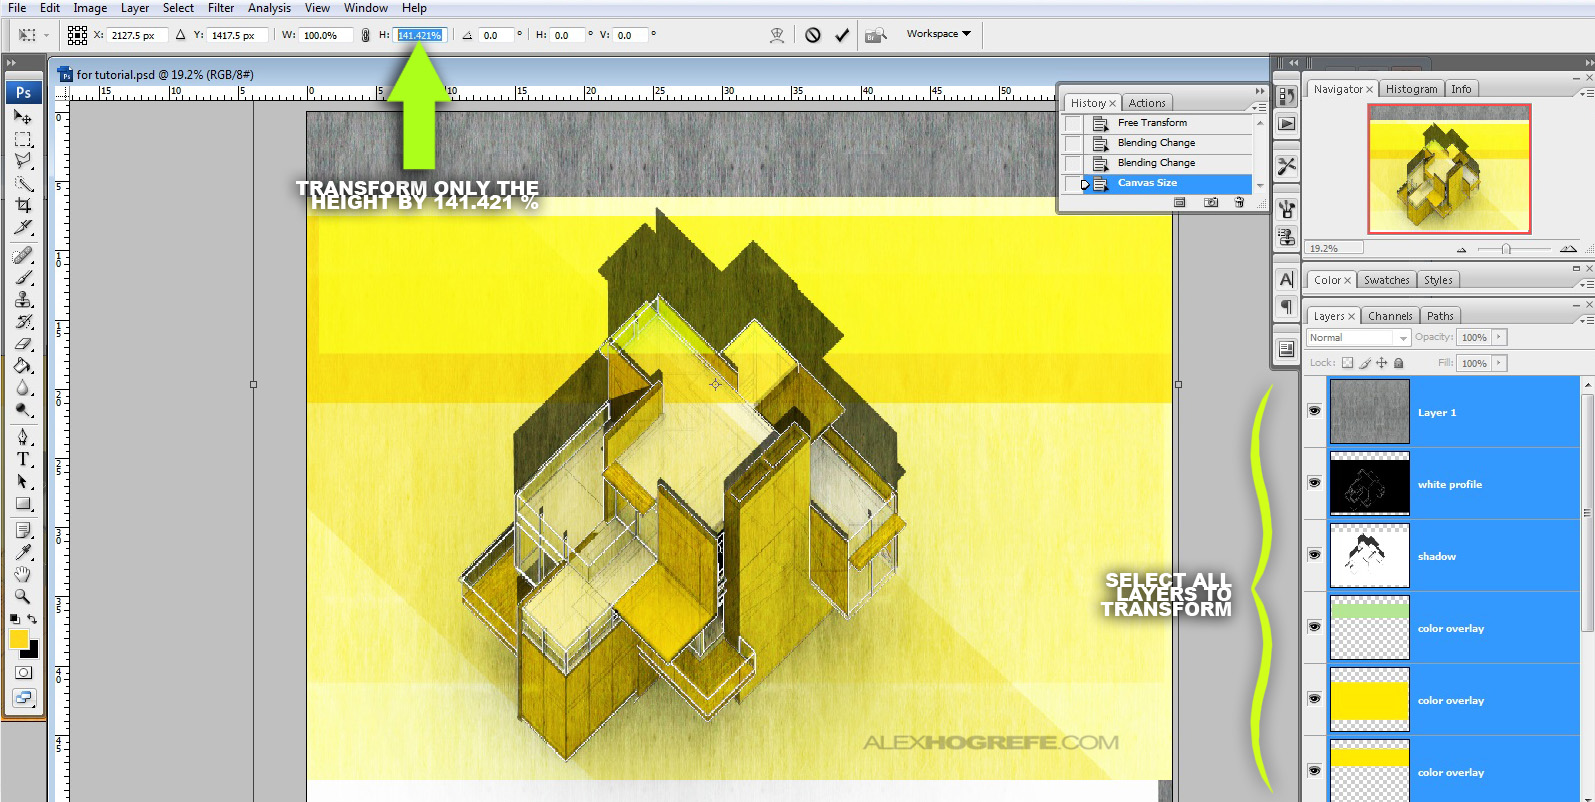
12. If you haven’t seen part 1 of this series, then this next step won’t make much sense. In order to make this a true plan oblique, I need the stretch the image vertically by 141.421%. I did this by first increasing the canvas size to make room for the newly stretched image. I then selected all of the layers, chose “Edit>Transform>Scale” and typed 141.421% in the horizontal attribute. Once this is done, the plan of this image will be all 90 degree angles. If the illustration is scaled properly, every line will be measurable and accurate. Even vertical lines will be measurable.
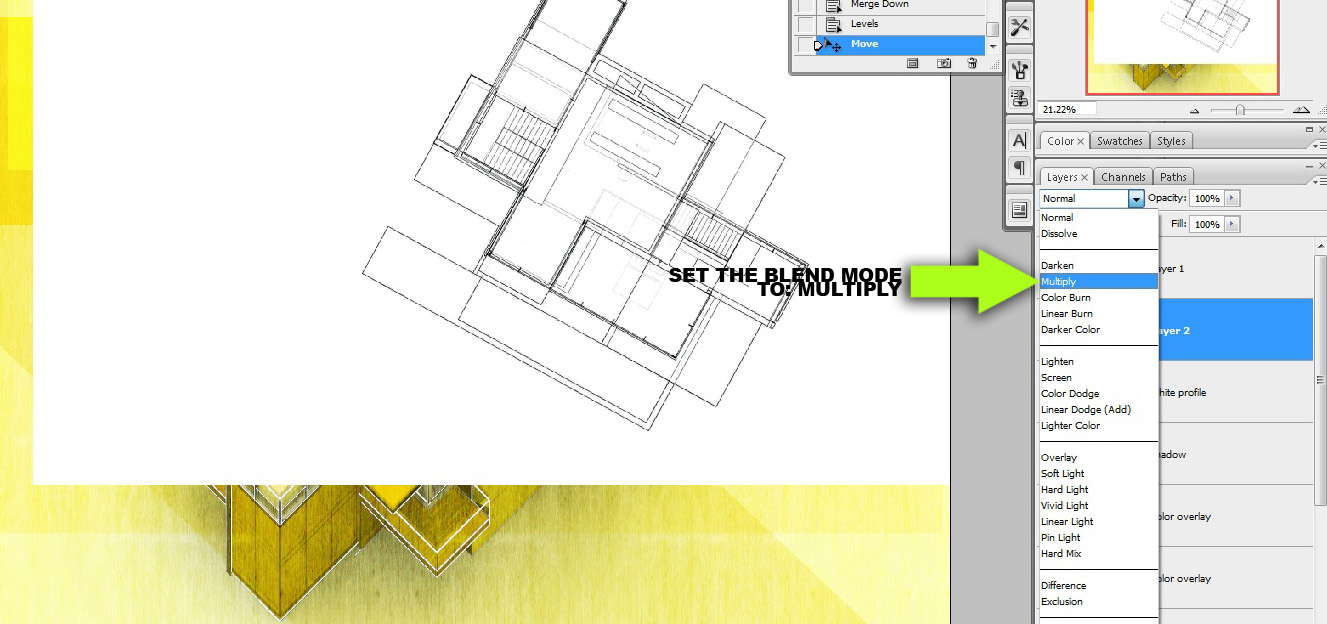
13. Finally, I brought in some floor plans and set the layer blend modes to “Multiply” so that I was left with only the line work. I don’t have completed floor plans yet so I just used exported Sketchup images.
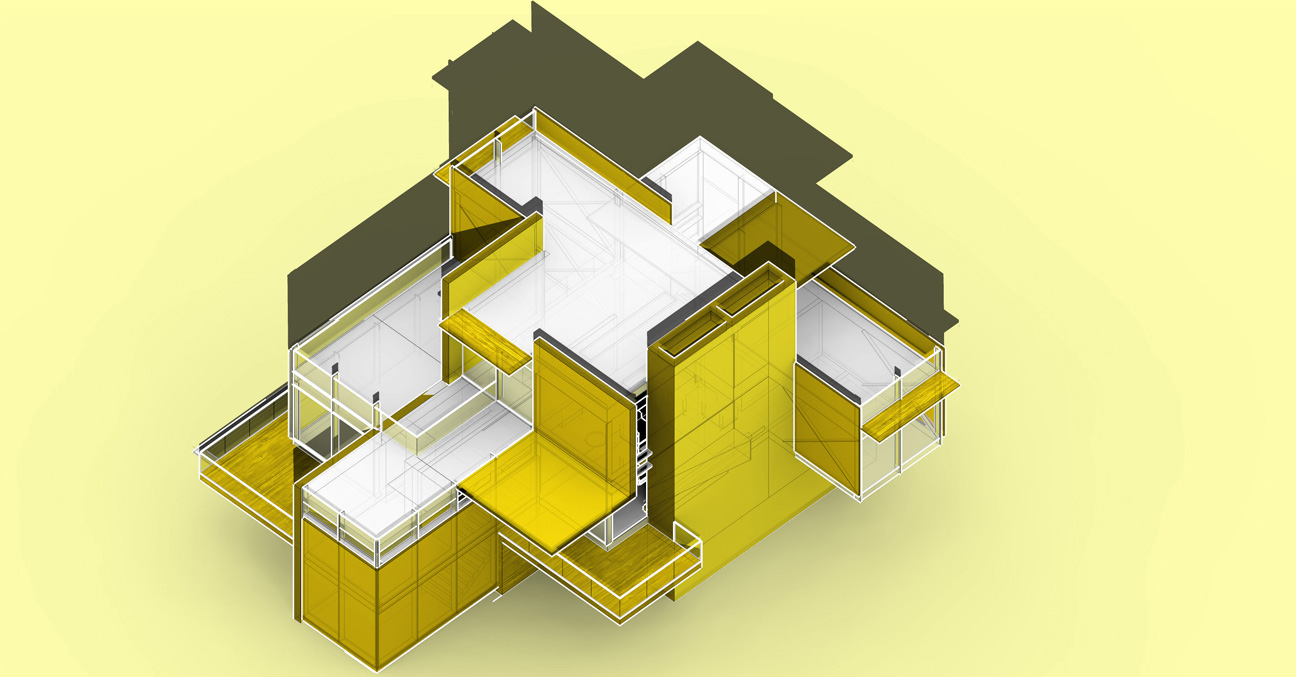
Below, you can see the completed illustration. What I like about this type of illustration is first, its vintage style. I also like how it shows off the form in a unique way, while also providing measurable information making it very functional. I used a very orthogonal building design for these illustrations, however, I can imagine organic forms working well with this style too.


Awesome tutorial!
Hey! It's amazing your blog! I study architecture in brazil and i learn a lot here for my presentations! Thank you very much!
CON RAZÓN SE DICE QUE LA IMAGINACIÓN ES MAS IMPORTANTE QUE EL
CONOCIMIENTO, EN TU CASO VEO QUE TENES MUCHO DE ESO, TE FELICITO ALEX
ME GUSTA MUCHO LA FORMA EN QUE ENCARAS TU TRABAJO
IVAN
This is wonderful and a tutorial that explains everything. Thanks Alex for sharing.
Hola Alex muchas gracias por su tutorial referente a la ilustracion en perspectiva en plano inclinado, ya la he aplicado a un proyecto personal con algunas variantes y el resultado fue muy bueno para ser la primera vez que realizo este tipo de ejercicio. Muchas gracias y que buenos que usted sea generoso en compartir sus buenas ideas- desde Colombia Jairo Amaya
Alex, another thorough tutorial of a very clever technique. I thank you for sharing, however I'm hoping you can can expand on how precisely you generated the clay model image considering the known issues associated with importing parallel (orthographic) cameras from Sketchup to Kerkythea. What's the trick?
Genial trabajo, gracias por compartir tu conocimiento
@Consumer,
When I import a parallel project view from SU to Kerkythea, it appears nothing is there. However, upon further study, I realized that the model is there, just zoomed in really close. There for, if you zoom out, you will see the entire model come into view. Since it is parallel projection, lining up the Kerkythea rendering with the PSD file shouldn't be an issue unlike perspective views. Just don't orbit in Kerkythea when your zooming in and out.
Alex ur the most amazing man on z planet … THANK YOU 🙂
Love checking out your blog, your ideas have helped me to improve the ways I present my work
Great to hear, thanks O.Red and Ant
I think your work is awesome, watching your videos has allowed me to exploit different ways of designing and presenting my own work while i am in school. Thanks for the inspirations.
Hi Alex, love your blog it's been very helpful for me as an architecture student, i had been using a similar method to get this axonometric views since Revit wouldn't do the, but wen i scale them, the percentage has to be around 171% instead of the square root derivative, don't know why this happens, maybe someone here has got an idea?
thanks again for the very useful blog.
Hey Alex. I love these isometric images. But i dont understand what do you use these for? I mean what do you show through these strong couloured images? What role does these have in your presentations.
Hi Zohaa,
The axon itself provides a lot of information. Both the x,y, and z axis are measurable meaning plans and elevations are to scale. Beyond that, these types of images are an experimentation with color and texture. They may not be appropriate for all presentation styles, but my goal is to think outside the box and test out different ideas to see what works and what doesn't. I also post these types of images in hopes of spurring inspiration to others who visit this site. Thanks for the comment.
Ahan..okay… Actually i was trying to use this for my class presentation. I just wanted to know your ideas how do you use them in what context so i could relate them with my work too. Its amazing what you do.
Thanks a bunch for taking your time out to help us 🙂
Your generosity is very inspiring. Great work.
always leaves me speechless.