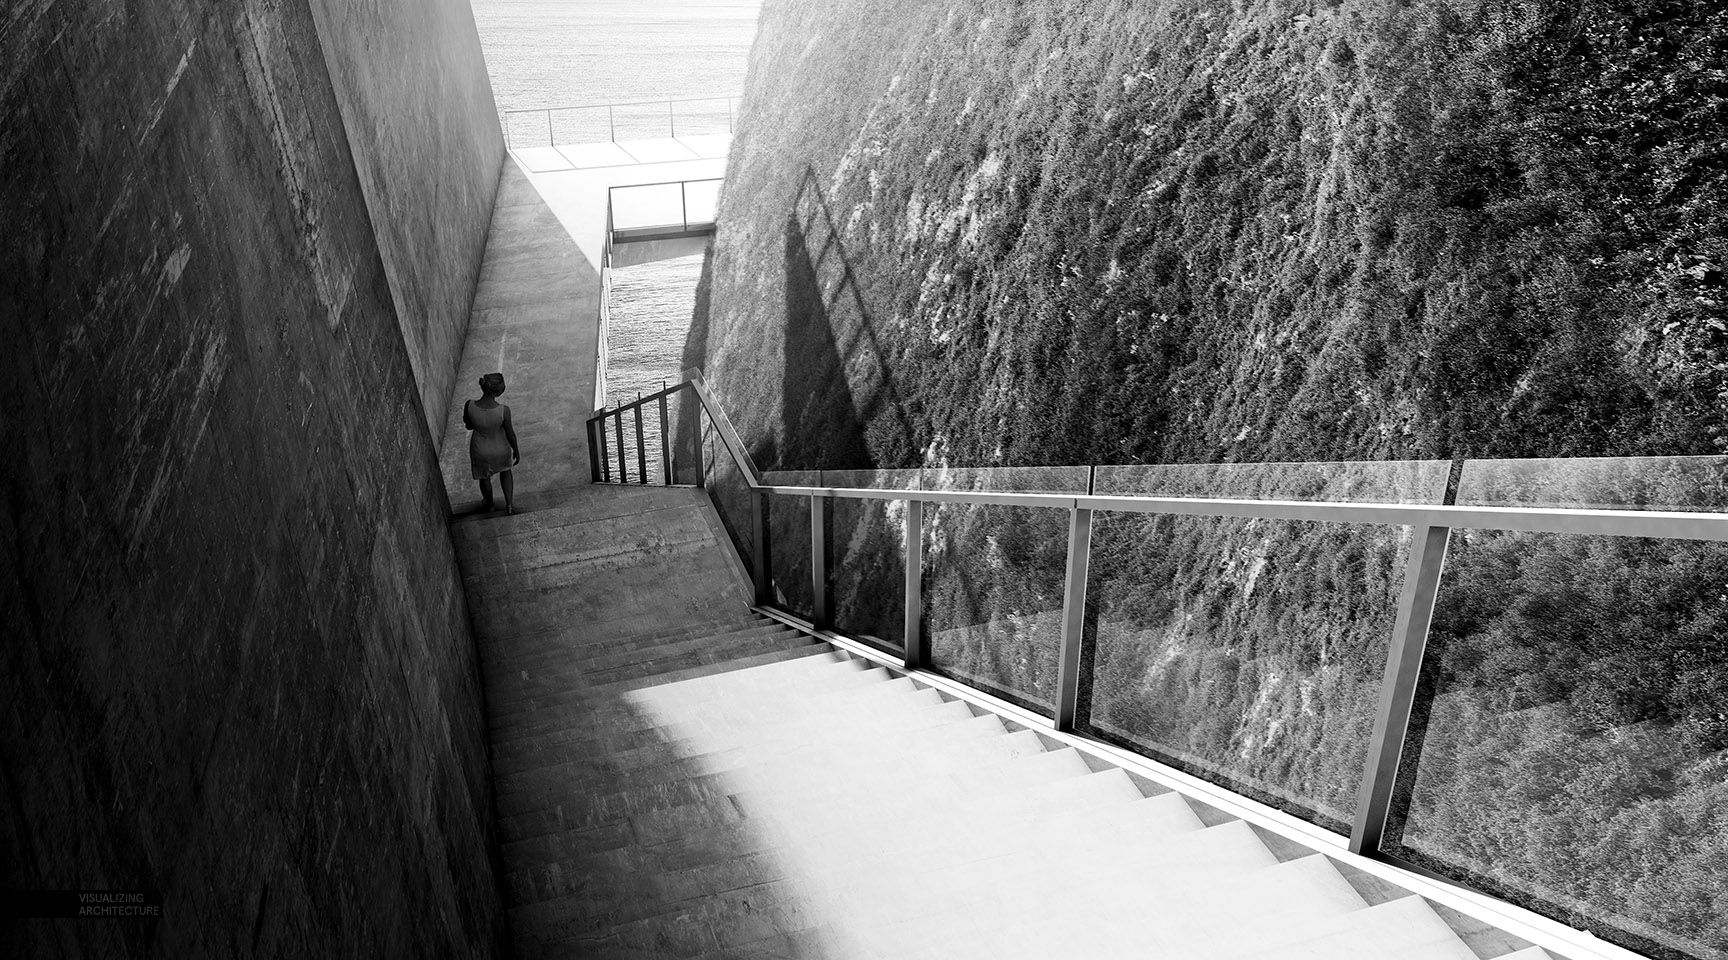
In part one, I discussed some quick study vignettes of the cliff retreat design. For part two, I want to go into more depth about how I used a Material ID render channel to speed up my material selections and generate these illustrations in a relatively short amount of time. This not only streamlines my Photoshop workflow, but also allows me to make quick updates to my Photoshop files later if my design changes. By utilizing Material ID channels and masked groups, I can simply render out a new ID every time I make a change to my design, update the ID layer in my Photoshop file, and then use that new ID to update my masks as needed. Below is a quick explanation of how I do that.
1. TURN ON MATERIAL ID CHANNEL
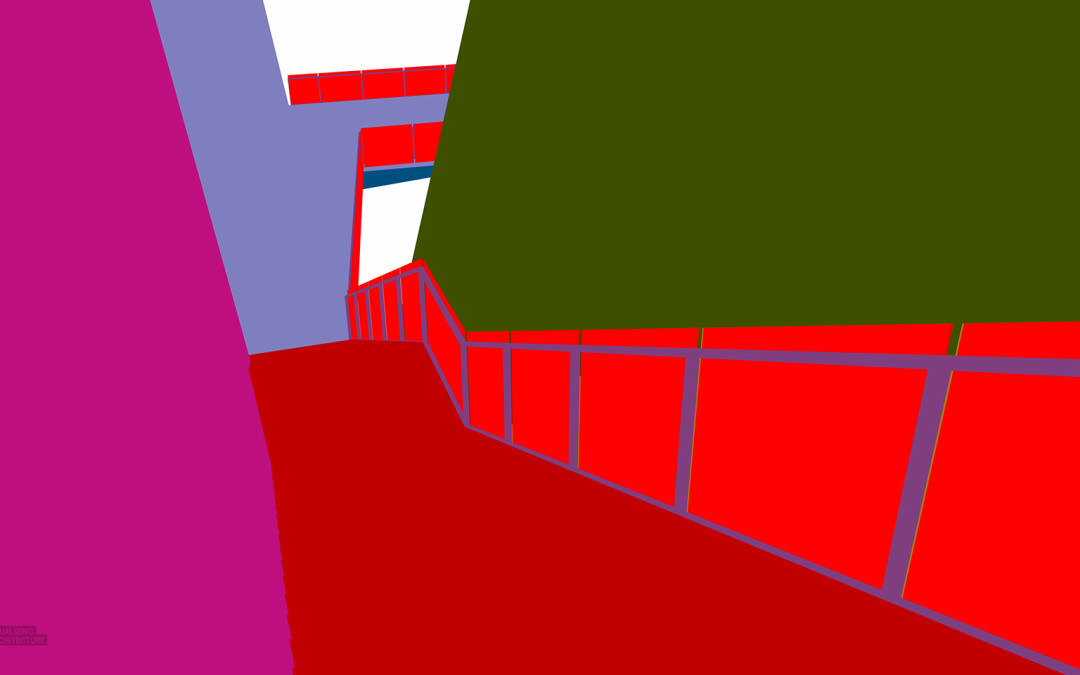
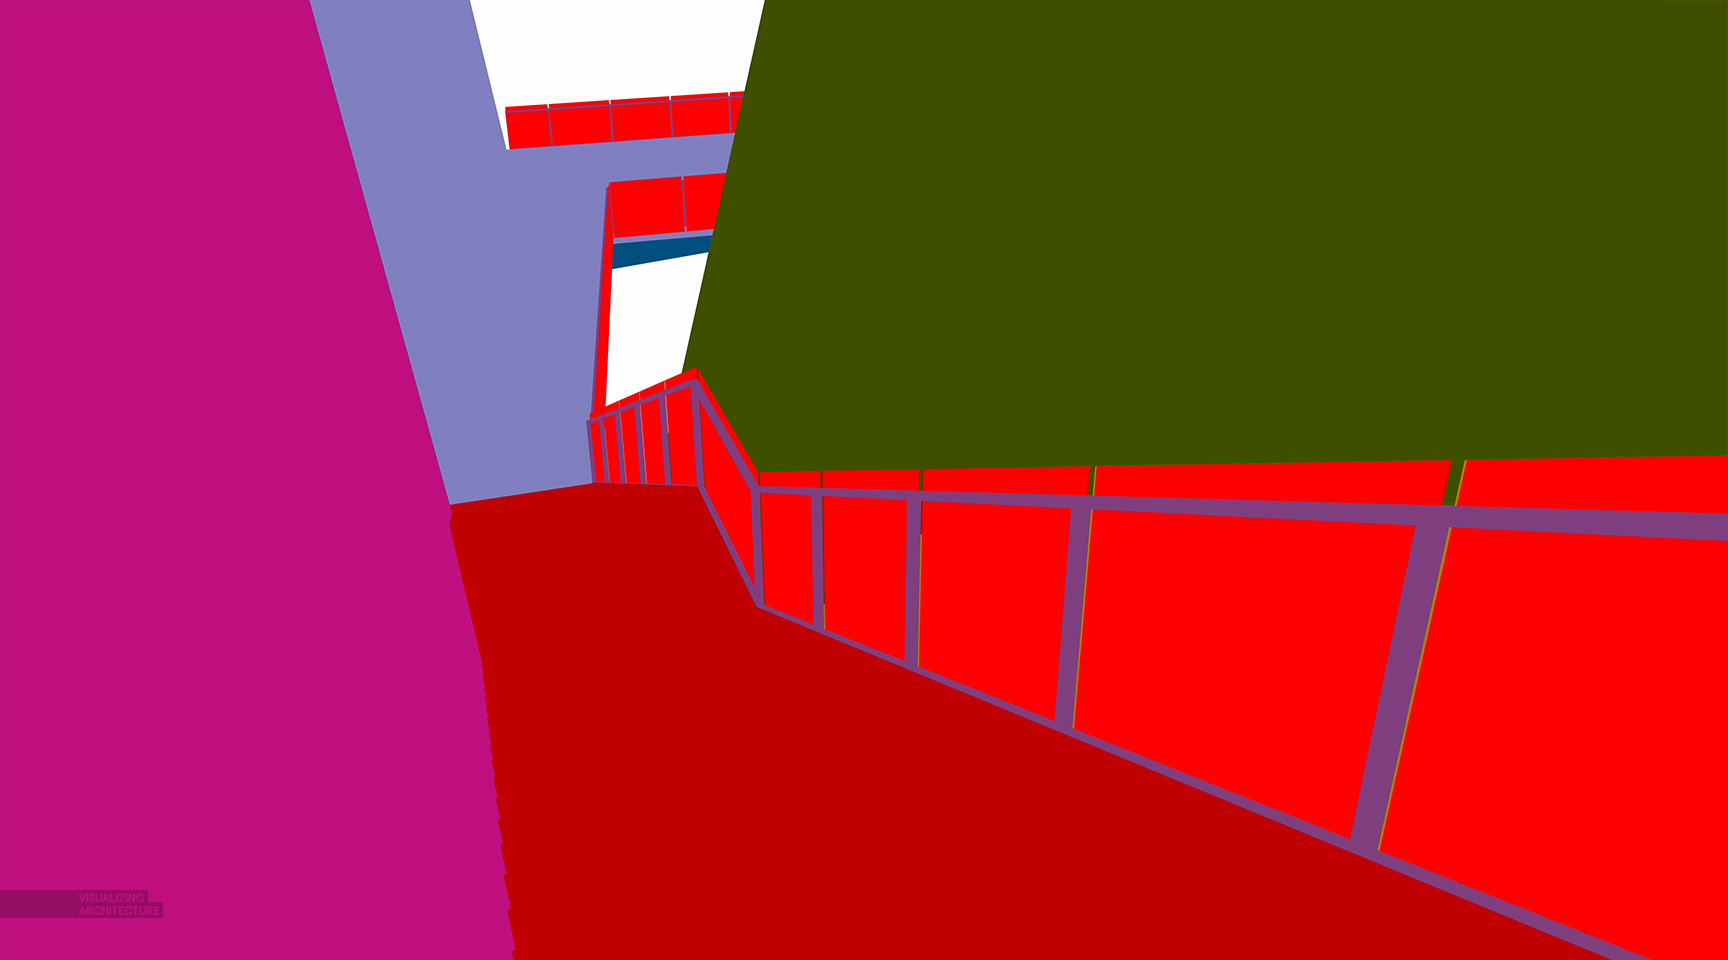
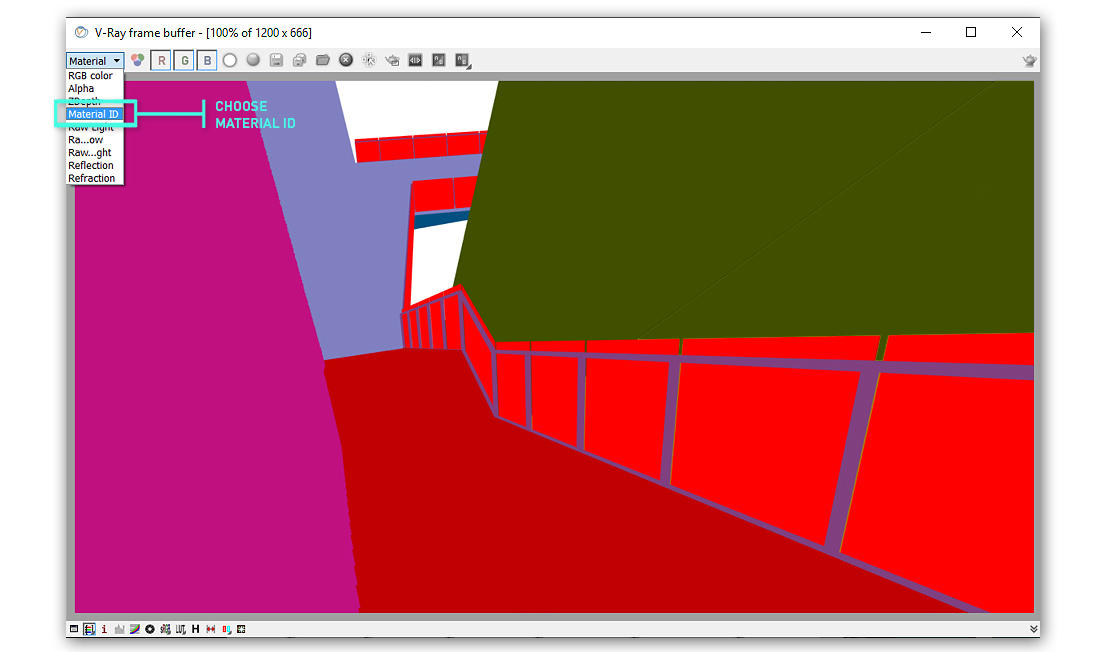
In this tutorial, I am using V-Ray for Sketchup which automatically generates colors for each texture used in the model. Above is the what the Material ID channel looked like for my view. Most rendering programs like V-Ray offer the ability to create a Material ID channel.
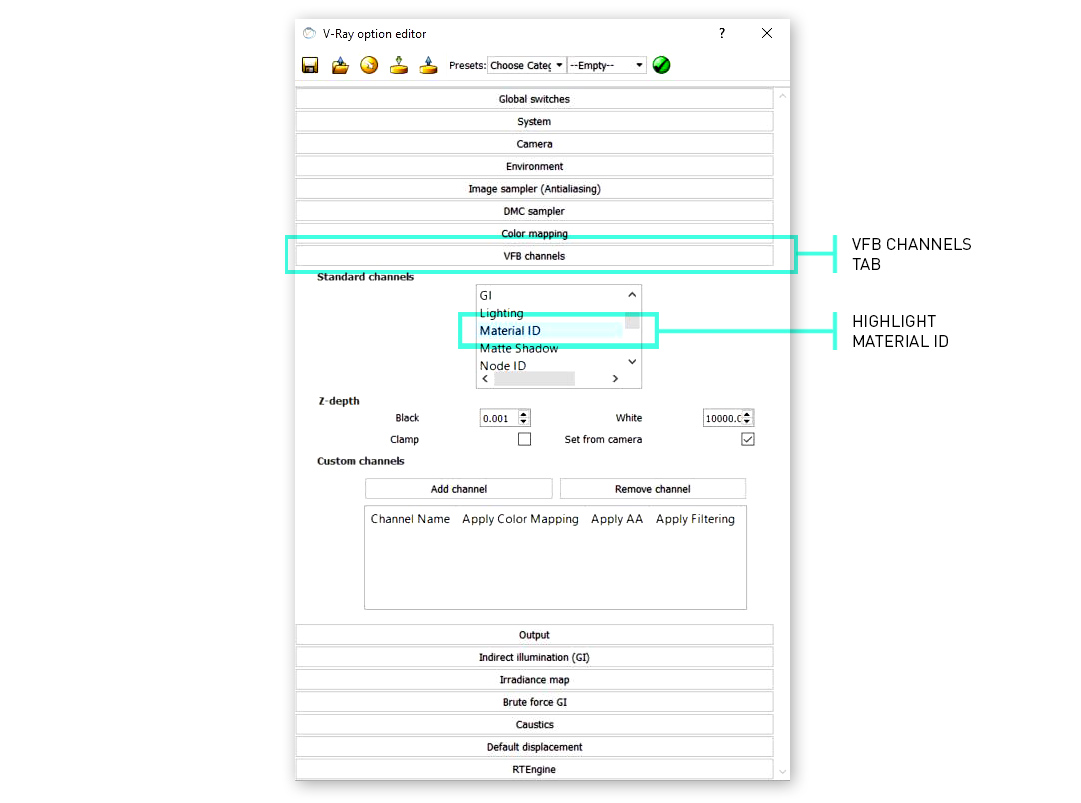
To turn on the Material ID channel, open the V-Ray Option Editor dialogue box, and go to the “VFB Channels” tab. In that tab, find “Material ID” in the Standard Channels list and select it. Now that it is selected, V-Ray will generate this channel when you render the image.
2. SAVE MATERIAL ID CHANNEL
After rendering the view, you can find the Material ID channel in the upper left side of the frame buffer window in the drop down menu. You can save the image from the frame buffer window but I typically have V-Ray save all of my channels automatically by checking the “Save Output” box in the “Output” tab of the V-Ray Option Editor.
3. BRING IN MATERIAL ID CHANNEL INTO PHOTOSHOP
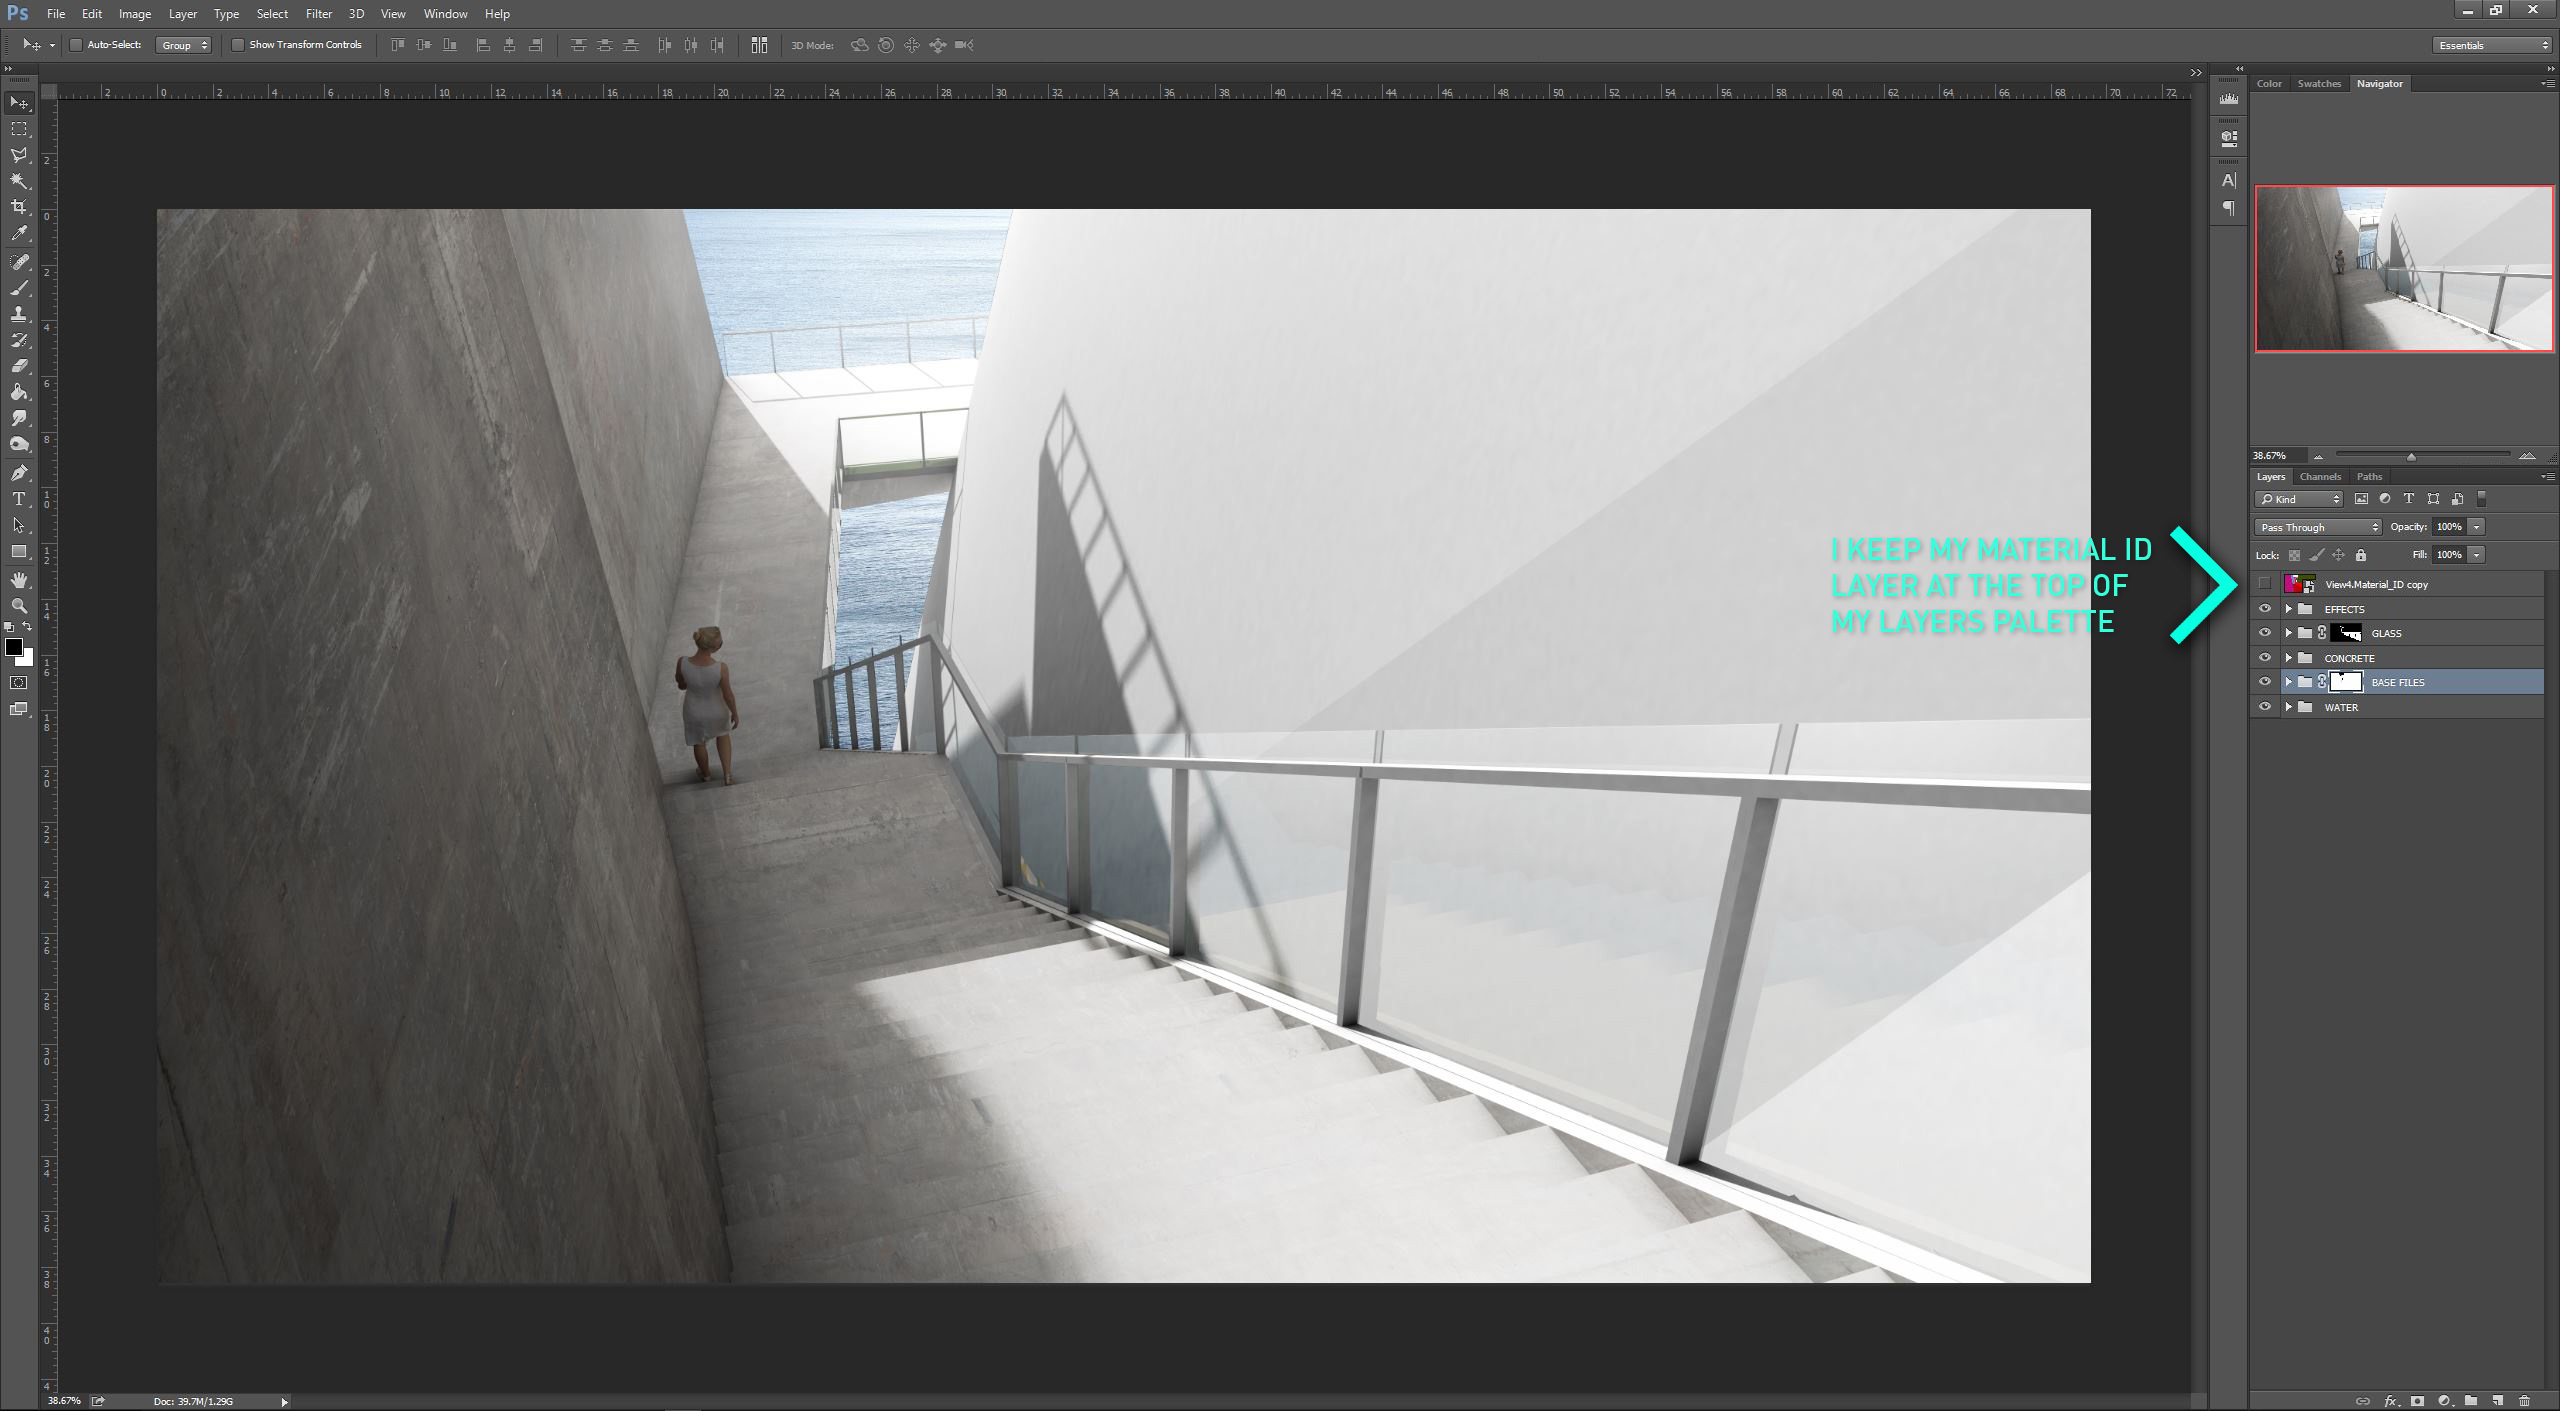
I like to keep my Material ID layer at the top of the layers palette. This allows me to turn it off and on easily to make selections without any other layers getting in the way.
4. MAKE SELECTION
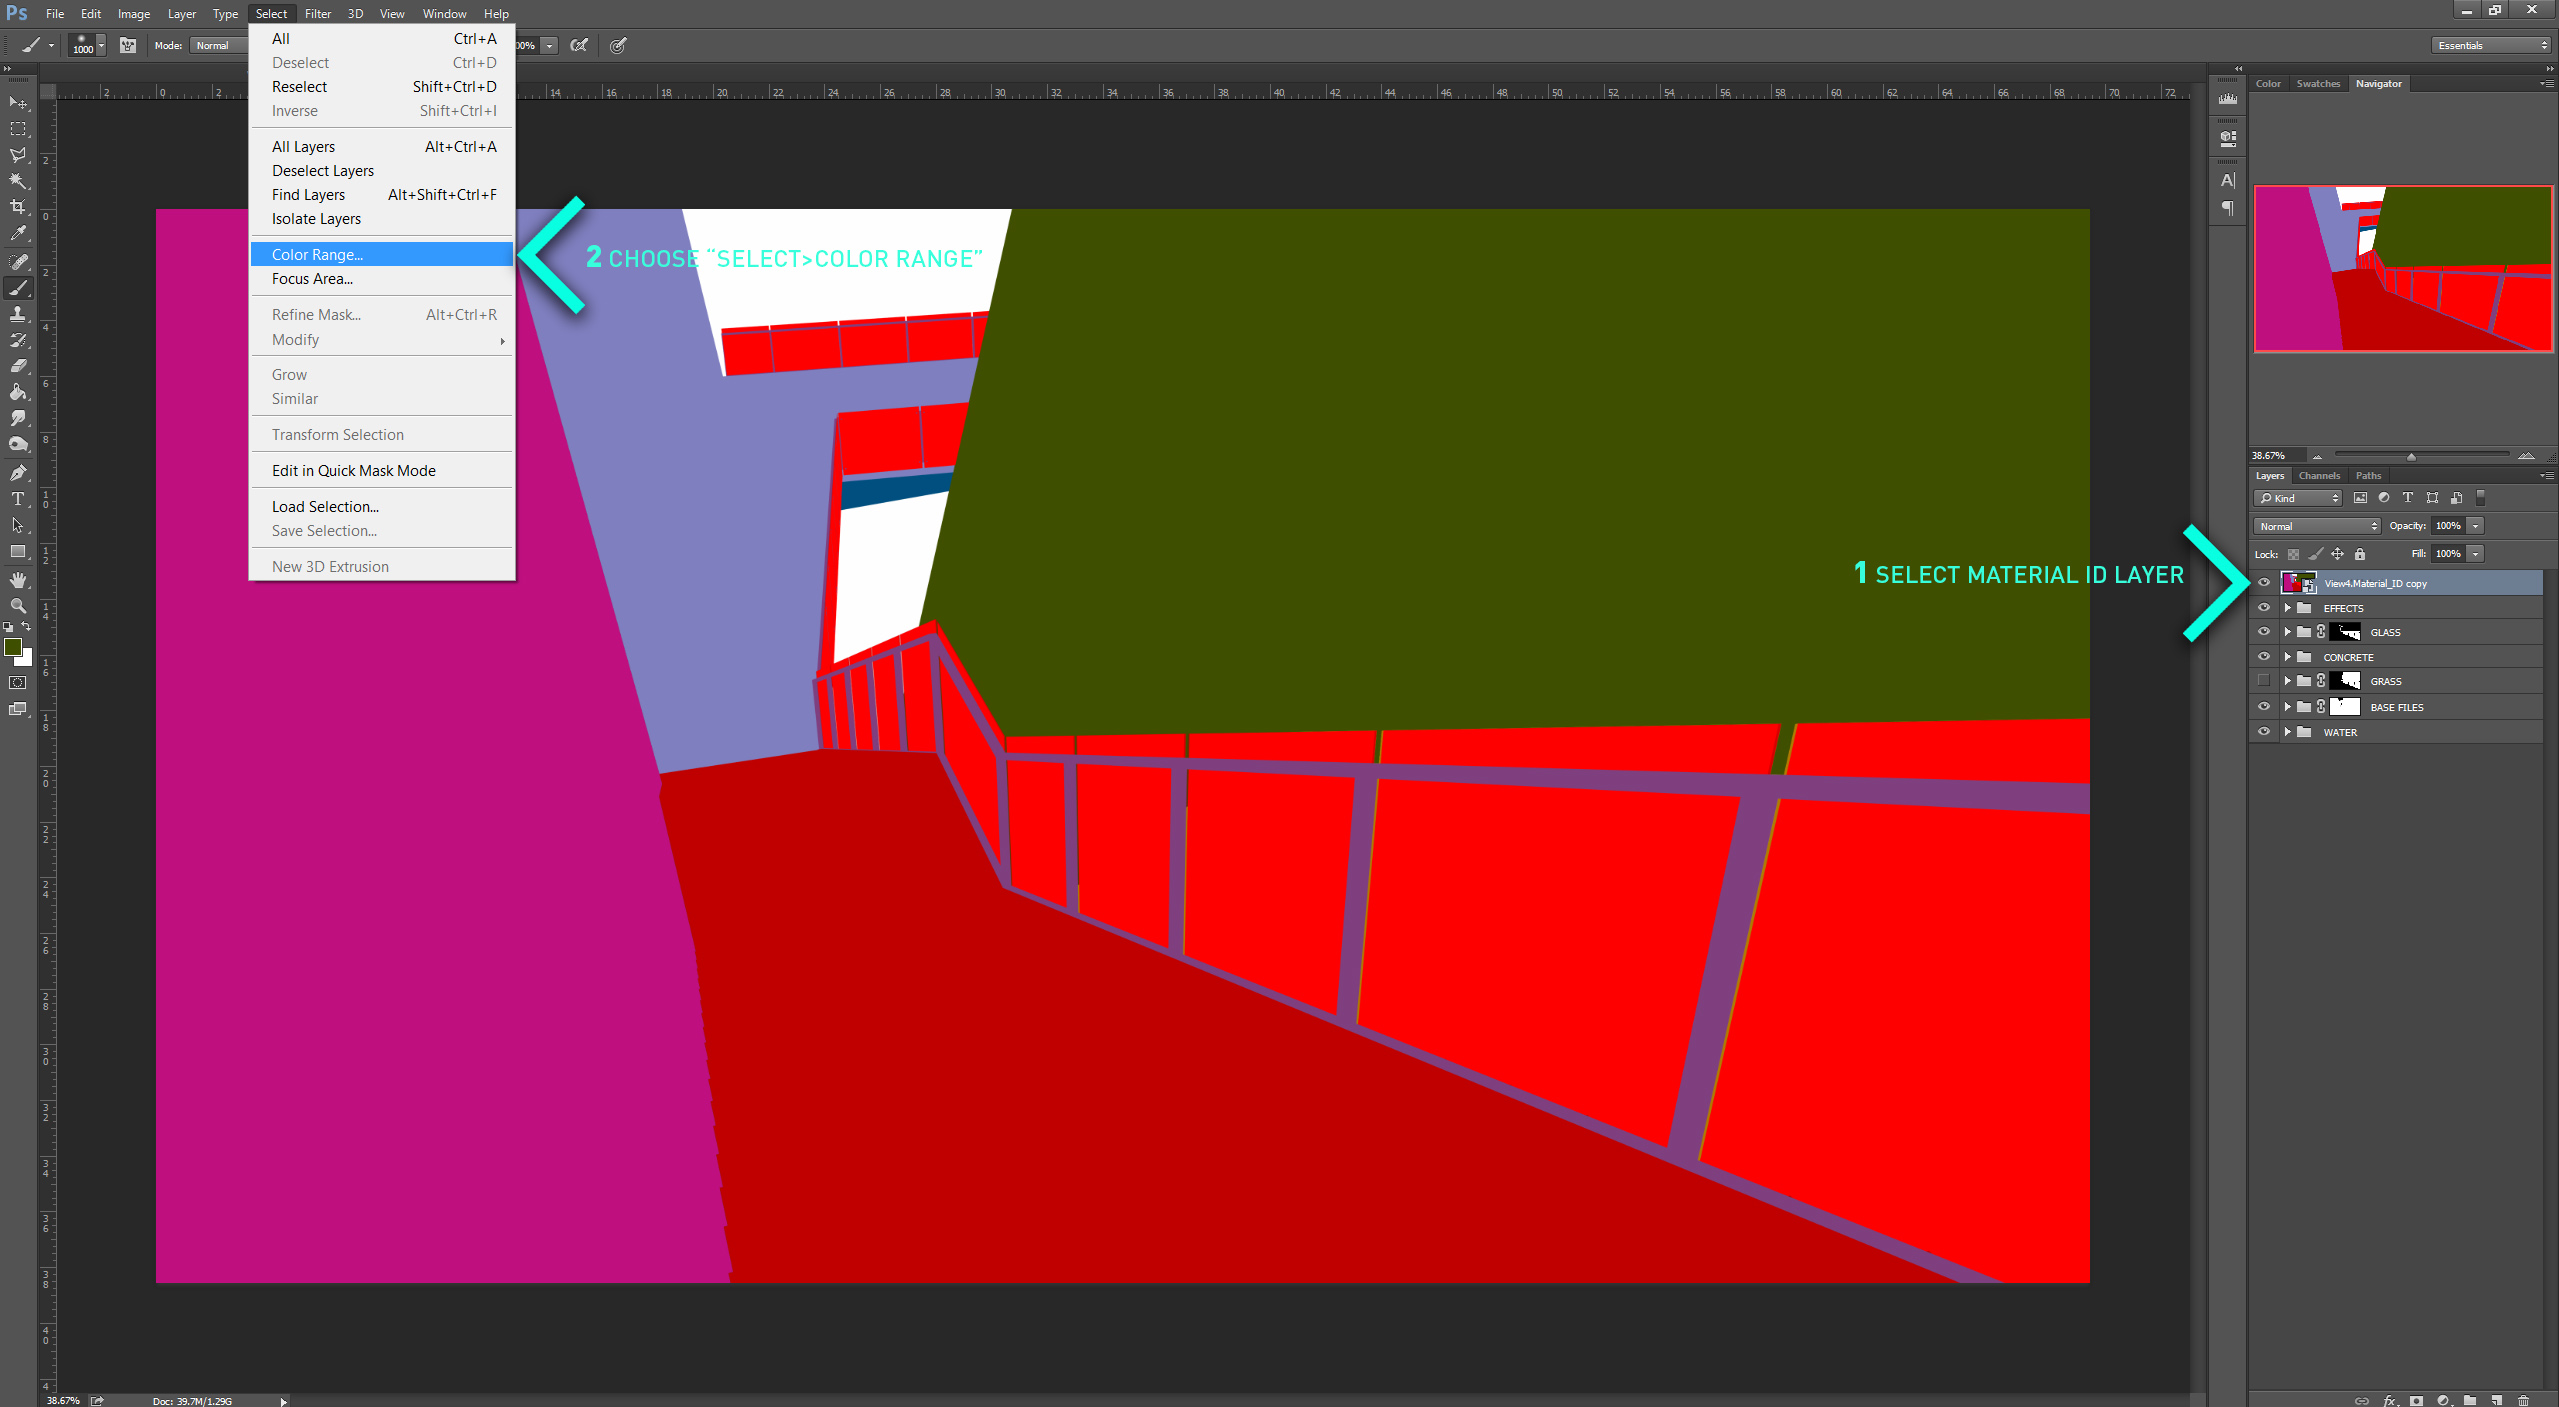
To make a selection, select and turn on the Material ID Layer. Then, Choose “Select>Color Range”.
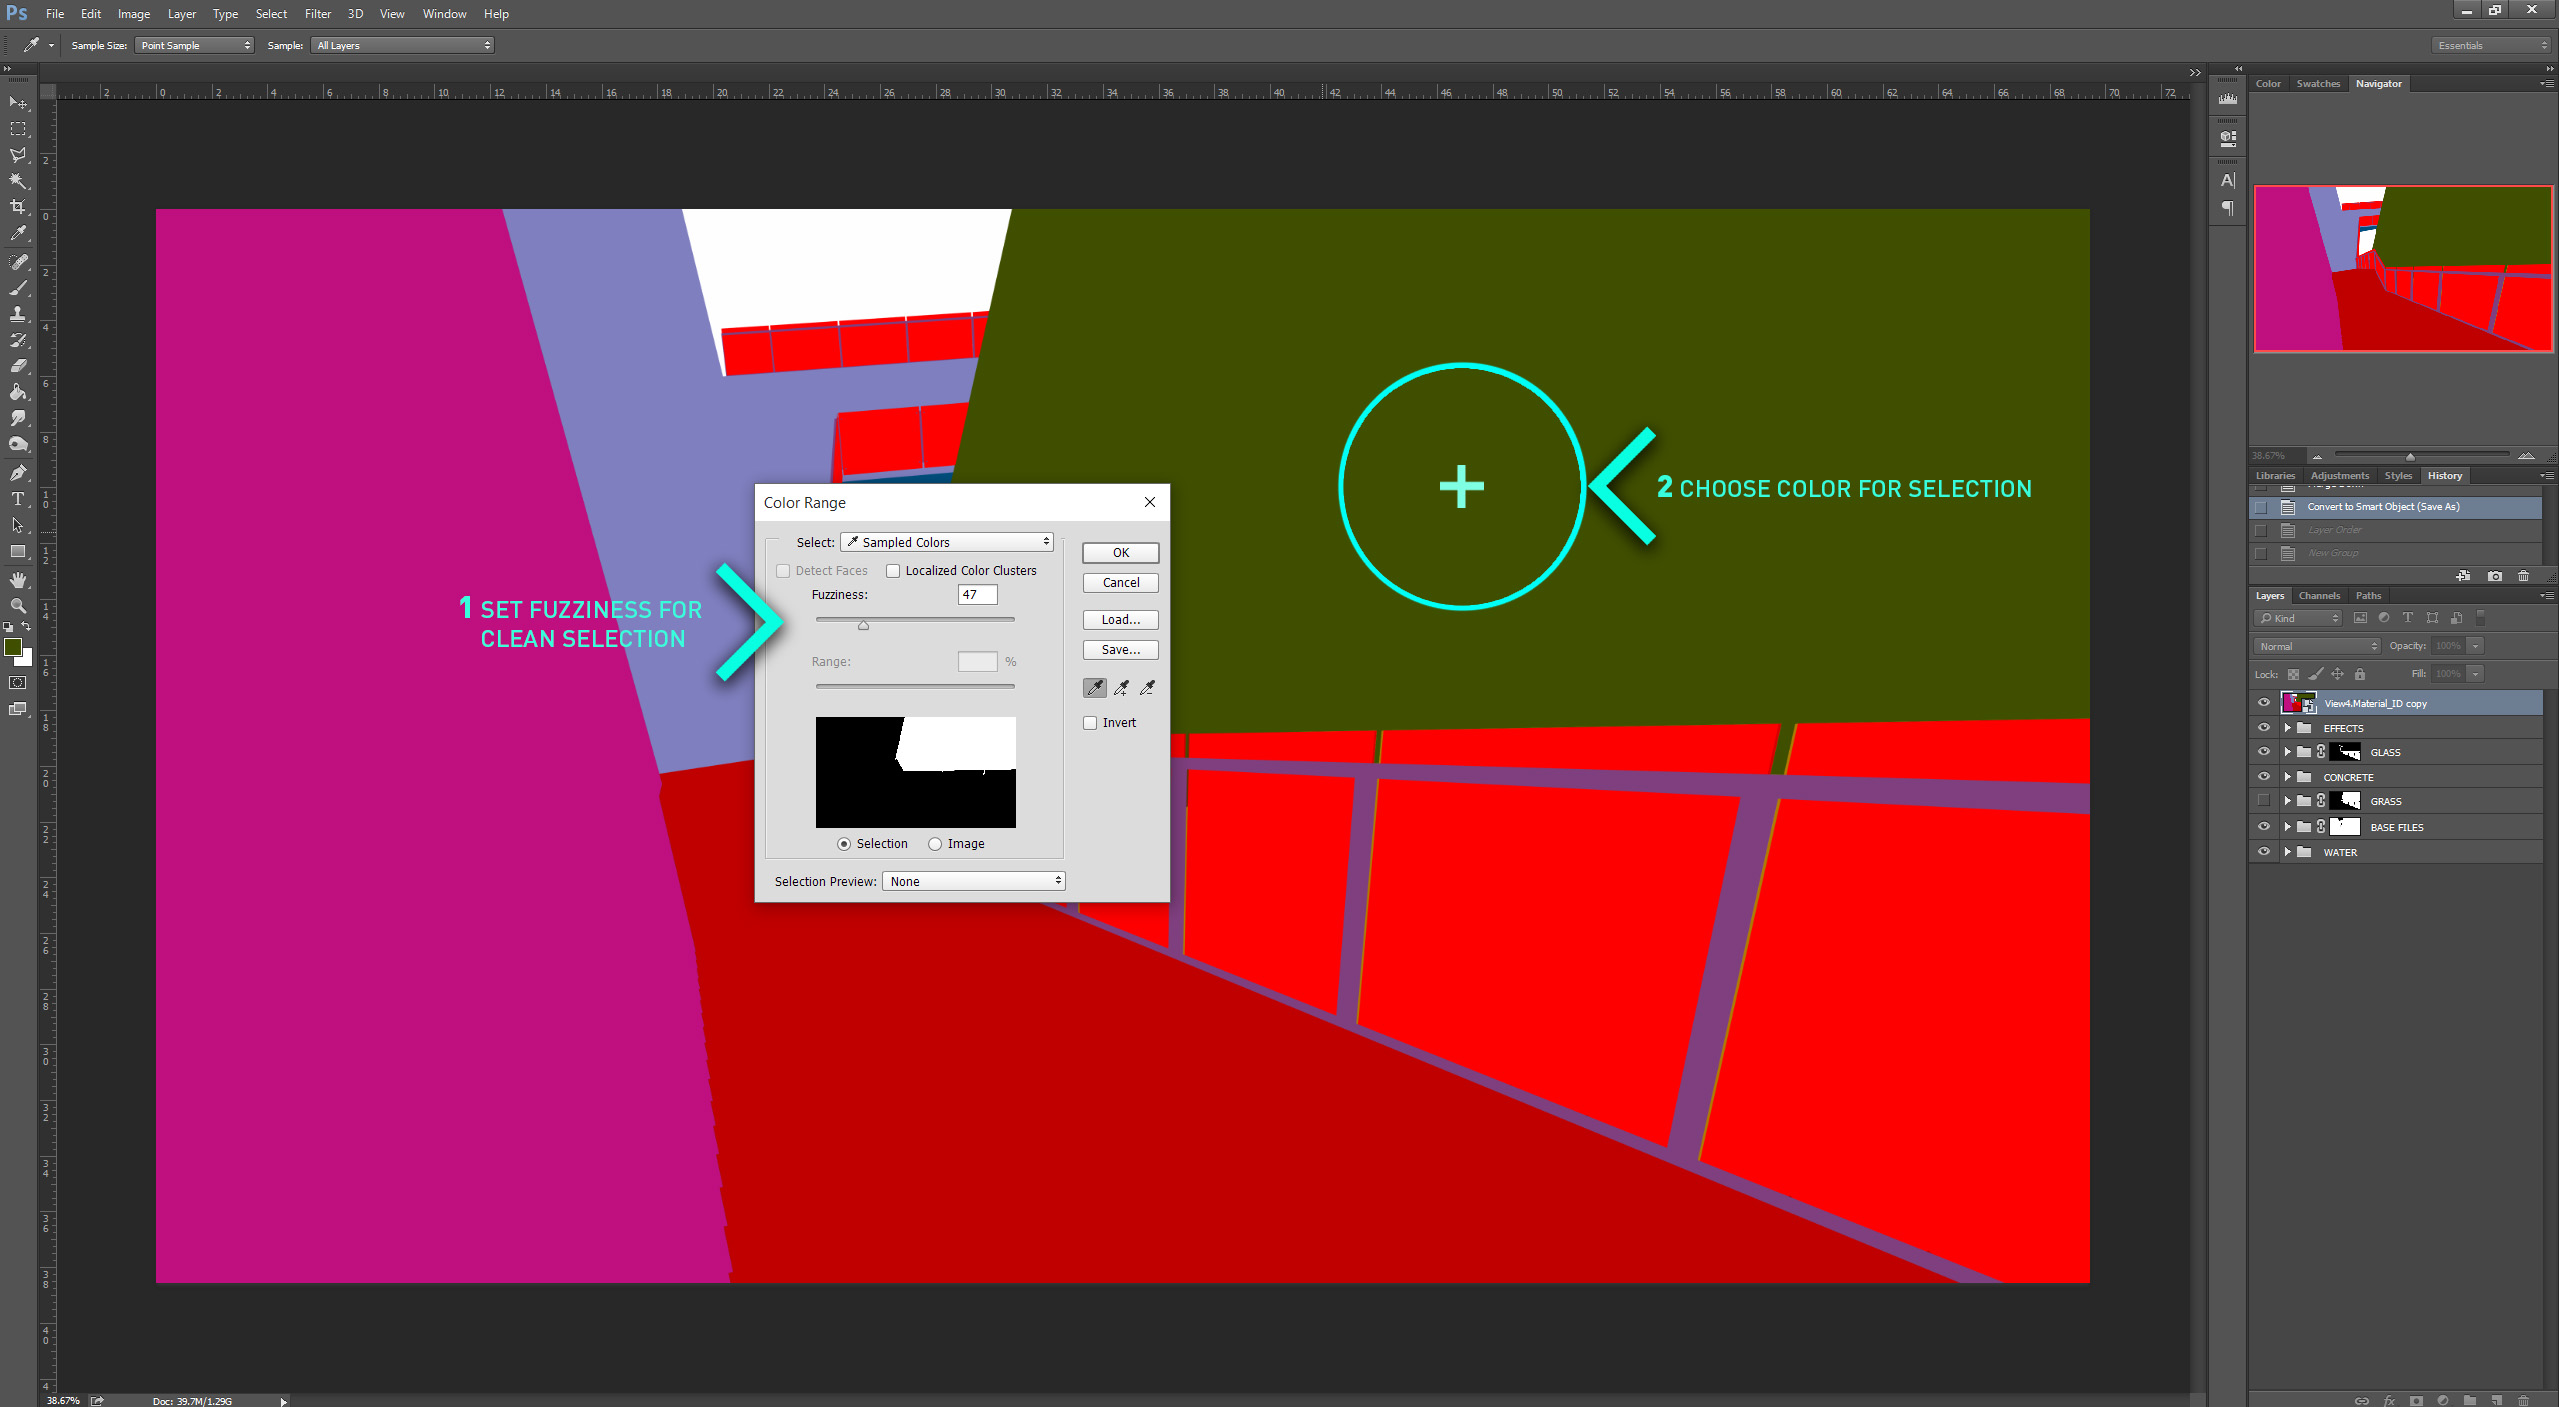
When the Color Range dialogue box appears, set the “Fuzziness” slider to somewhere around 50. This may need to be adjusted depending on the color and amount of detail that is being selected. Next, pick the color that you want selected and then choose “OK”.
5. SETUP GROUP AND MASK
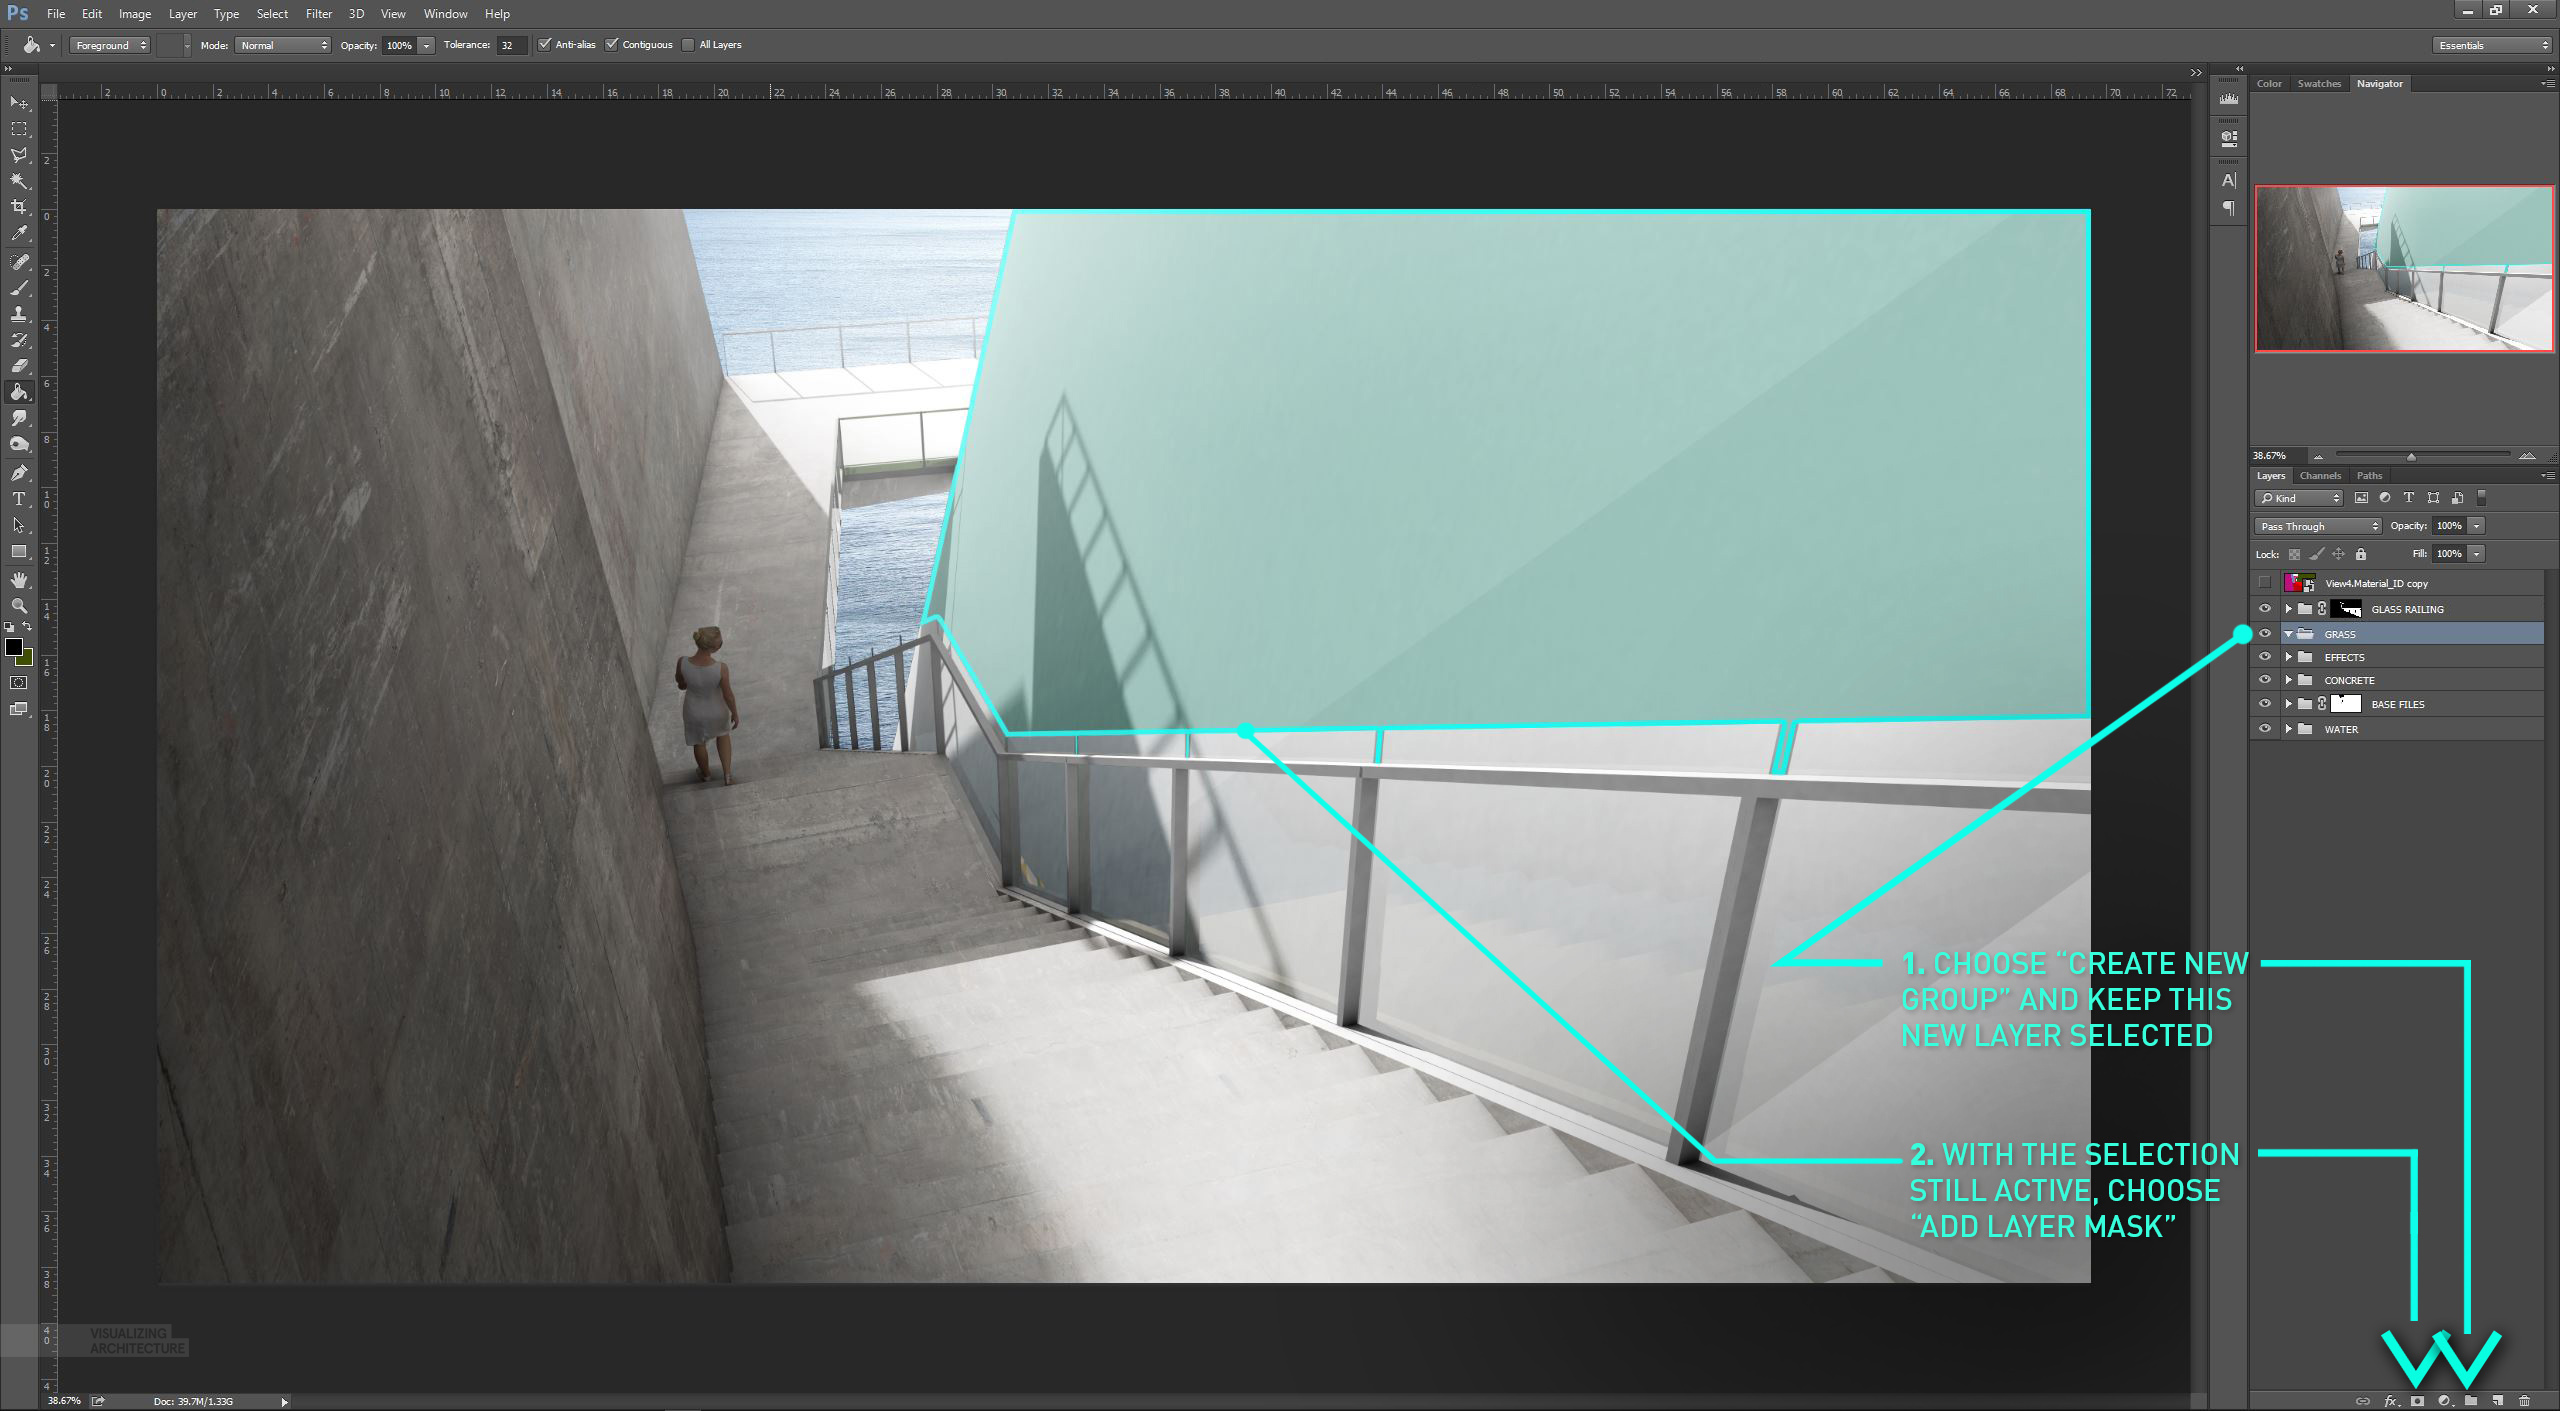
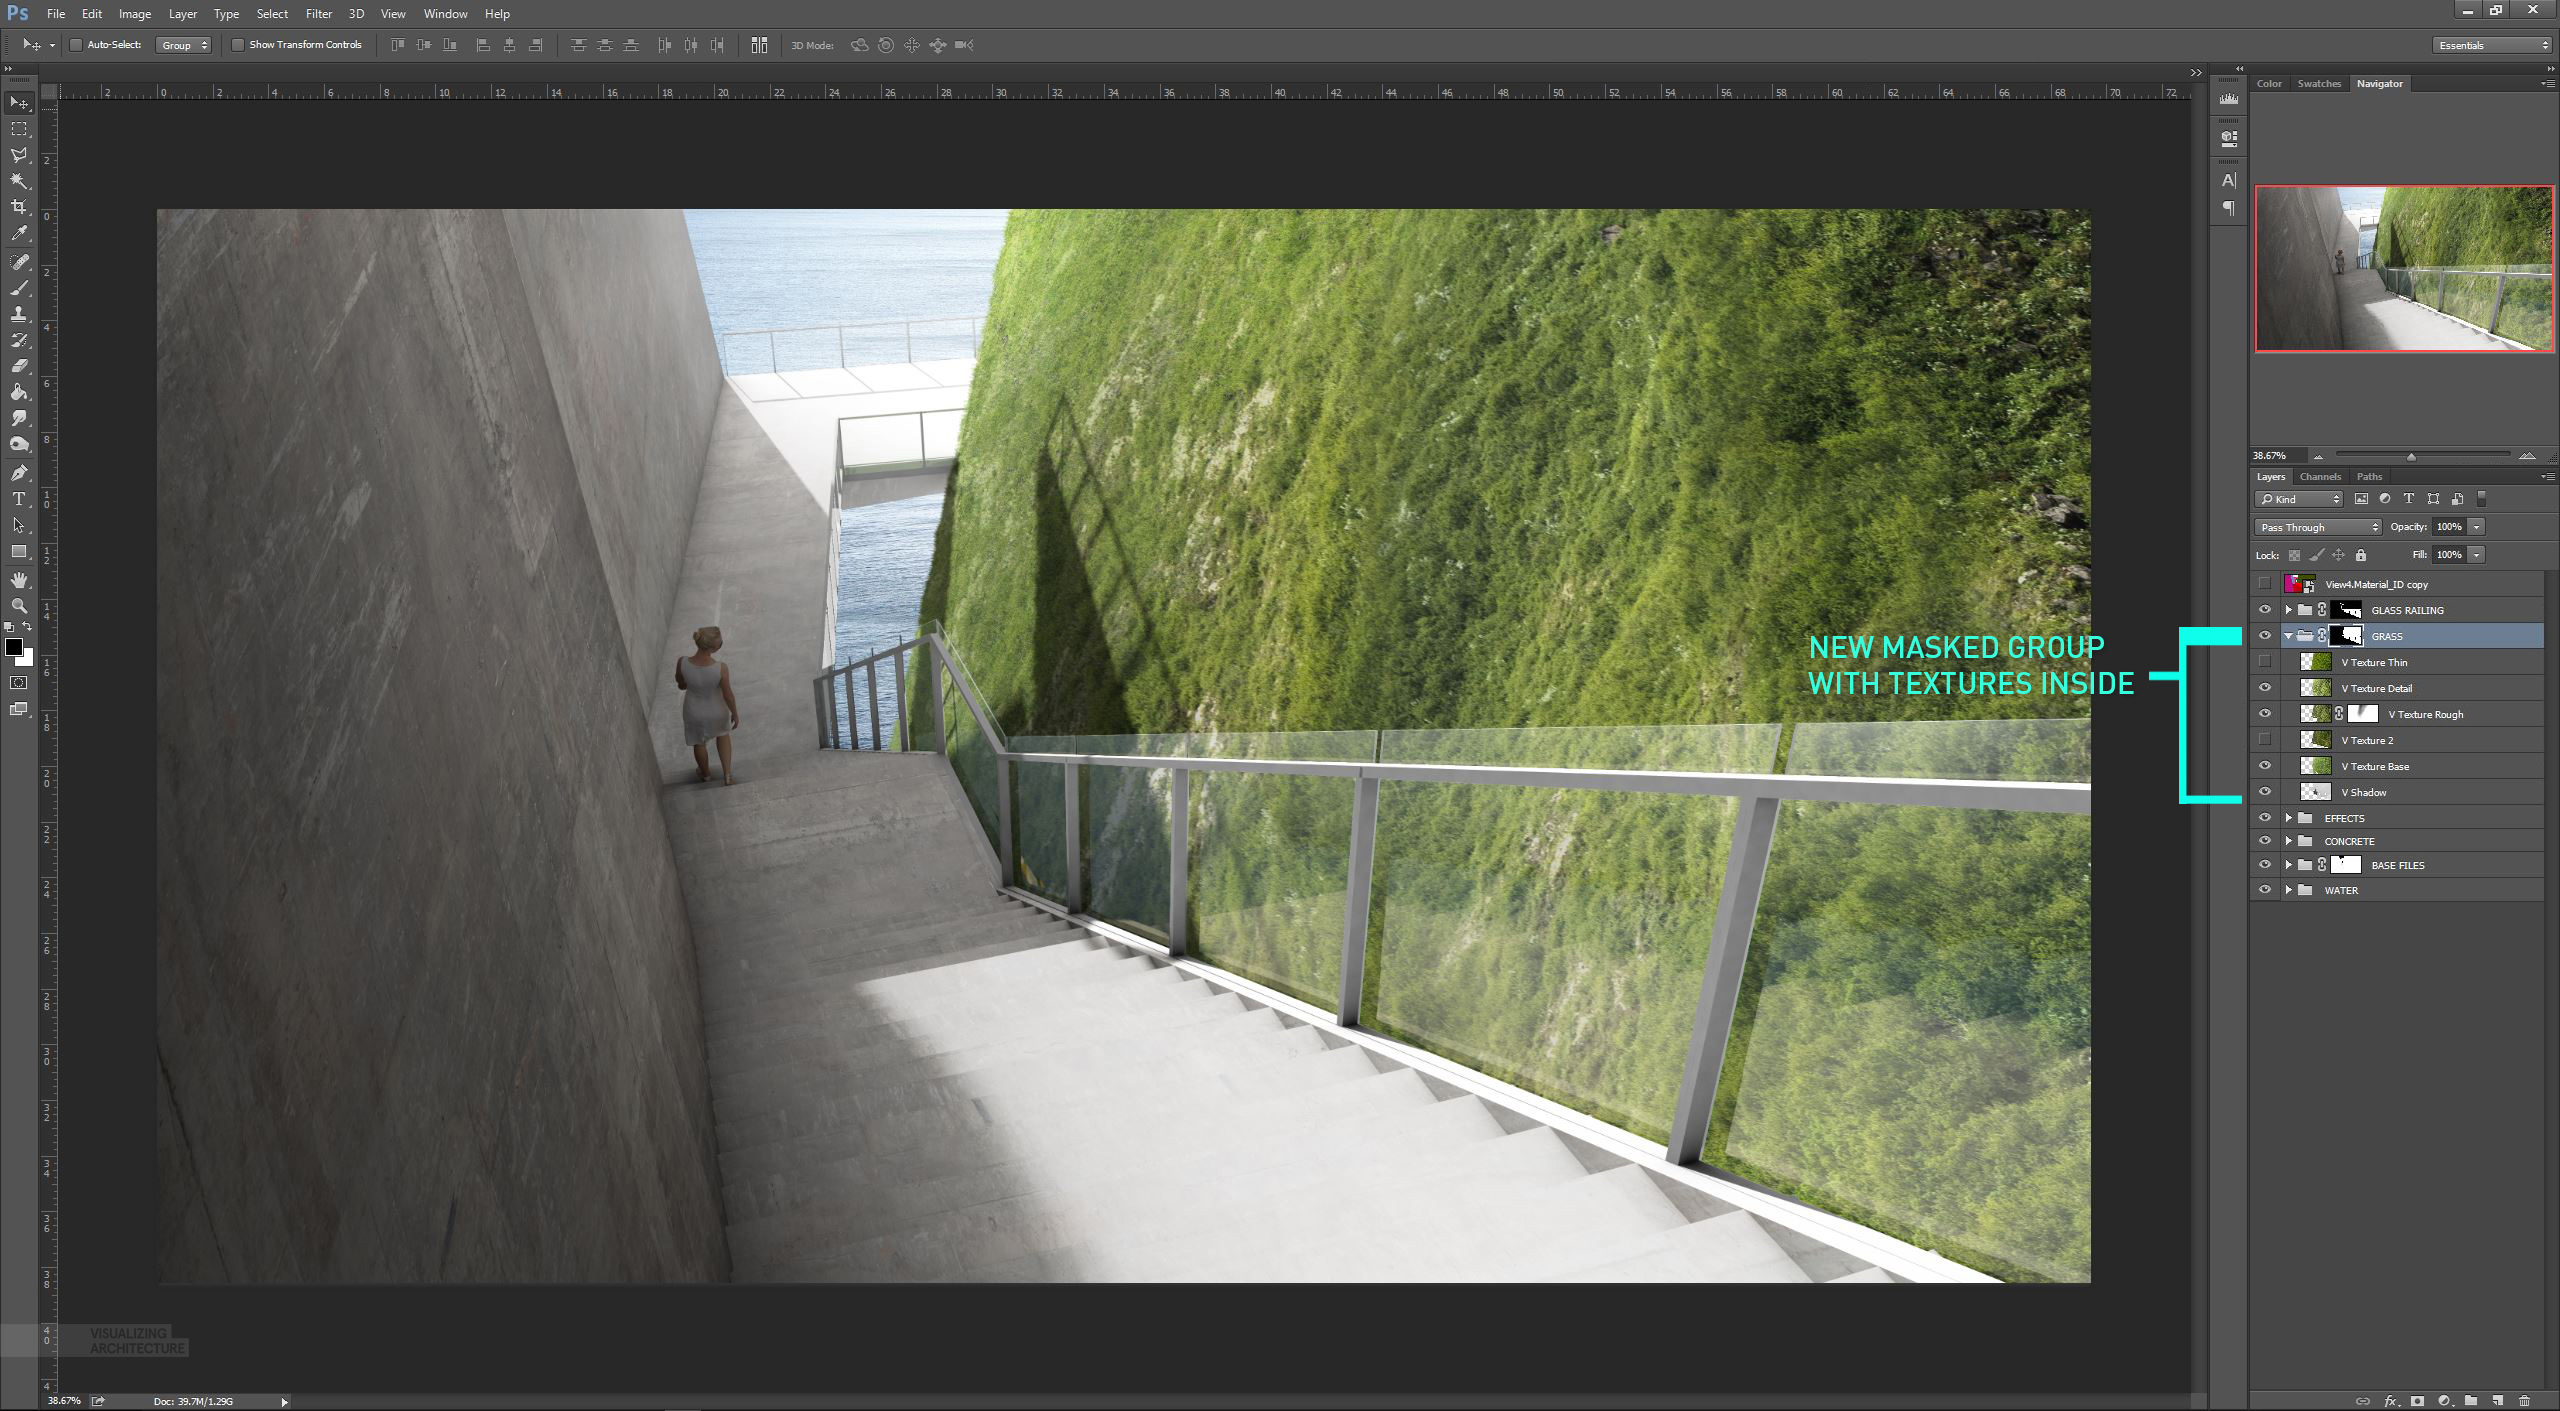
I could end this tutorial here since we have completed the task of using the Material ID to make a selection, but I want take it one step further and turn that selection into a mask on a group. This allows me to use one mask for many textures instead of applying the same mask to each individual layer. First, create a new group by clicking the “Create a New Group” icon at the bottom of the layers palette. With the selection from the material ID still active, select the “Create New Mask” icon at the bottom of the layers palette. This will apply a mask to the group just created. For more info using masks, check out this post: Hatch Patterns
I now can drag my grass textures into that group just created and not have to worry about masking each individual grass texture. This is especially useful if I make changes to the railing or wall, I don’t need to update all of the individual grass texture masks. Instead, I only need to update the group mask and all of my grass textures inside will be updated too.
By rendering out the Material ID with each new rendering, I can make selection fast and accurately. By applying masks to groups instead of each individual layer, I maintain a clean and organized Photoshop file with minimal masks. This workflow allows me to easily update my Photoshop files as I continue to design and refine my project.


This is a great example of a real office technique Alex. As I am sure you know, designs change until the building is built, and nothing is more frustrating than redoing work over and over especially if the workflow is the same. This is a good solution.
Thank your disinterested share.
Alex, could you explain how you were able to utilize the material ID of the glass railing to achieve the effect of the grass appearing behind it?
Hello,
I guess Alex made another selection from material ID (red color for glass). After that you could apply it to previously mentioned mask of a group with grey color (so that is just partly transparent) or you could use another group/layer with mask and add same grass texture- that would probably make it easier to keep reflections with blend modes.
Me once again 🙂
If you enlarge last image of this tutorial you can see that there was another group used called GLASS RAILING with glass (red from color id) mask, so i belive the second mentioned technique was used.
Best visualisation blog Alex, keep it up.
Ethan,
I created a new group with the a mask of the just the glass. I then used the reflection channel that V-Ray generated (similar to how it creates the material id channel) and lowered the opacity so that it was mostly transparent. I put this on top of the grass group. This also means that the Grass group mask extended down into the glass.
Hello Mr Hogrefe,
https://3dwarehouse.sketchup.com/model.html?id=u08104820-3066-4830-8240-fa5ff8ad84e2
Hey, thx for the tips, but I always confront a problem in this process. Actually after using MI and editing the colours of the desired surface, I always find a border around the surface not being edited, a very narrow one but still anoying. How can I fix this?
You can always adjust your selection… Menubar: select >Modify > Grow(Shrink). You can also make slight mods to the mask if you double click it. A tool palette should pop up giving you the option to refine the edge.
Hi, great tutorial ?? how can i make a blend material like yours in vray sketchup ?
完全免费,十万站长,互刷排名
http://www.loveuv.com/l/NDGBXQ
注册即送5000流量。
Alex,
Do you have a post discussing good computer specs for rendering and high memory files?
Thnx
Hi Alex
Great this will be very helpful for me.
益群网:逆向网赚,坐等收钱
【会员福利】
优势一:静态分红,免费签到就有钱,每日最高一百元
优势二:十级提成,逆向网赚,什么不干,照样有钱赚
优势三:营销软件,无限下载,每日增加,且永久更新
【自动下滑】
每人限定五个下线,多推荐的自动下滑到一级下线名下
从而成为推荐者的二级下线,以此类推,直到十级
不论这个下线是谁直接推荐的,你都有提成
你直接推荐的每个你提成5元,非直接推荐的每个你提成0.5元
总之,多干多赚,什么都不干也照样赚
【注册网址】
http://www.846387.36u.win/
Hi Alex, i wonder if the concrete wall on the left was render using Vray or you use photoshop to add a texturs….. if is the second case, are any chances that you explain a little more “how to do it”?
Great Work but the way! big fan here hehe
hey alex ! once again, great tutorial ! thanks alot for sharing 🙂 ! I know you already upload couples videos on youtube and you should upload all these on your blog, that would be awesome 🙂 !
Hi Alex, thanks for this walkthrough. Are you aware if it’s possible for transparent materials to be excluded from the material ID channel render ? Say I have a a texture with transparency and want to optimize selection behind transparent surfaces ?
Thanks
Alex thanks so much. I tried doing the same thing you did in this tutorial.but I was not able to adjust the grass so it cover under the glass railings..nothing to click and drag. Pls what do I do. Tnx