I received a lot of emails asking if I could explain how I created the pedestrian paths diagram in the previous post. To generate the line work, there are many ways this could be done. In the past, I probably would have used the spline tool in CAD. The line work could also easily be created in Illustrator. However, not many people know about or use the pen tool in Photoshop. It’s similar to the pen tool in Illustrator but with some minor differences. In this case, I will be using the pen tool to create a path that I can tell the brush tool to follow.
1. Setup the Brush settings
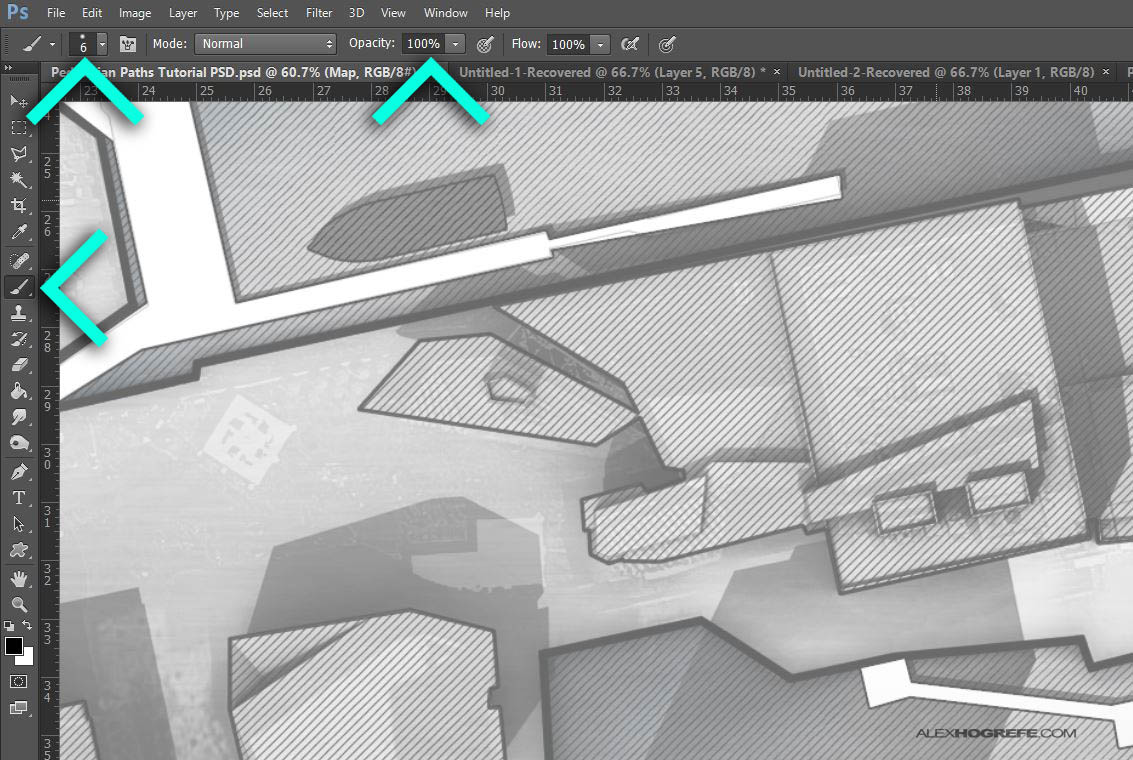
I need to first set the brush settings because this is what I am going to use to add a stroke to the path created in the next step. The settings in this step will determine the thickness of the line as well as the color, hardness, and opacity. I chose a hard brush, 6 pixels big, at 100% opacity, and with black paint. You may need to draw a few lines to determine if you have the correct size.
2. Setup the pen tool and begin creating paths
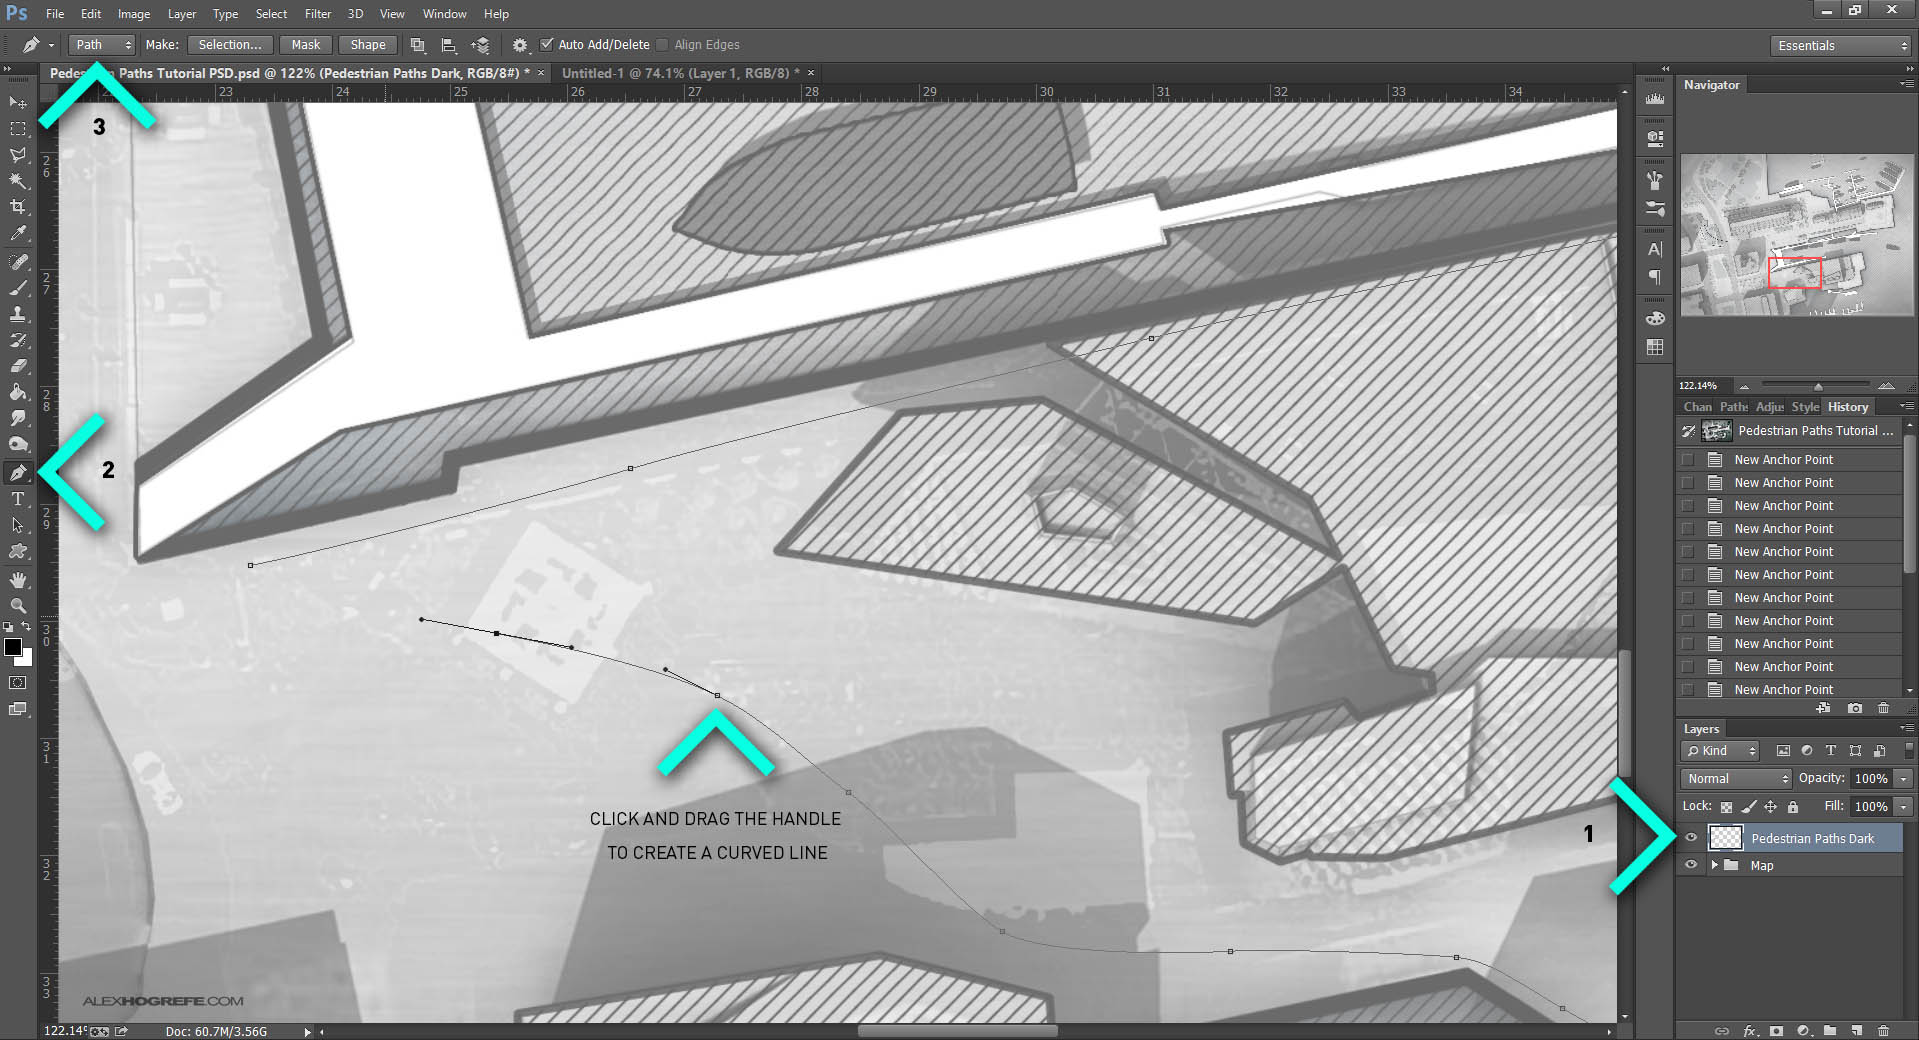
Before choosing the pen tool, first create a new layer. The paths will not show up in the layers palette but the stroke that is applied to the paths will be drawn on this layer. Now, choose the pen tool and be sure the “Path” option is selected in the pen tool settings tool bar at the top.
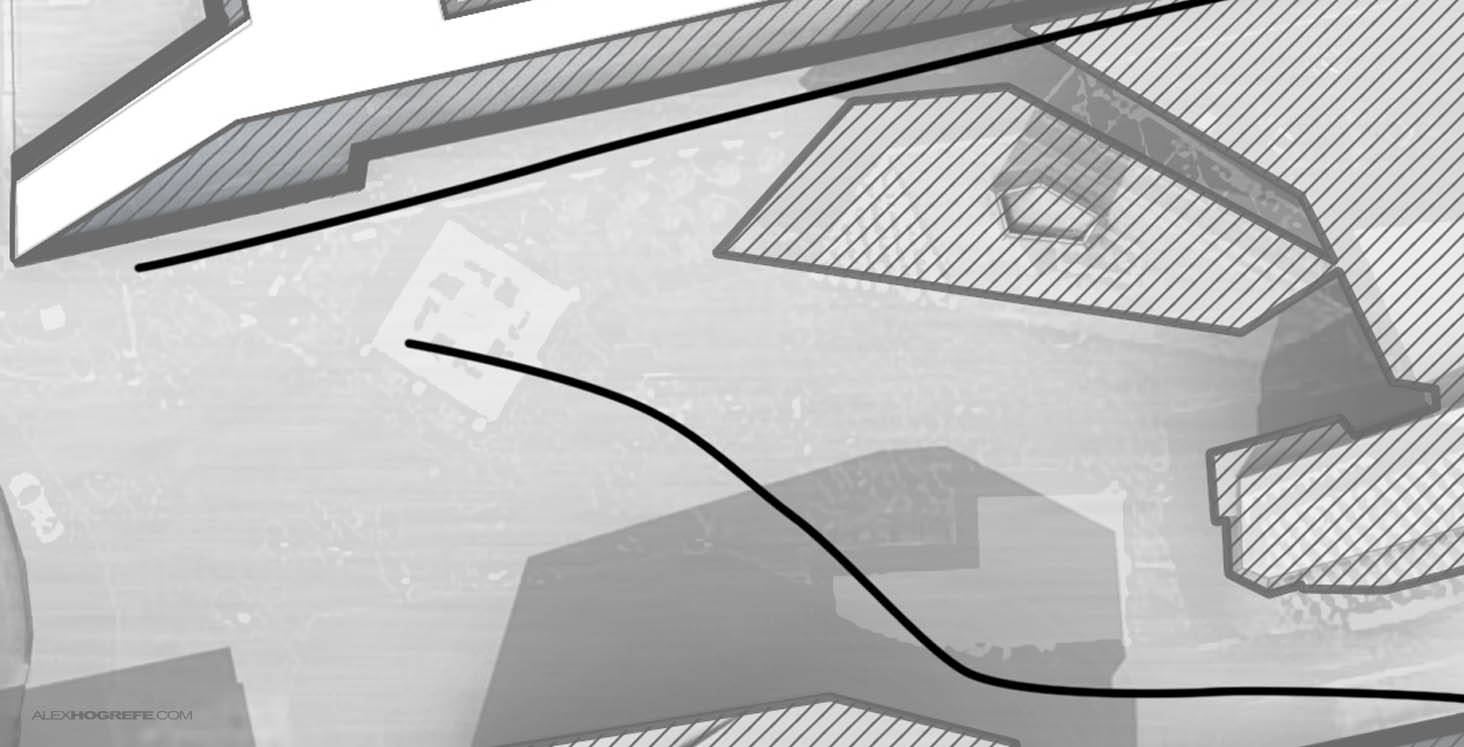
With the pen tool activated, begin drawing the paths. To create the curved paths, click and drag when choosing the points on the path. This will create handles that can be used to control the size and shape of the curve at that point.
3. Stroke Path
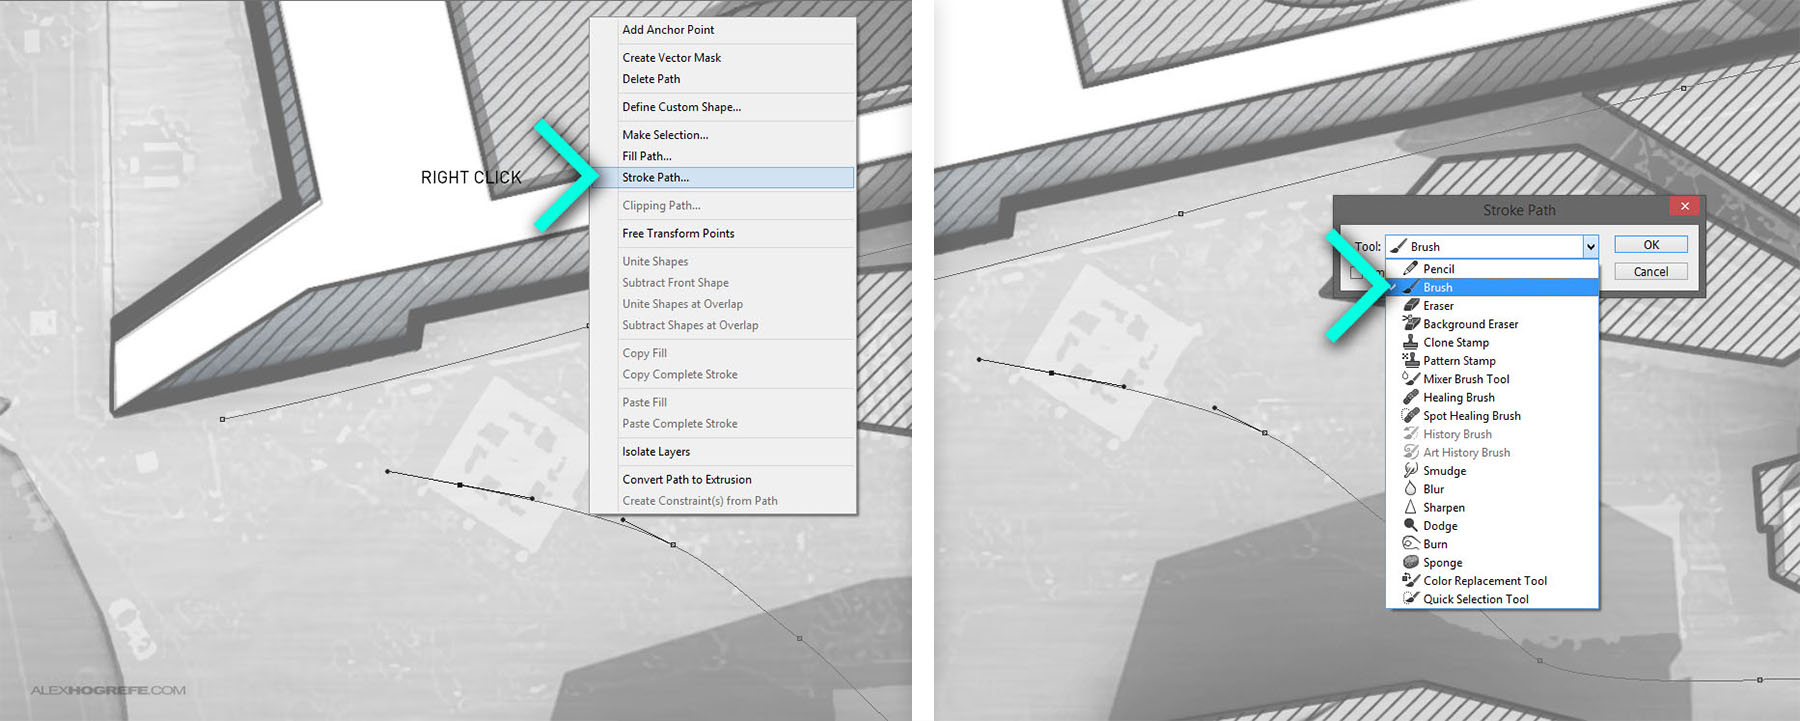
Once you get the path where you want it, right click near the path and choose “Stroke Path”. If this option is grayed out, double check that you have the new layer selected that was created in the previous step.
A second dialogue box will appear asking what tool to use for the stroke. We want the “Brush” tool since this is what we set up in the first step. Then choose “OK”.
To finish the path, hit the enter. Repeat these steps to create each path.
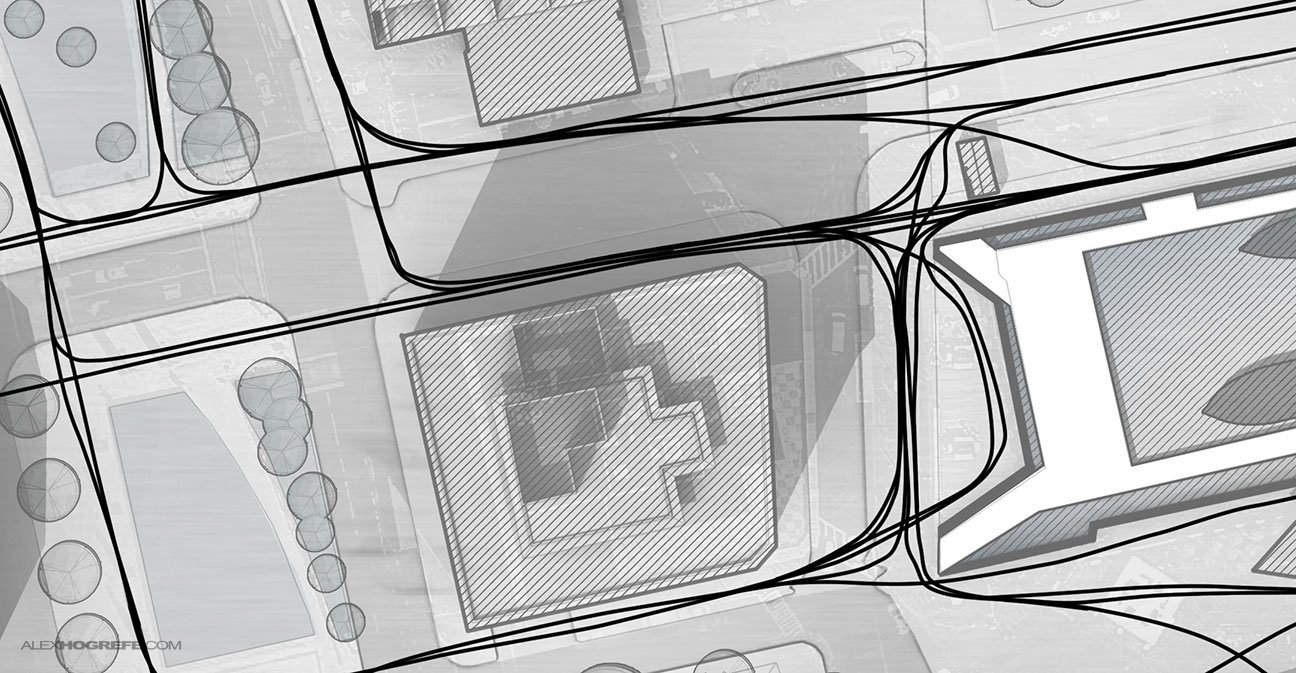
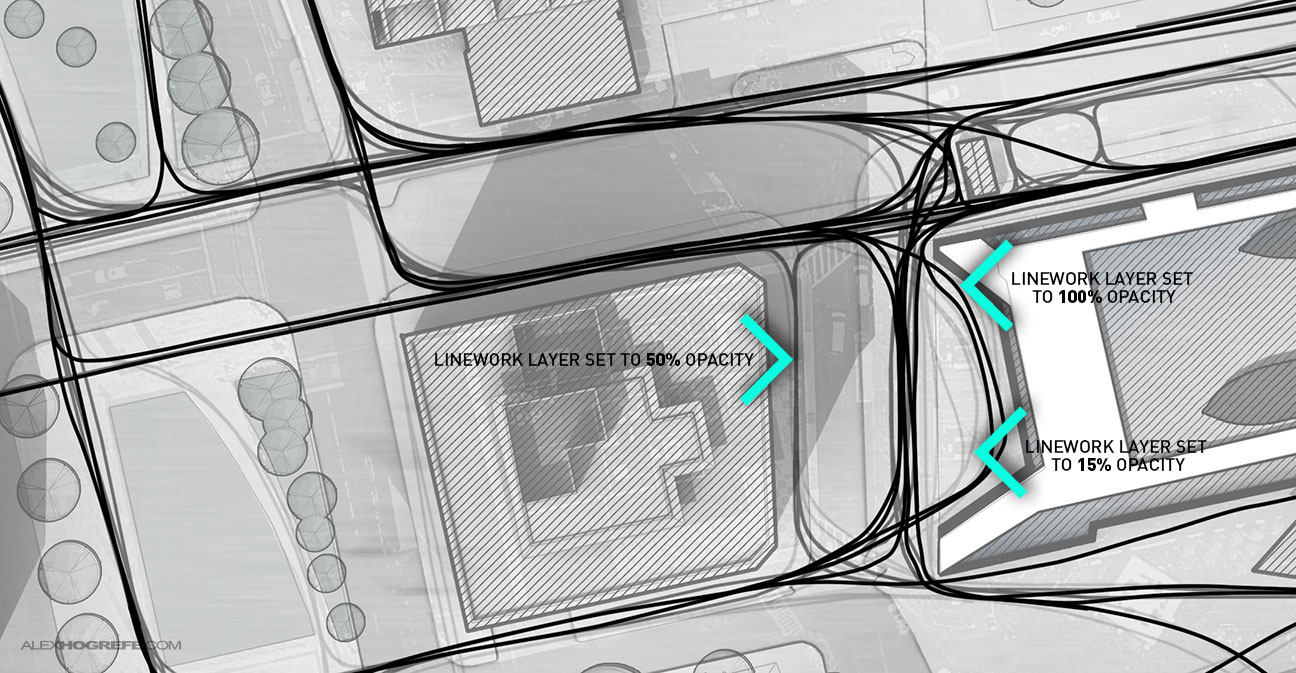
4. Generate many paths at different levels of opacities
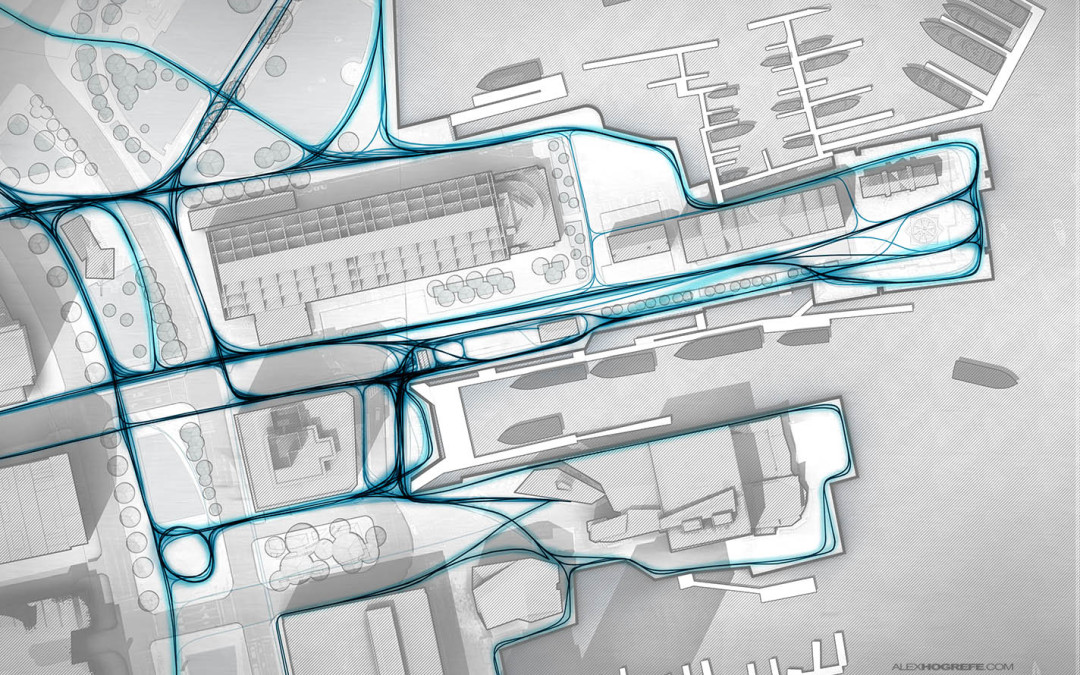
I want to create a hierarchy of paths revealing different levels of traffic intensity. This is shown through both a density of lines and levels of opacity. For this image, I created three different path layers. The first layer was set to 100% opacity, the second to 50%, and the third to 15%.
5. Add line work glow
I want the line work to have more of a presence in the illustration, so a slight glow will be added. This is done simply with the brush tool. I used a soft brush, 90 pixels big, and set the opacity to 12%. Where the lines are dense or converge together, I layered in some black paint.
I also duplicated the dark paths layer and applied a Gaussian Blur filter.
I removed the background so that this step could be seen a little more clearly.

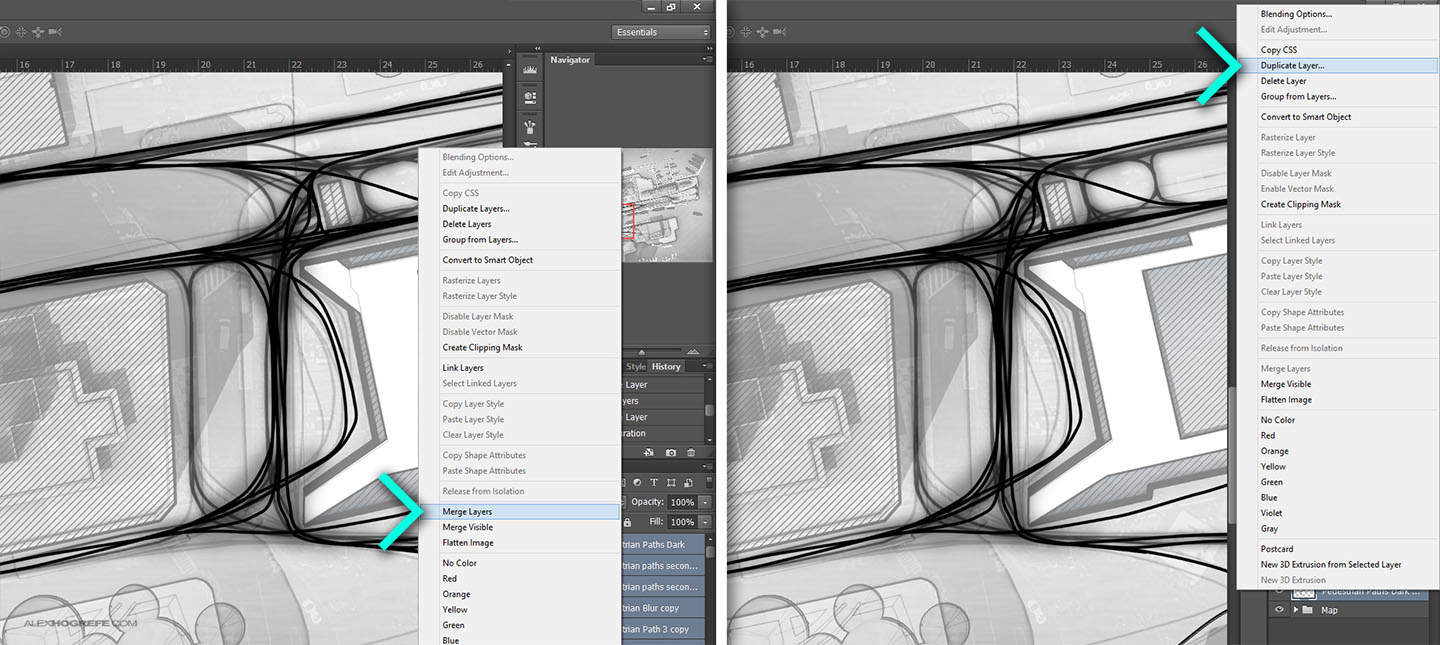
6. Add Color
To further punch up the paths, I’m going to add color. To make things easier, first merge all of the path layers together. It may be best to first duplicate these layers and turn off visibility so that you will still have the original individual layers available to edit if needed later on down the road. To merge, select all of the path layers, right-click on one of the layers, and choose “Merge Layers”.
Once the layers are merged, right-click on the new single layer and choose “Duplicate Layer”.
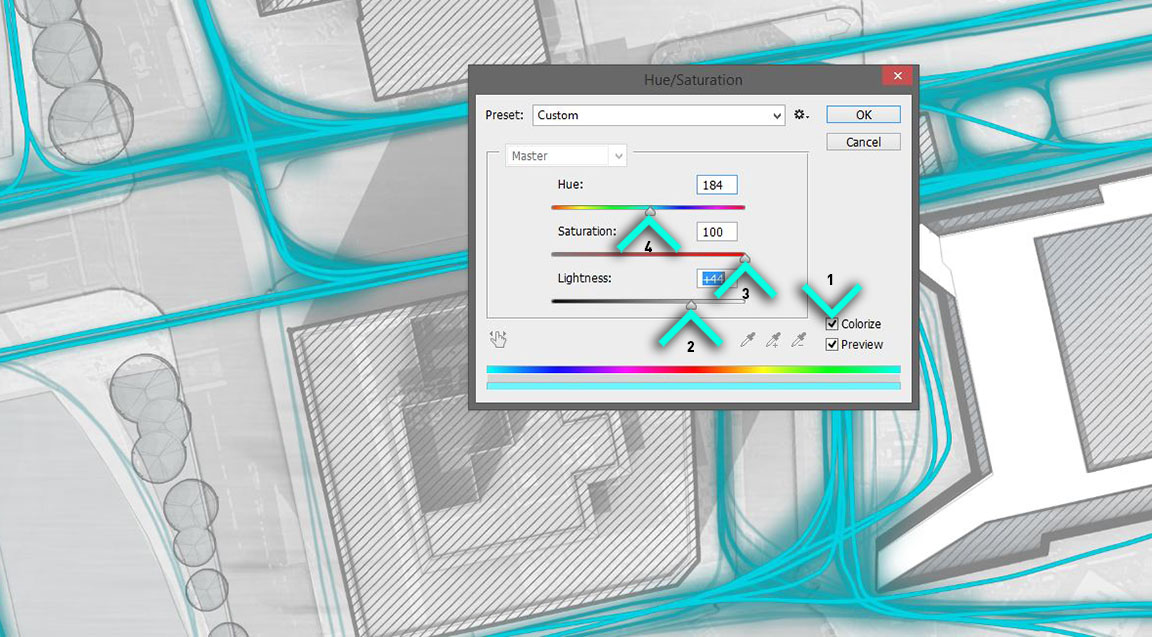
With the duplicated layer selected, choose “Image>Adjustments>Hue Saturation” at the top. In the dialogue box, first check the “Colorize” box. Then move the “Lightness” slider to the right to ligten the line work. Also move the “Saturation” slider to the right to increase the color. Finally, adjust the “Hue” slider to the color tone you prefer.
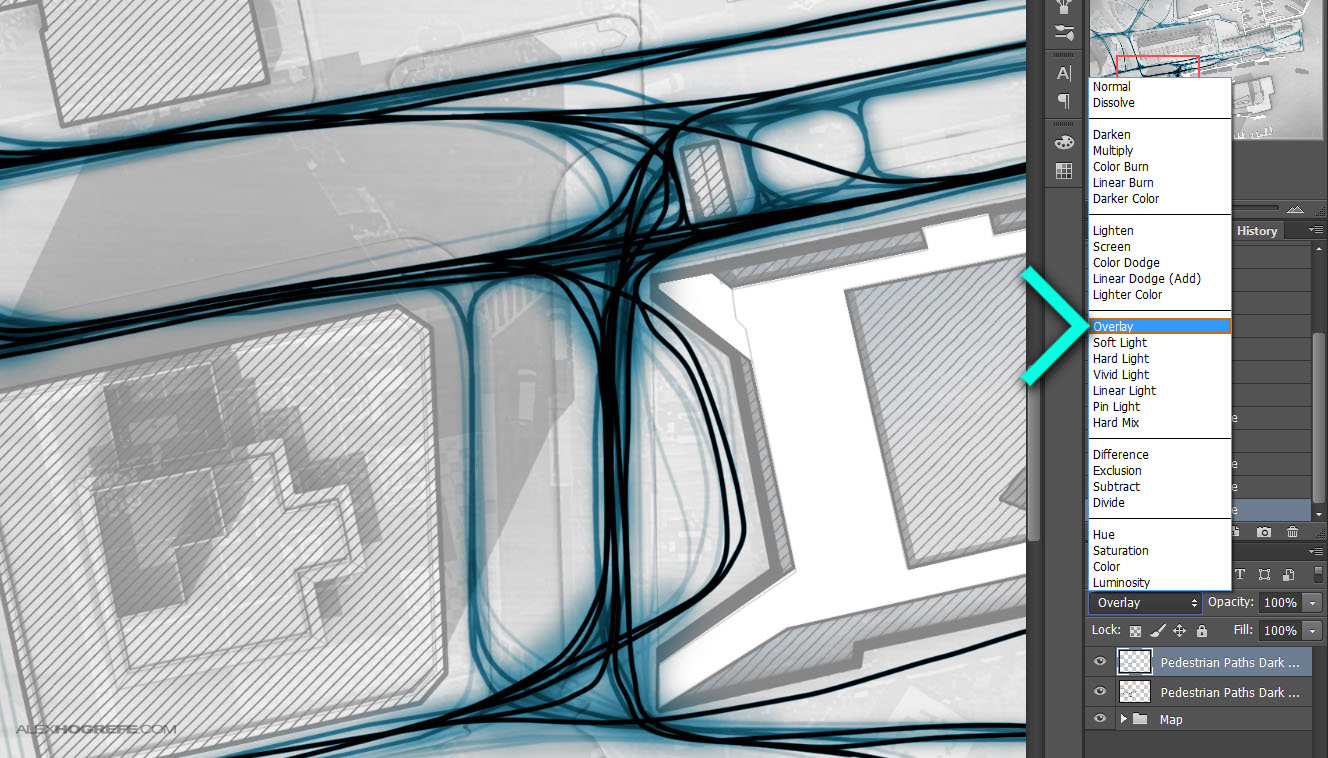
7. Set Layer to Overlay
Finally, set the blend mode of the colorized layer to “Overlay”. This will help blend the color into the image and let the darker line work underneath show through.
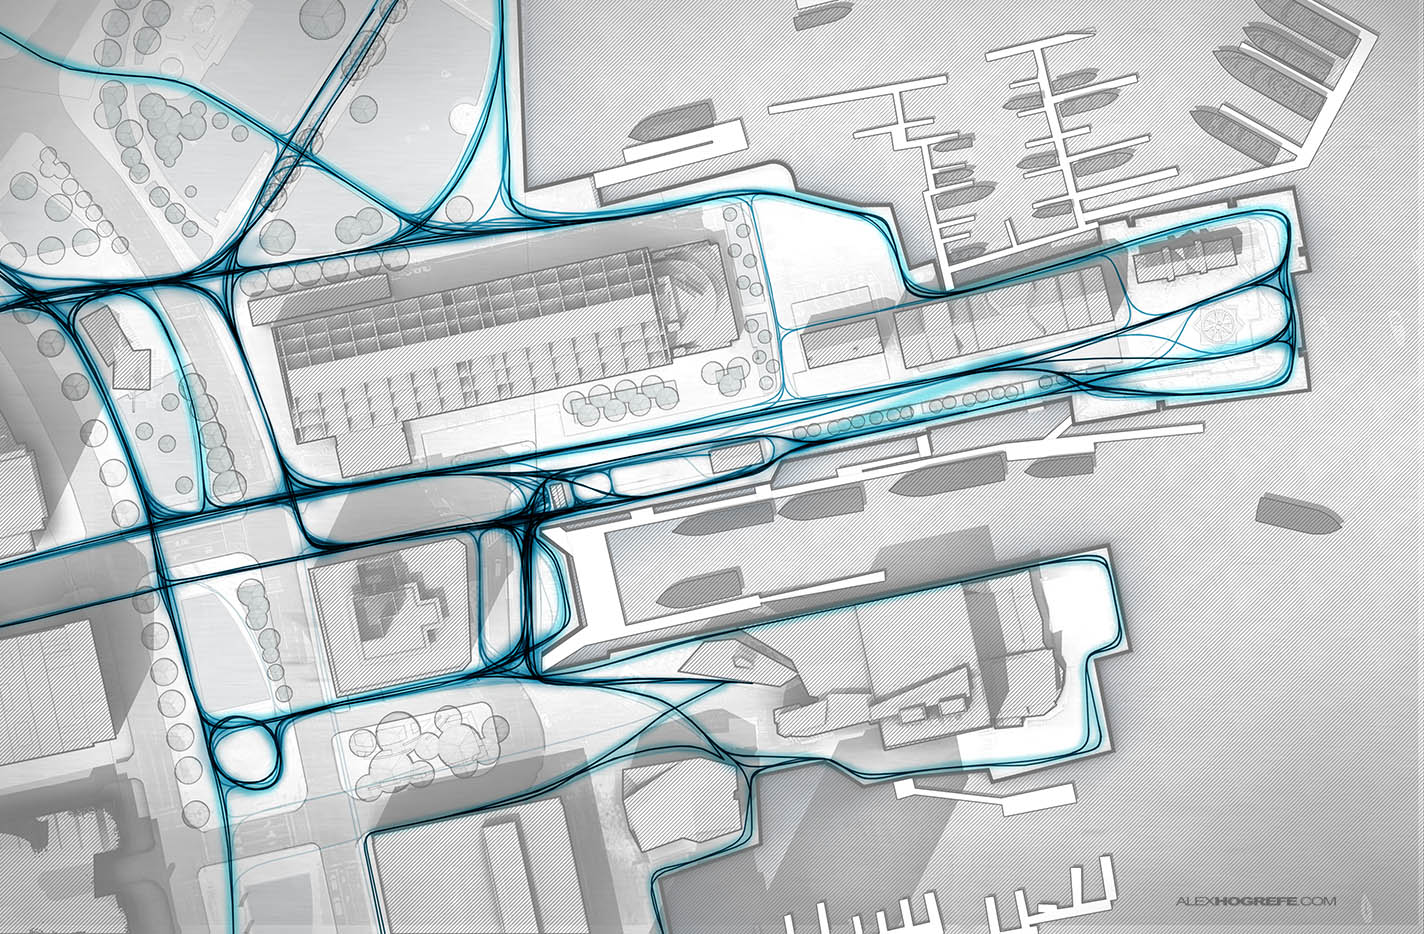
The final result is a series of smooth curvy lines created without the need to jump into another program such as Illustrator or CAD.


Your dedication to teaching people your methods is astounding. I salute you for your amazing efforts to keeping this blog going!
Thank you for this. I am one of those who emailed you about this, and it is much appreciated.
Thank you for the tutorial Alex! this will be of great help. I've only ever used the pen tool in illustrator before but never in Photoshop, so I'm definitely going to give it a go. Great work Alex, looking forward to seeing more of what you have in mind.
The timing of this post is spot-on. Got a studio review coming up and this is exactly what I'm working on!
Thank you so much for your time and dedication to make this blog such a key tool to enter the study of architecture!
Dude, I love your work. keep it up it is much appreciated. God bless!
Ti seguo da circa 2 anni dall'Italia e ti volevo ringraziare per quanto mi hai insegnato con i tuoi tutorial.
Grazie a te ho imparato facilmente, e velocemente, tecniche di disegno che mai avrei immaginato di riuscire a conoscere.
Ti ringrazio di cuore della gratuità con cui metti a disposizione di tutti noi quanto conosci.
Muy buen tutorial y muy bien explicado, gracias por tu esfuerzo.
is the base image an export from sketchup? did u render the plan in kerykthea Alex?
i really appreciate who recommended this website to me!!
ur really so brilliant and ur work is really amazing me!!hope this blog can be better!
dont stop what you are doing, the help i get from this web site is unmatched by any other
Thank you very much! You helped me very much on my school works.
Which program did you use for the plan? (before you did the pedestrian paths)
Thanks bro may God bless you more.thanks for the knowledge
thnx for all your tutorial man! I never liked making renders/impressions until now!
your really smart with amazing work.. thank you for this perfect explanation.. i am learning a lot from you. 🙂
all respect
you are really smart with amazing work.. thank you for this perfect explanation.. i am learning a lot from you. 🙂
all respect
I am a big fan of yours and I loooove your work
thank you very much for everything
I love you
I know people who know you all over Germany. Architecture students in particular.
Me and my friends learnd more from u than from any other lesson in university or youtube 😉 !
Stay tuned! Please!
Great!! Hi from Brazil.
I am an architecture student and your website is by far one of the most useful things I have come across. I thank you for all the hard work you are doing to help us out, you are an inspiration!
Thank you so much for your amazingly simple yet in depth tutorials! And it was great to be able to hear you speak at my alma mater not too long ago… the University formerly known as Philadelphia…
My question is: in a series of diagrams such as this, how do you arrive at the data in order to portray true to life traffic demands and patterns?
Hey Alex, first things first, amazing job done here.
Can you do a tutorial for site analysis diagrams on an aerial image taken from google earth as the base map?
How would you treat the image so that it doesnt look like its a google earth image?
It would be really helpful! THANKS!