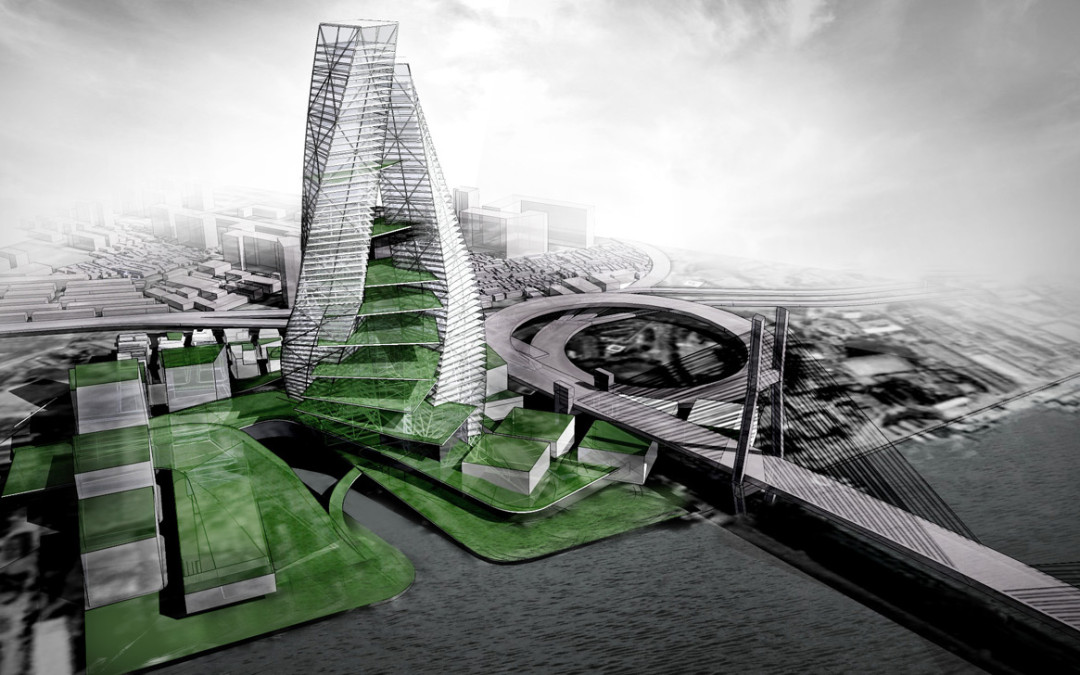
This tutorial will create a daytime rendering by exporting images from Sketchup to Photoshop. This means no external rendering programs are needed. This rendering is not meant to be realistic, but instead, provide an option for quick artistic renderings without the “Sketchup” look.
VIDEO
STEP-BY-STEP TUTORIAL
NOTE: I have inserted a Google Earth map image on the ground plane. This adds a little more interest and texture to the final rendering.
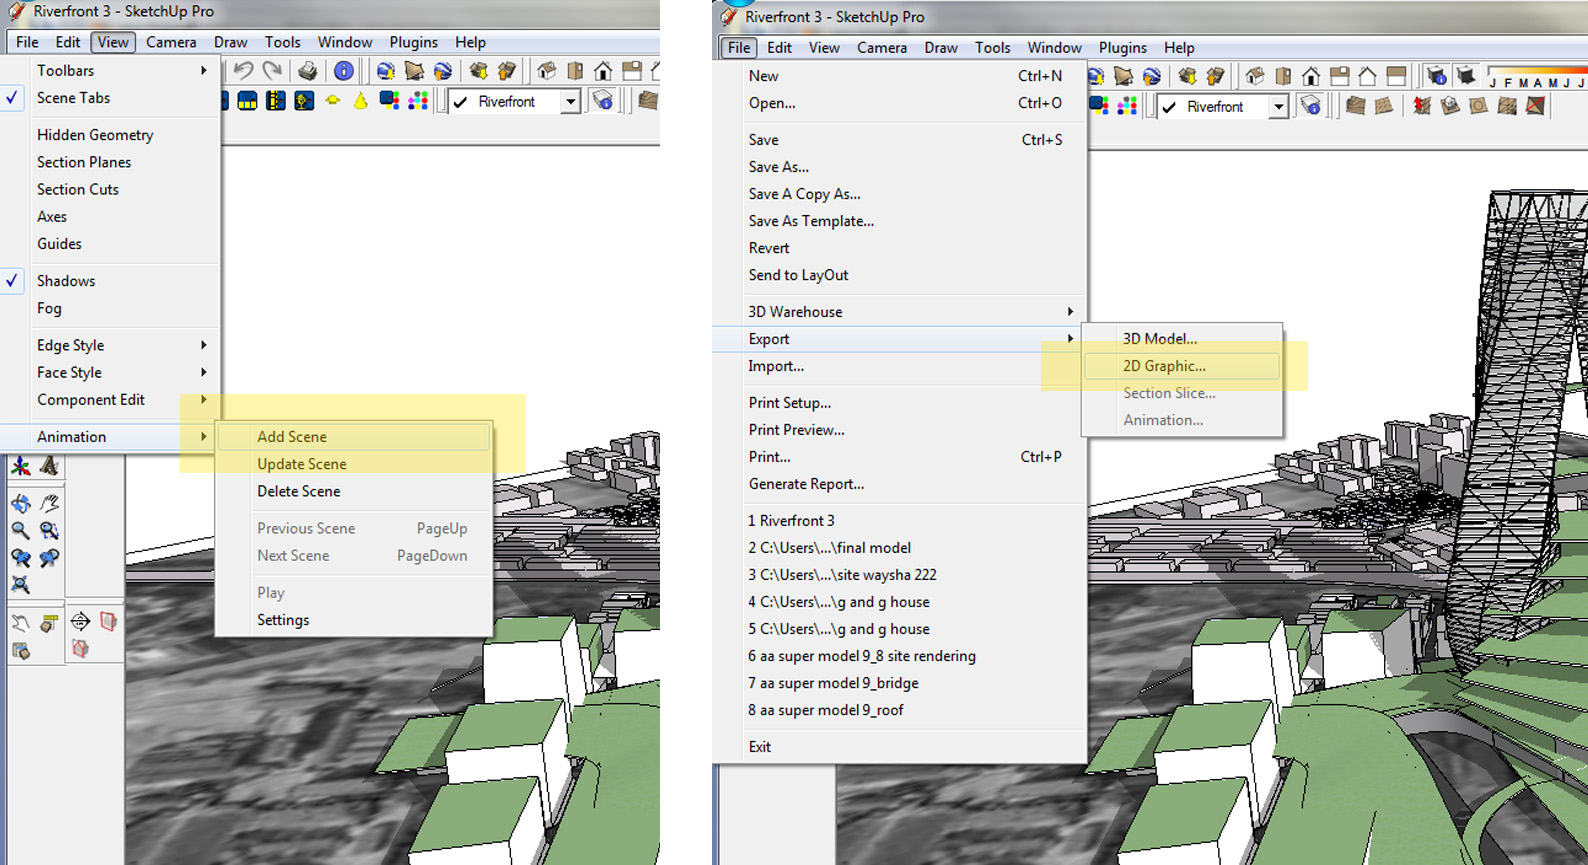
1: First, a view should be saved because multiple images will be exported and overlayed in Photoshop. Accidentally moving the view will make it almost impossible to get the images to line up later. This can be done by going to View>animation>add scene
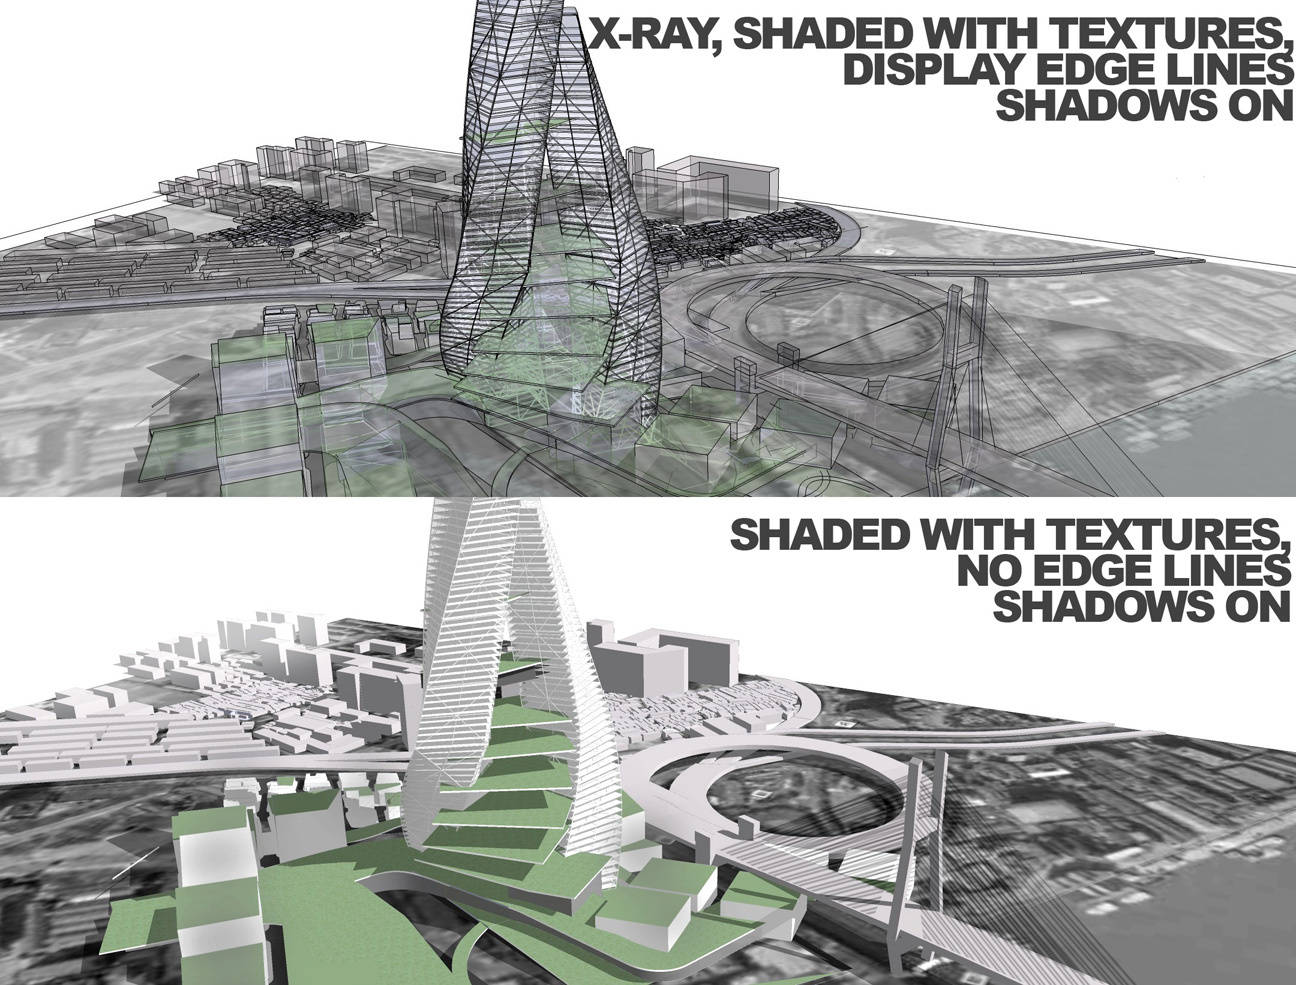
2. Export two images from Sketchup with the following settings:
FACE STYLE: Shaded with textures, EDGE STYLE: no edge lines, shadows on
FACE STYLE: X-ray and Shaded with textures, EDGE STYLE: edge lines on, shadows on
3. Open the first image- Shaded with texture, no edge lines- in Photoshop
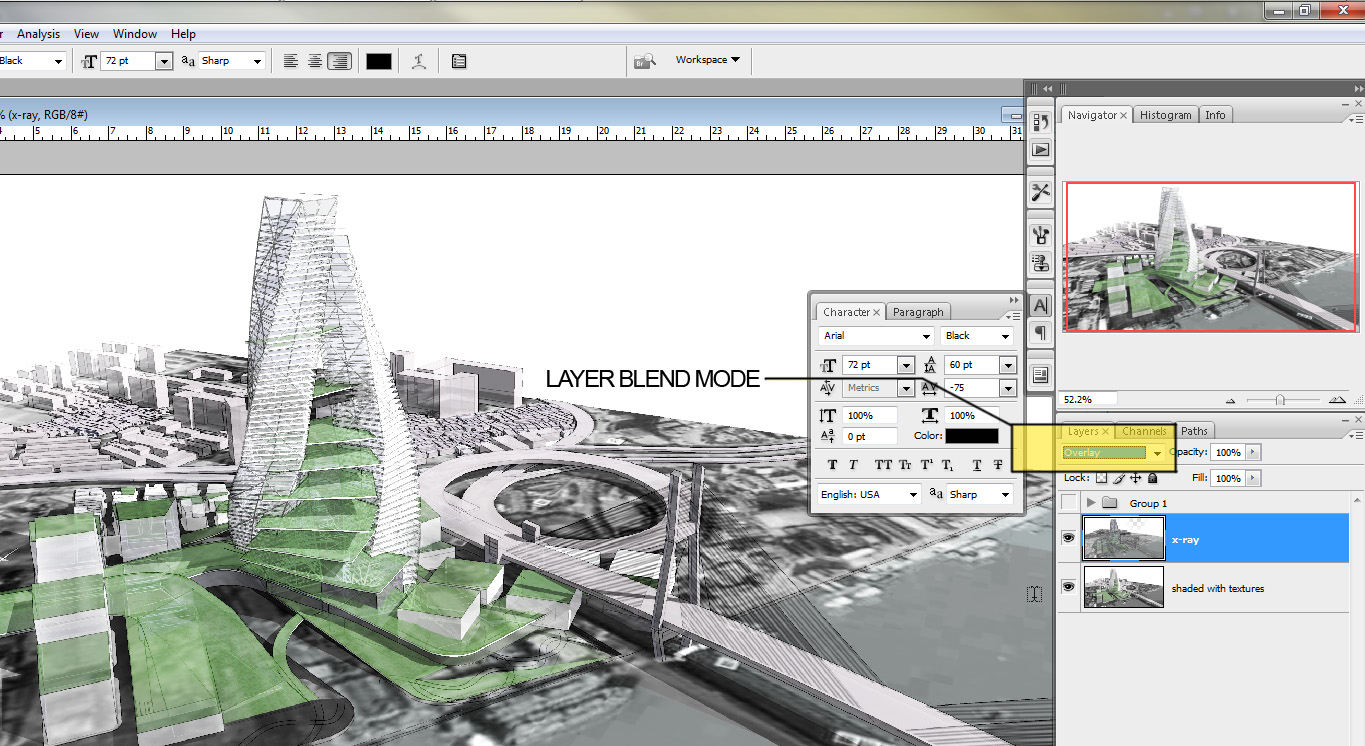
Open the second image-X-ray with edge lines- on a new layer above the first image in the same document. Be sure the images line up over each other exactly.
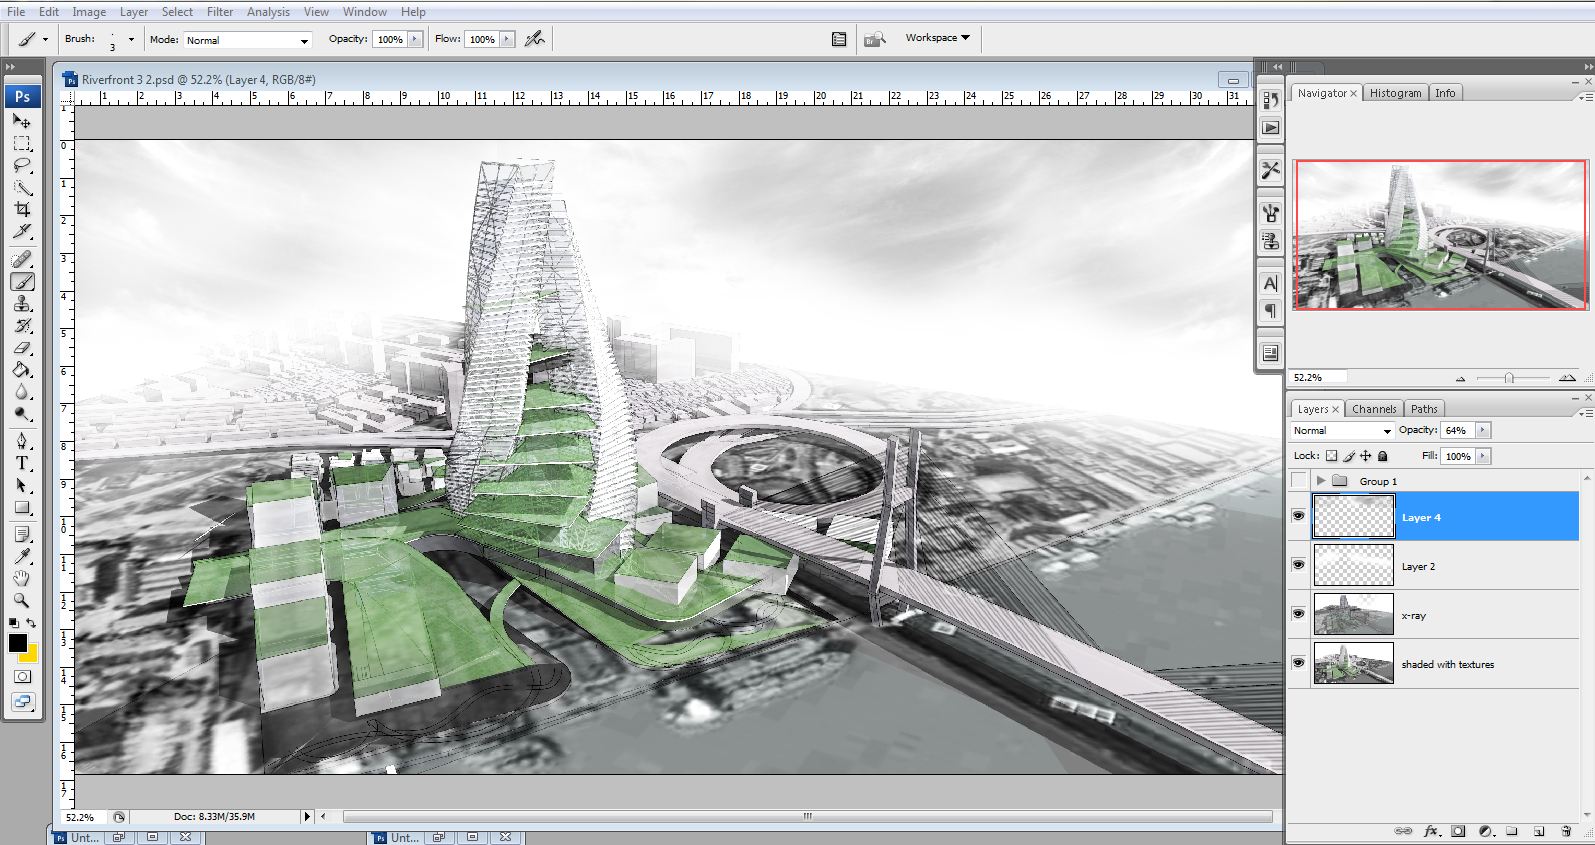
Next, set the blend mode of the x-ray layer (the top layer) to overlay. Blending modes are found in a drop-down menu in the top left corner of the layers palette. The composition should look similar to the image below:
4. Create a new layer and move it to the top.
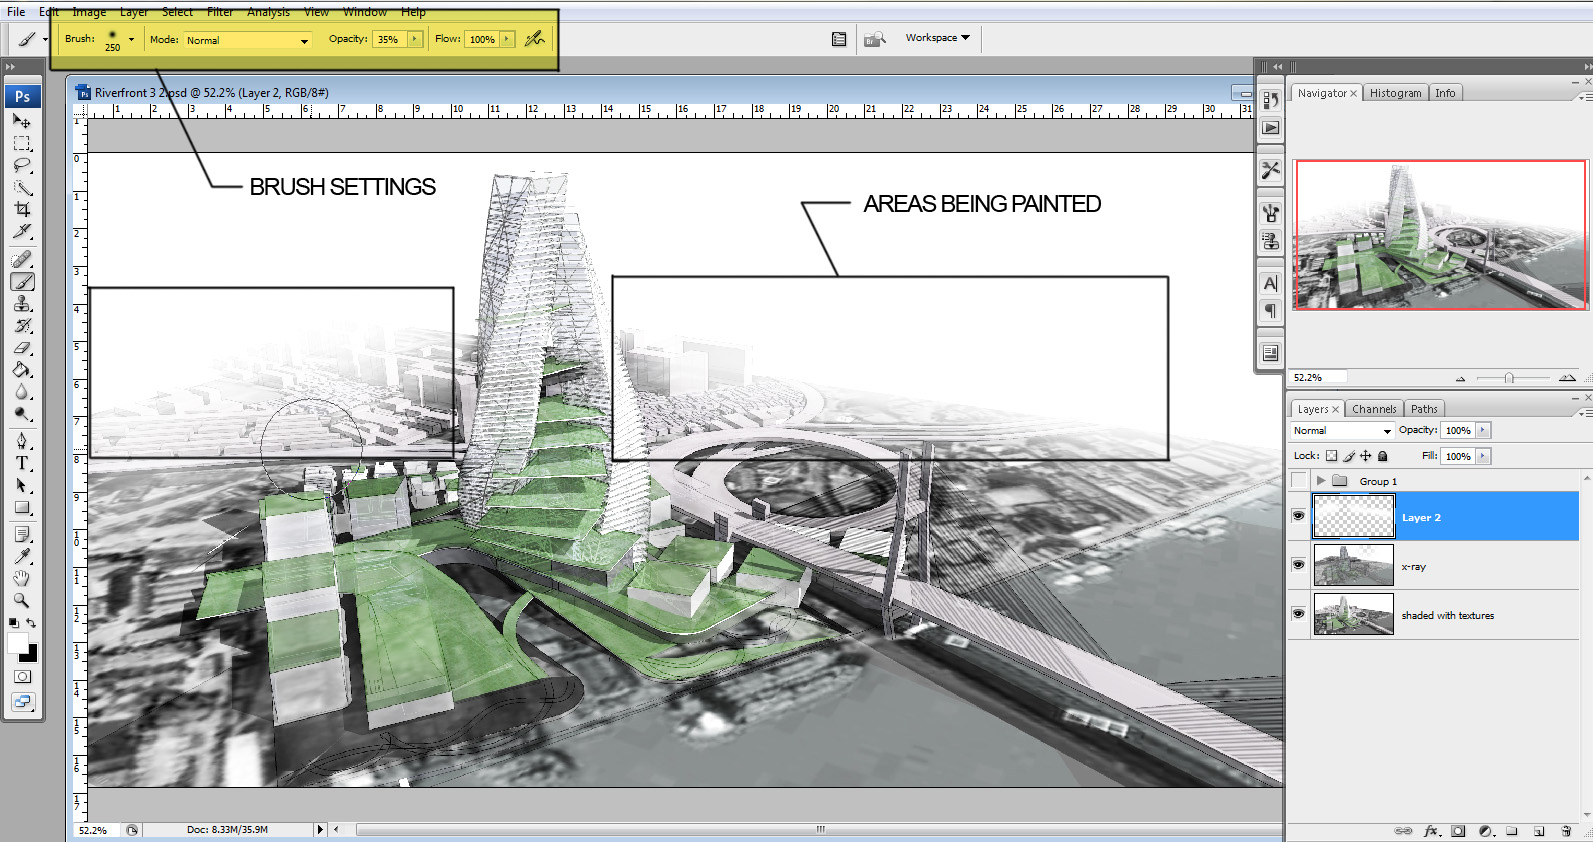
This layer will be used to create the illusion of fog in the distance and also to hide the edge of the Google map.
Select the paint brush tool and use the following settings: soft brush size 250, opacity set to 35%
Slowly paint the background so that the edge of the Google map and model disappears.
(NOTE: to avoid painting areas you don’t want, use the polygonal lasso too to select areas to only be painted)
5. Next, a new layer is created and a sky inserted. As the clouds get closer to the horizon, I erased them more as well as around the building
In this rendering, I really toned down the sky by desaturating it and lowering the opacity. I don’t want to draw attention away from the building by using bright colors and well-defined clouds.
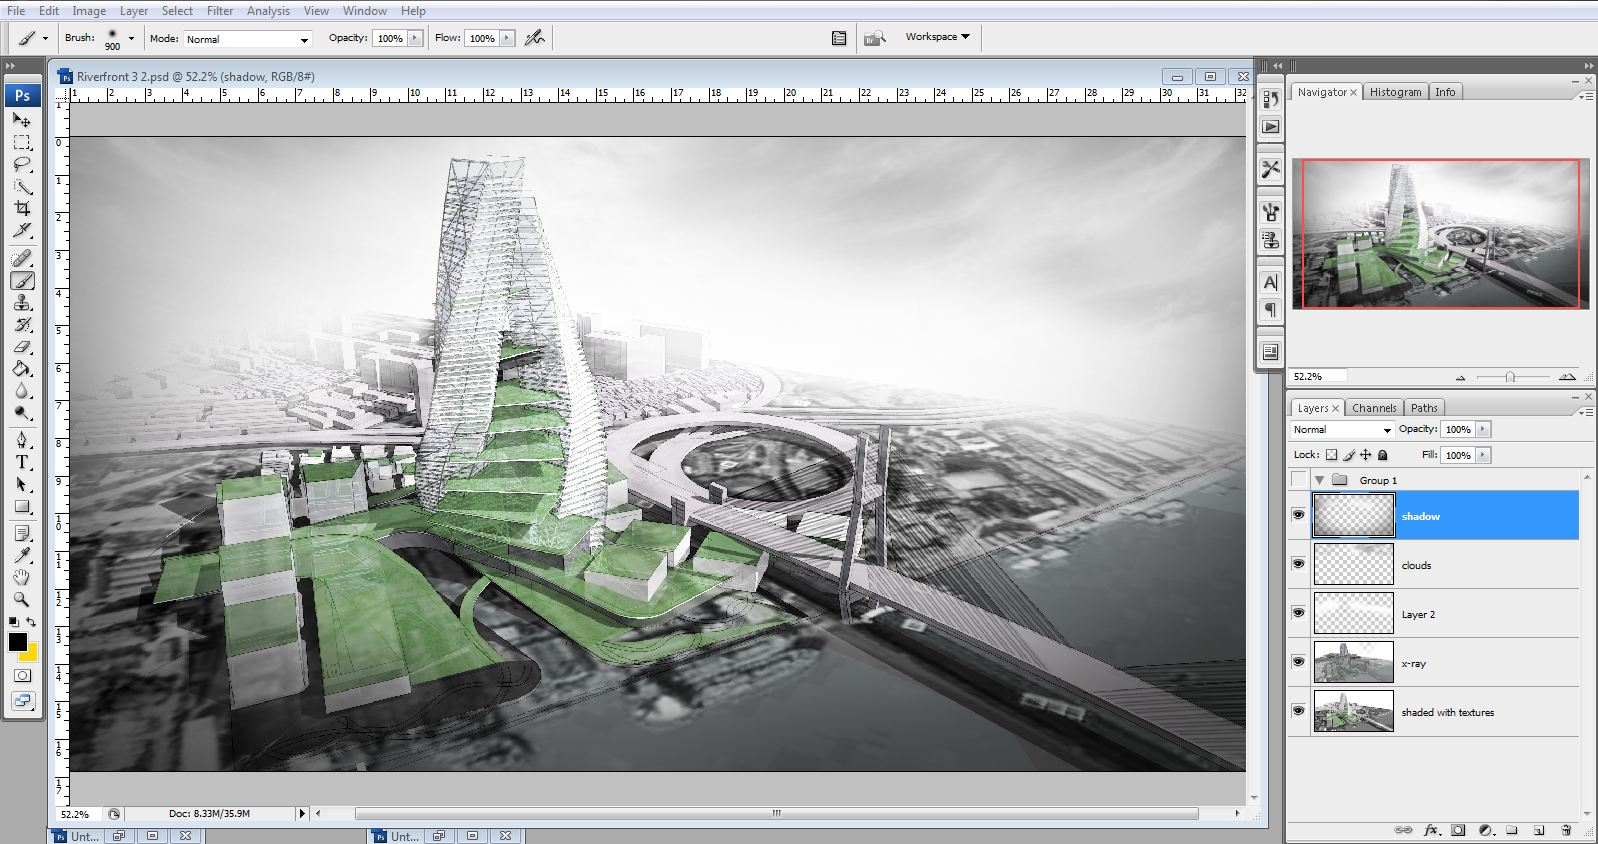
6. Create one more layer and move it again to the top.
Select the paint brush tool and use similar settings as: soft brush size 1000, opacity set to 35%
With the color set to black, paint around the edge of the rendering until you get a similar effect as the image below. Because it is on a different layer, you can play with the opacity to get the right amount of shadow. I typically apply this step to many of my renderings. It makes the rendering a little more dramatic and draws the focus to the building.
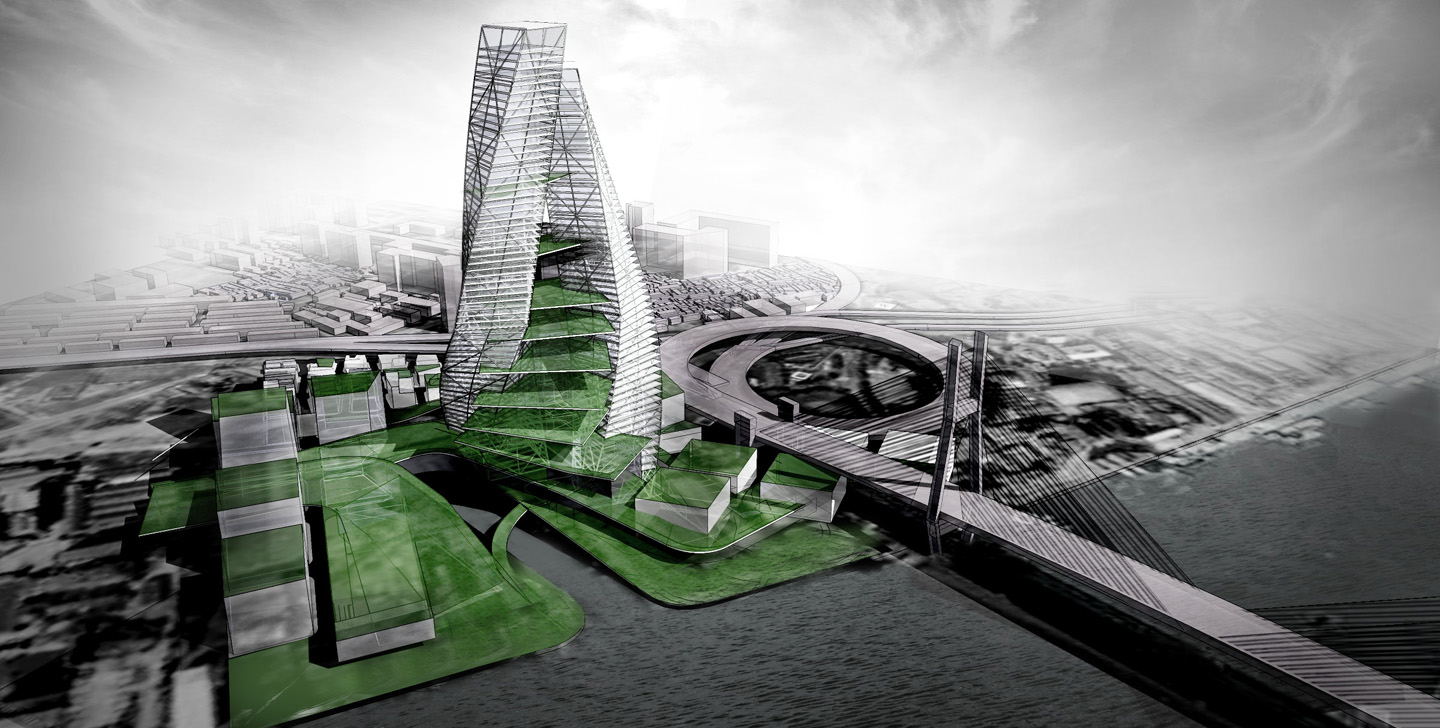
In the final image, you will notice I Photoshopped an image of water into the river and adjusted a few other areas which is more rendering specific. What I like about this rendering is that it is very quick to produce, but also that it has more of an artistic look to it compared to the traditional Sketchup look, with out using complicated external rendering programs


you are master of programs man!! bravo! and thanx.. it helped..
hey alex,
Im trying to follow your steps to render in psd.. now I created the model in rhino+gh.. but when i imported to skp as a cad file. it comes as if it was in wireframe view.. and when i export as 3ds. there come many lines across the model. any tips..??
thanks
Juan,
exporting as a 3ds file has worked best for me. Anytime you export from a NURBS model in Rhino to a mesh model in Sketchup, the surfaces will be triangulated creating all the lines you see. There is a way to clear that up. In Sketchup, you can select the surfaces that have the lines you want to get rid of, right click and choose "soften/smooth edges" and play with the settings until the surface is cleared up.
Hey Alex,
Thanks for your response, I noticed you used Rhino+GH as well as Ecotec Analysis. Not sure if you are aware of this yet..
http://utos.blogspot.com/
It a link between Gh and Ecotect
Wow!!! Really nice works! Been searching for so long for this kind of tutorials, and wow! This is really good stuff! I am tired of rendering all of my perspectives using rendering software alone and find this really refreshing since it does look more like an art rather than technicalities. Its fits our styles as artists.
Good job man!
you can share model for me?
thank you
congdanngoan@gmail.com
amazing. again.
you can share model for me?
thank you
nhathieu243kt@yahoo.com
AMAZING…
THANKS FOR YOUR TIME..
Sorry to bother you, this question was already ask but could you send me the model please
Gosh i wish i can be ur student!! :))
Alex, so did you just transfer this from rhino to sketchup (if so… best method?)? Is this what you normally do? I'm curious what your preferred work flow is. I love your graphics and website, thank you so much!
Yeah, the model was saved as a 3ds. file from rhino. Then imported into sketchup. It will come in triangulated, but you just select the geometry, right click, and choose 'soften smooth'. I have been using that method for years, it works great.
amazing!
thanks for the tutorial. it's very helpful and easy to follow.
hello… can you please teach me how to make a reflective glass ? reflecting the skies.. thank you very much
Amazing….!!!!!!!!!!! 🙂
Wow ~~~ this architectural rendering work is fantastic!
I enjoyed the tutorial and would love to see the model. Would you mind sending it?
Cheers,
Wm
i was searching this kind of stuff for a long time.
thanks alex for providing such useful tutorial which works for both professionals and students
great going thanks and best of luck.
really useful!!! Lots of information in one short video. GREAT JOB!
The background/sky and haze you created is masterfully done, great stuff, thanks for sharing your knowledge and expertise.
Do you use Sketchup pro or the free version of Sketchup.
I only have the free version and find it extremely hard to achieve the detail that you express in your models.
@Sean Maher,
I use pro, but for this tutorial and most of my others, the free version is more than sufficient. In terms of what you can model, they both do the same thing.
you can share model for me? plz plz plz
thanks for this tutorials.
milad_ahmadian1368@yahoo.com
plz help me alex
Alex,
Do you build your models completely in Sketchup or do you use another program and import the model into Sketchup?
hola muy buen tutorial¡¡¡¡ me gustaria obtener el modelo para seguir el tutorial y entenderlo a mayor detalle, sera tan amable de proporcionarmelo porfavor 😀
If you export the 2 images from SU with the same size & point of view,
it's easier open the 2 images in separate,
select and copy (ctrl+a , ctrl+c) the wireframe image ,
go to shaded image and past.
the image will be on the right place, no need to move or adjust.
He Alex,
Great work! really amazing.
I have one question though.. Why do you only make your renders in sketchup? Why not (if you made your model in rhino) make a render in another programme and then finetune it in sketchup?
Kind regards,
Coco
I have recently viewed all of your tutorials and I could not be more grateful for them! I am a 3rd year architecture student and for so long I have struggled with renderings and these tutorials will do me wonders. I can't wait to see more!
Thanks Samantha. Glad they helped
Hey!
All the time i'm turning on your projects when i do some work for my self! Really proffesional and amazing! Is it possible to give some tutorial, when you already have render done, it's not good, so post production in Photoshop, some tricks how to make a better render in post production…
Thank you in advance!
Hey Alex, I would like to know an easy way to create the environment for my models (building around it) do you have a tutorial explaining how to do this? And if not, any pointers?
He Alex,
thanks for this tutorials.
you can share model for me?
huseyinn.ozkaya@gmail.com
Sir, you are an inspiration and the knowledge you share , very few would have taken so much time to do it… invaluable 🙂
plsss can anyone tell me how i can get this model ?
thnxx ..
Alex,
Love your work and can't wait to try to redo my portfolio for grad school submissions. Do you have any tutorial videos or tips on adding scanned hand renderings to my portfolio? Throughout my time in school I have done much of my work by hand and rendered by hand but i would like to somehow display them in my portfolio nicely and I'm not too sure how to start. Hope you can help!
Thanks,
Ryan
You are a BOSS!
Thank you for this. As an artist, I've been rendering my views manually and really personalized for about 5 years now. I've always felt uncommited to render via computer, specially because of the enormous amount of time I see my classmates spending doing it, but this really inspires me to try something new. Thank you very much and longing to see new render ideas soon.
A quick question Alex, do you ever use a wacom screen or pen stylus for your photoshop work?? thanks, and great work!
Hi alex, Big Big fan of your techniques, How do you get a google map into your render ?
Big Big Fan of yours. Excellent tutorials. Whats the procedure to get google maps into your images ?
Amazing Work.. Would really appreciate if you could share your model with me, it would be of great help understanding it.
Thanks
pooja.mehta91@ymail.com
Thank you for introducing this skill!
It helps!
Hi and thankyou for all of your tutorials post, these are very great tut, and helpful, but can you share you psd ( Raw image, resource ..) ? It should help a lot to learning ! Thanks
P/s: If you want to share, please email me : solar.dawolf@gmail.com
Thanks again !
very good ,i am trying to translate it into Chinese,because there are so many students studying architecture
Phenomenal work. Will encourage my students to stop by your website. Cheers!
nice tutorial! thanks you for posting
Hi Alex, I really appreciate for all of your hard works. You’re doing a great job making these tutorials. Helped me alot. BTW how much time do you spend on making models in Sketchup ? Do you only use the default tools or download some from other websties ?
thankful Architect practice make perfect
just create design daily