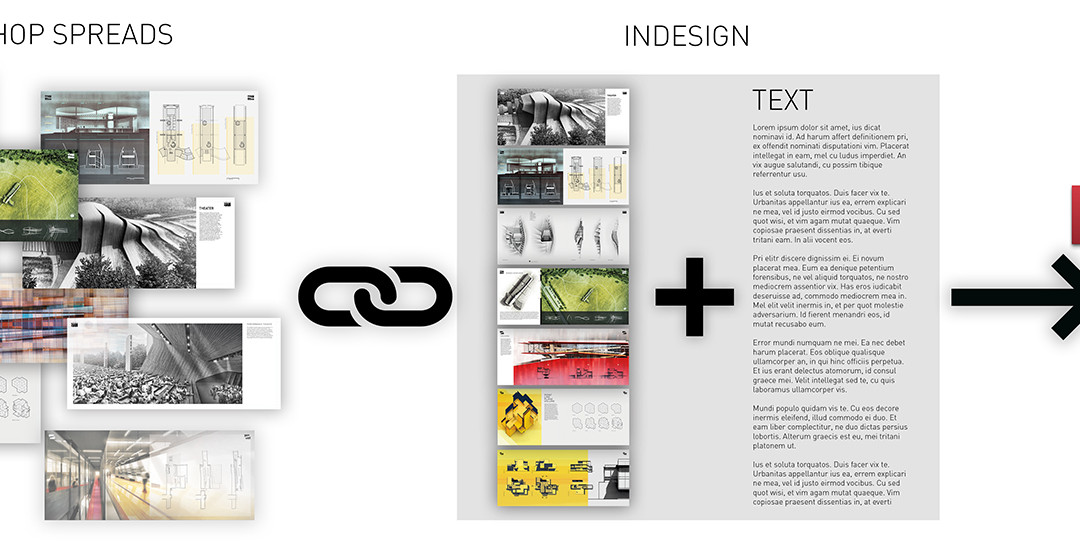
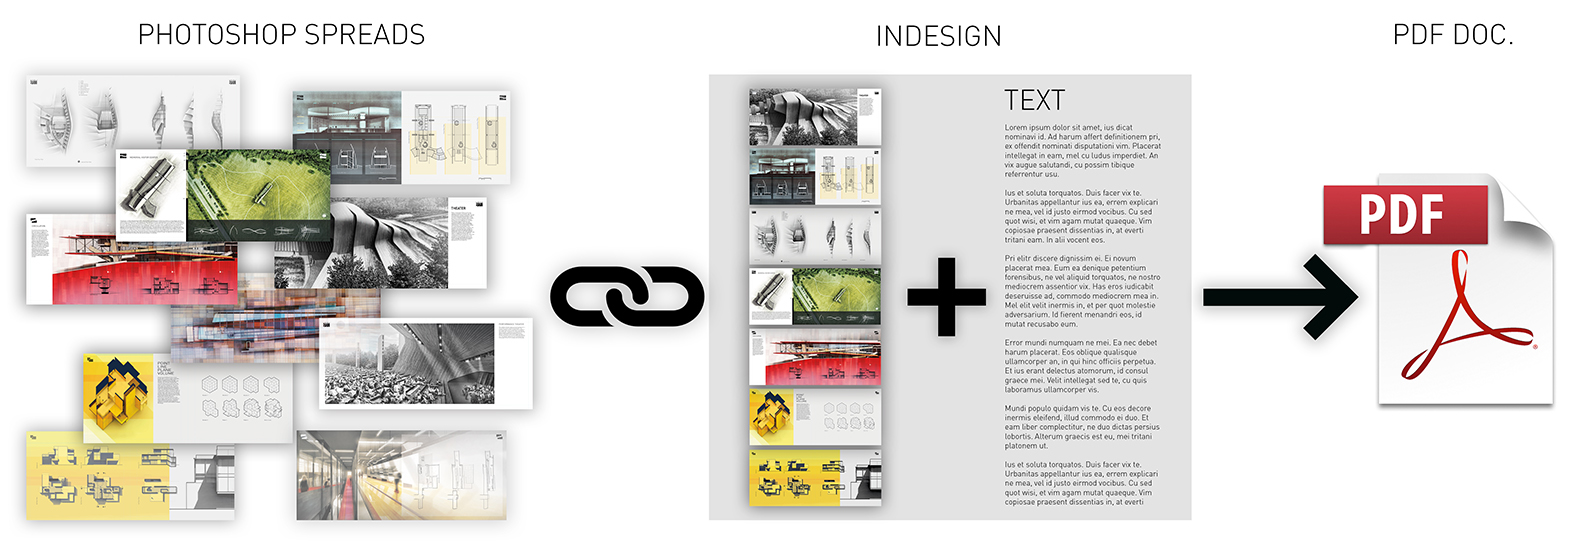
I have talked about portfolio setup in the past but not specifically the workflow. I don’t hide the fact that I prefer to build my layouts in Photoshop. It’s what I’m most comfortable with but also what gives me the most flexibility to blend images into one another and really experiment with layouts. I have seen others create their portfolios in Illustrator and InDesign which works too. I have implemented InDesign into my workflow, but as a management tool and not so much as a design tool. InDesign acts as a master file that houses all of my text and organizes all of my PSD files in one place. This means I can quickly comb through many pages at once to study the flow of the story and transition of graphics. It’s very easy to get caught up focusing on each spread as its own entity. InDesign allows me to see the document as a whole and creates a malleable environment to easily move pages around and make quick edits to text. Below, I outline the workflow that I used to create my latest portfolio and prepare it for printing.
1. Determine how the document will be printed
The process begins with deciding where and how I will print the portfolio. For this example, I will be focusing on online printing since this is the easiest and most accessible option for most people. Knowing how you will print the portfolio will inform certain specifications and sizes to be used. For example, blurb only offers a few sizes that will work for my portfolio and the proportions are quite different from my standard 6″x9” size that I have used in past portfolios. Therefore, I want to keep this in mind when designing my new portfolio because the size significantly affects the grid proportions and layout. However, Blurb also provides an InDesign plugin that sets up the file for bleeds, setbacks, and other pertinent document settings. This helps minimize any formatting issues when its time to upload the final portfolio design.
2. Photoshop Template
Once I determine where the printing will be done, I next set up a Photoshop template. This template is meant to mirror the InDesign document template exactly. Therefore, I will be using the exact same bleed settings and setback guides. Below is how I set things up in Photoshop:
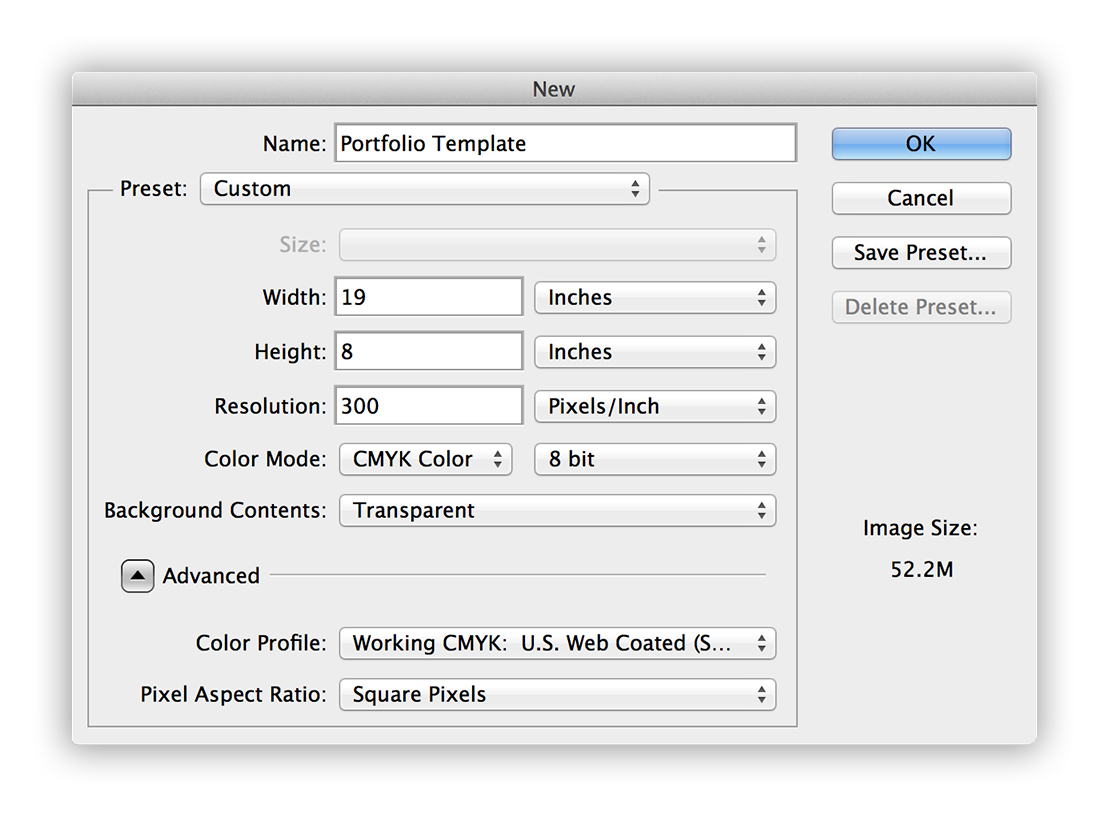
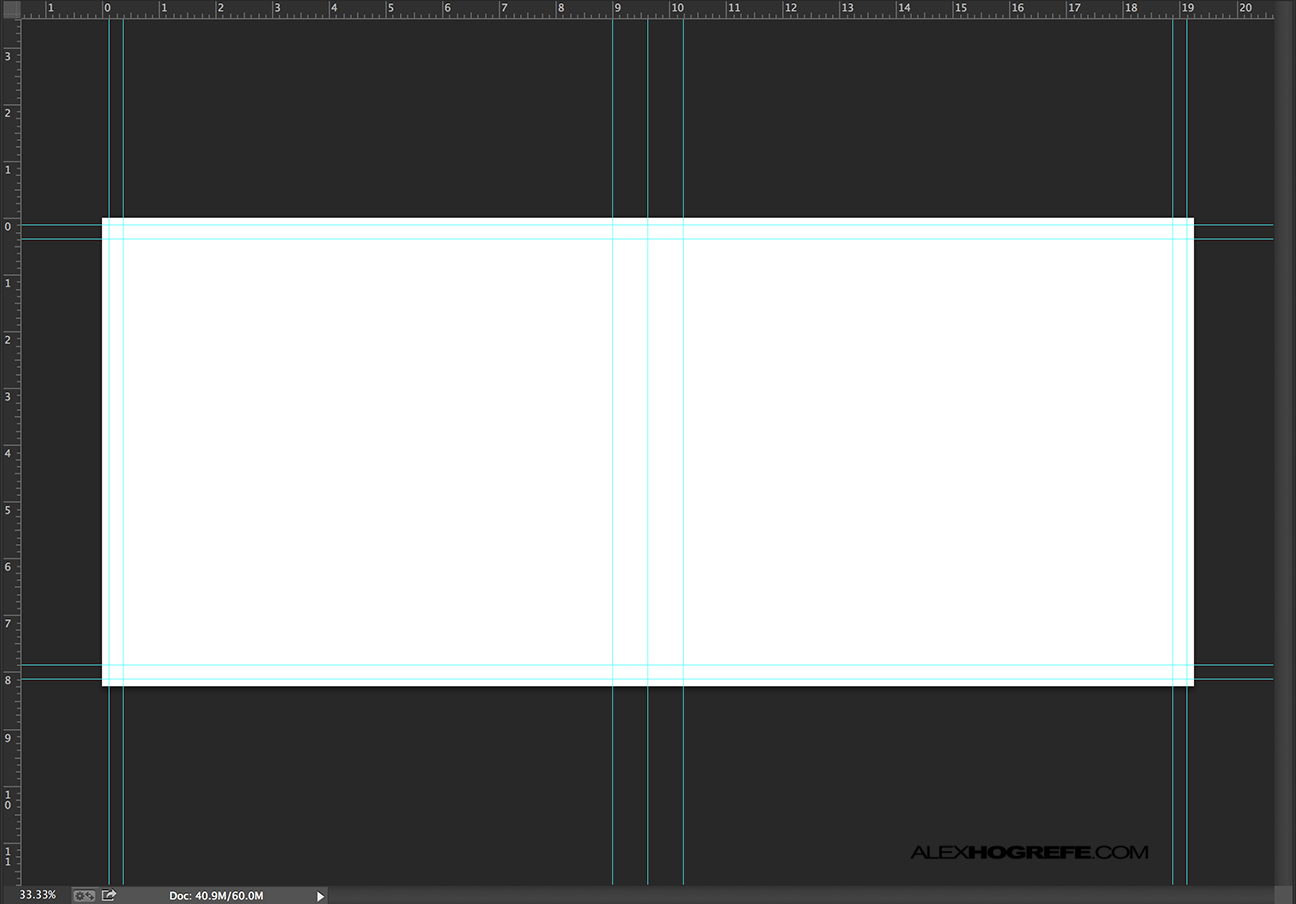
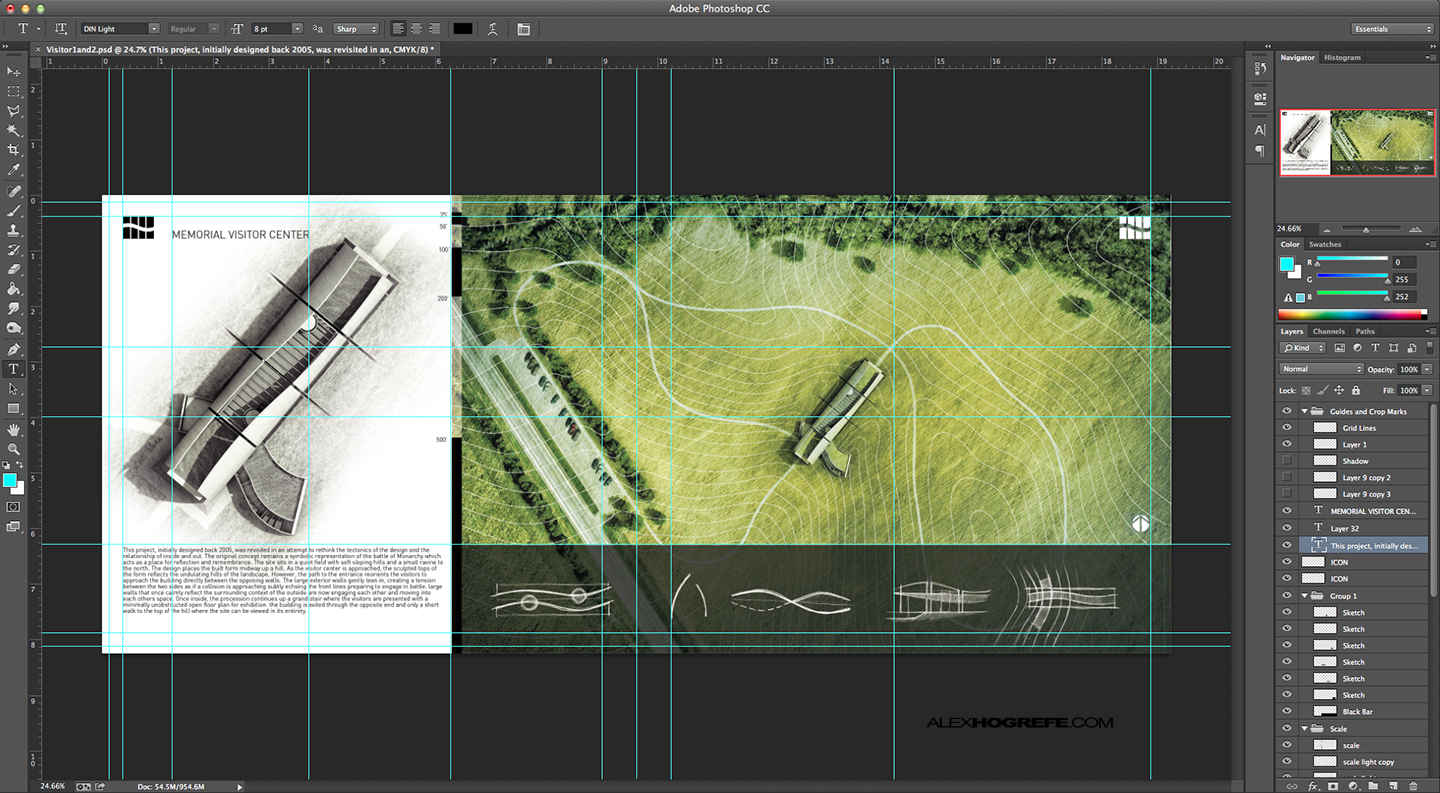
2A. Initial Page Size: The individual page size will be 8” tall by 9.5” wide. This is the final cut size given to me by the online printing company. This means when you open the portfolio and look at the spreads, they will be 8” tall and 19” wide. Since I like to design by the spread and not by individual pages, I am going to set my Photoshop template to the 8”x19” size. I am also going to set the resolution to 300 dpi (dots per inch) and set the color mode to “CMYK Color”. The image below shows the setting I used when starting a new document. To make changes to the page size and resolution, go to “Image>Image Size.”
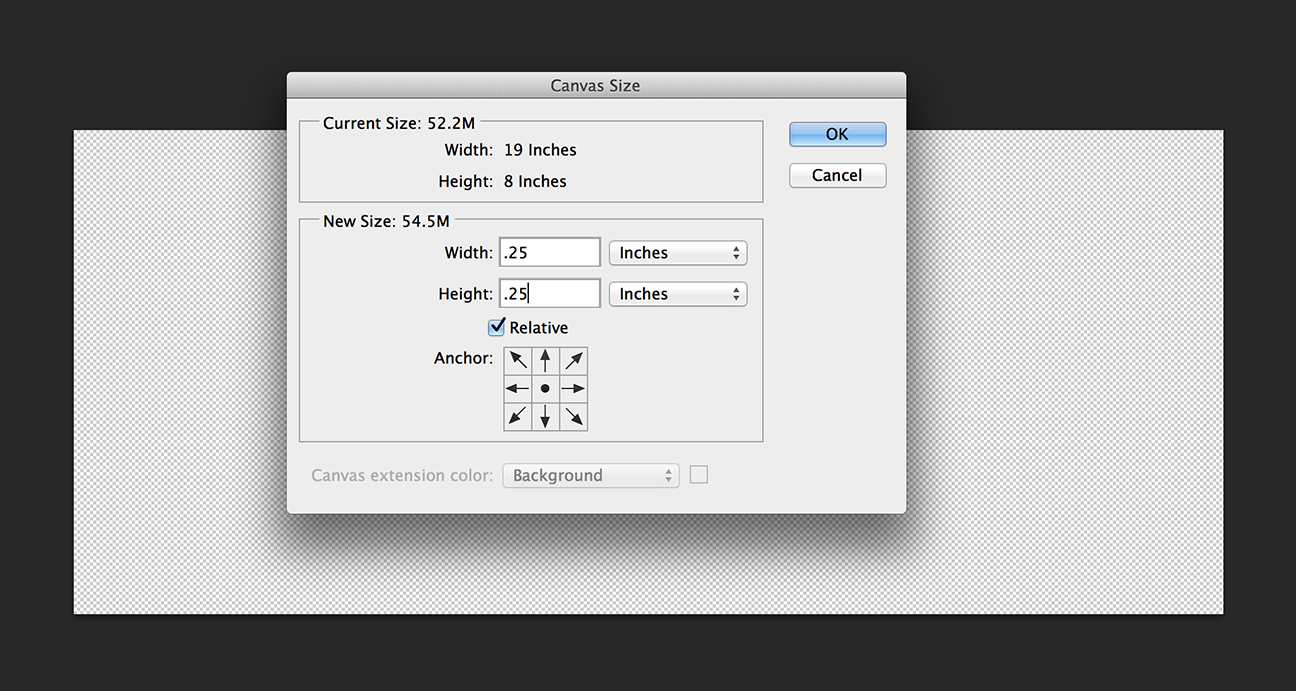
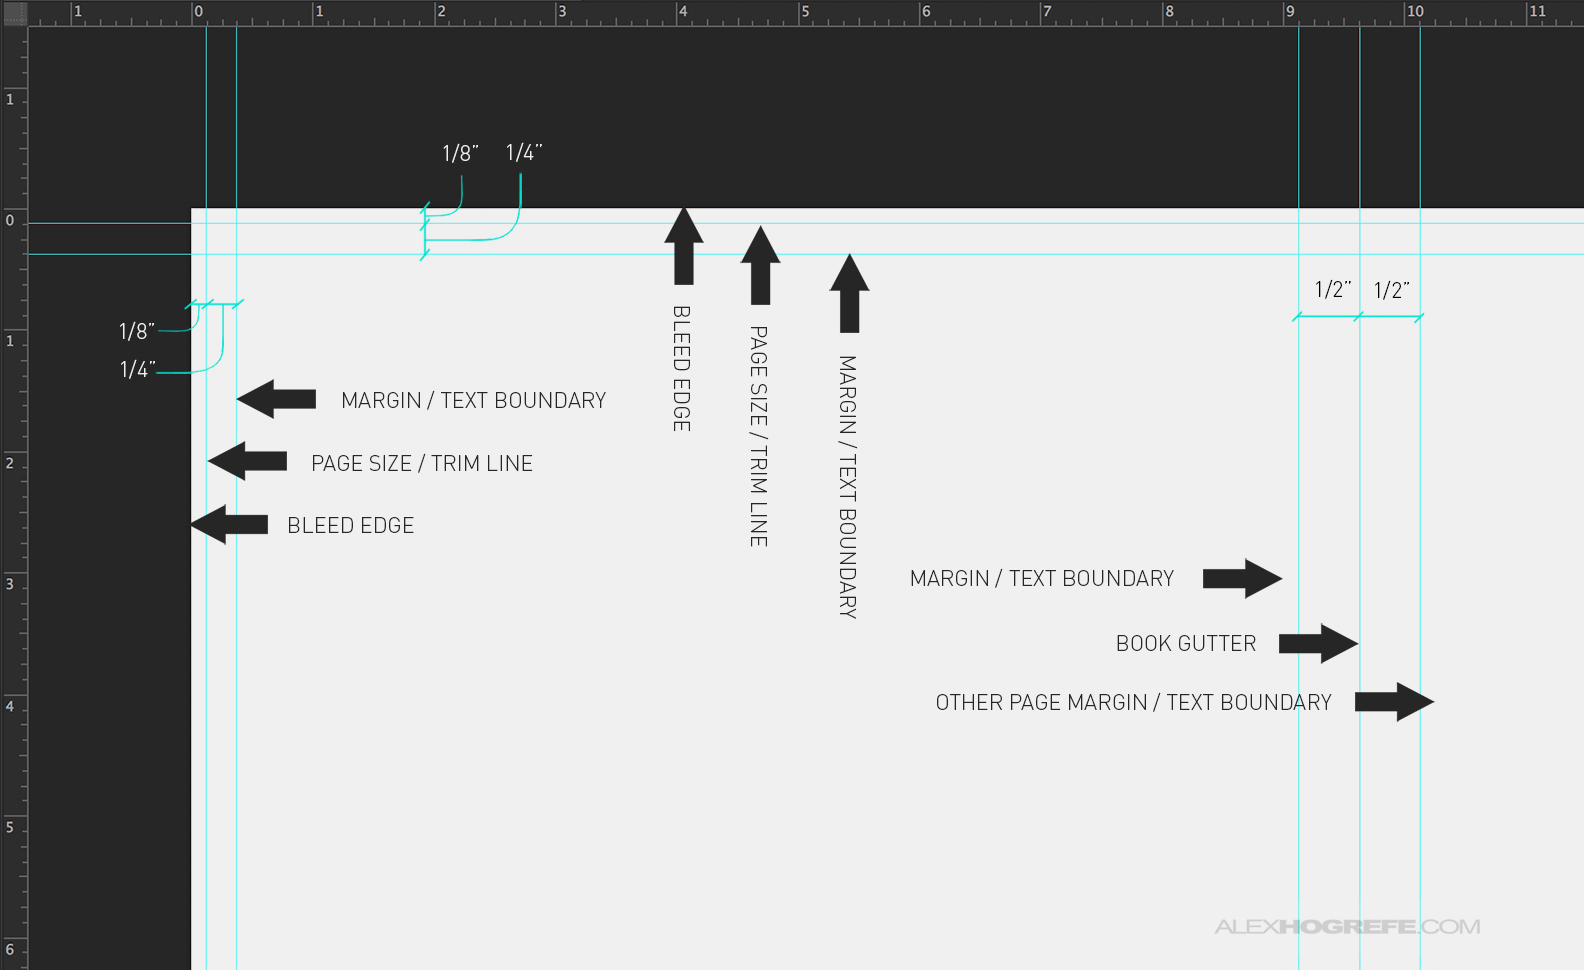
2B. Image Bleed: My portfolio has images and colors stretching all the way to the page edges, so I need to add a bleed to my template. The standard bleed dimension is 1/8” on all sides. Some printers may require something different so it is important to confirm this dimension with them before setting up the template. To add the 1/8” bleed space, select “Image>Canvas Size”. First double check that the anchor is in the center, and then increase the width and height by 1/4.” Obviously, the extra 1/8” could be added when setting up the initial page size, but I wanted to show how to add the bleed after the document has been created.
2C. Setup Guides: Once the size of the canvas is set, I insert the guides. I want to mark the locations of the cut line, text setback, and the fold. To do this, you must first turn on your rulers by going to “View>Rulers”. With the rulers on, select the “Move Tool” and simply drag guides from the rulers to the locations you need them. You can precisely place guides by choosing “View>Add Guides”. You can also lock the guides by choosing “View>Lock Guides”. The image below shows the state of my template at this point.
3. InDesign Document Setup
I want the InDesign template to be identical in size to the Photoshop template. This allows me to easily place the PSD files directly into InDesign without any alignment issues.
3A. Initial Page Setup: Before setting up the InDesign Template, first look to see if the online printer has provided any online resources. For example, Blurb offers a plugin that generates a template for you. However, in some cases, a template will need to be created from scratch which I outline below.
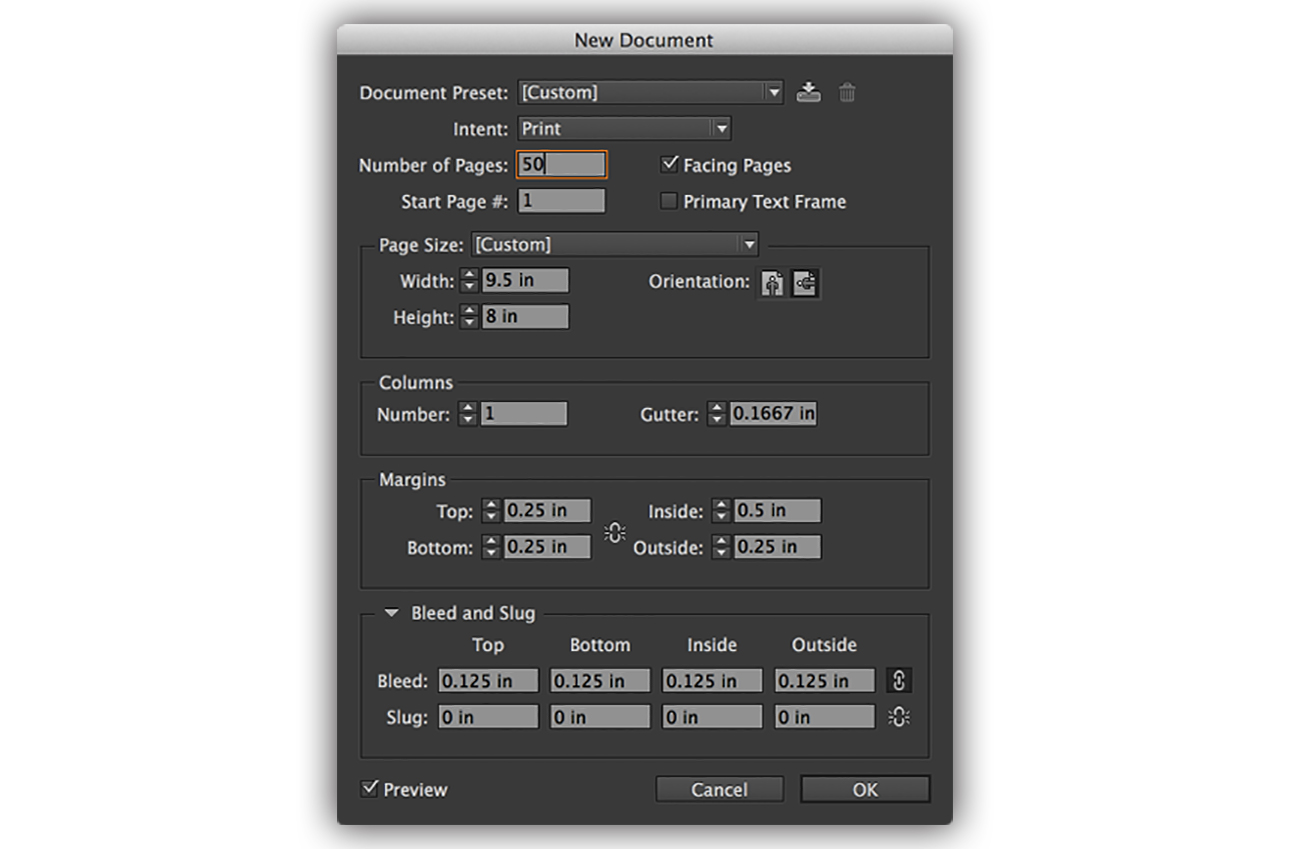
Go to “File>New>Document.” In the new document dialogue box, make sure “Facing Pages” is checked. This will allow you to create spreads instead of individual pages. Also, estimate how many pages your portfolio will be and insert that number into “Number of pages”. The number of pages does not have to be exact and can be changed as the document is developed.
Change the width and height to the final “Cut” size of a single page. In my case I want it to be 9.5” wide by 8” high. InDesign defaults to picas, not inches which is the unit I want to use. A little tip when setting the width and height is type what you want in inches and follow the number with “in” such as “8.5in”. InDesign will give you that dimension in picas. You can also change the units by going to “Preferences>Units and Increments” and change the ruler units to inches for both the horizontal and vertical.
I set my margins to 0.25” except for the inside margin which is set to 0.5”. The margins act as a barrier by which important text and images stay within. However, images and graphics can extend outside of this line and should continue all the way to the bleed edge. Different size margins are okay to use but I wouldn’t suggest going less than 0.25”. You will want a larger margin in the inside edge to account for binding.
Finally, I set the bleed to 0.125” (1/8”) for all four sides.
Choose “Ok” to complete the setup.
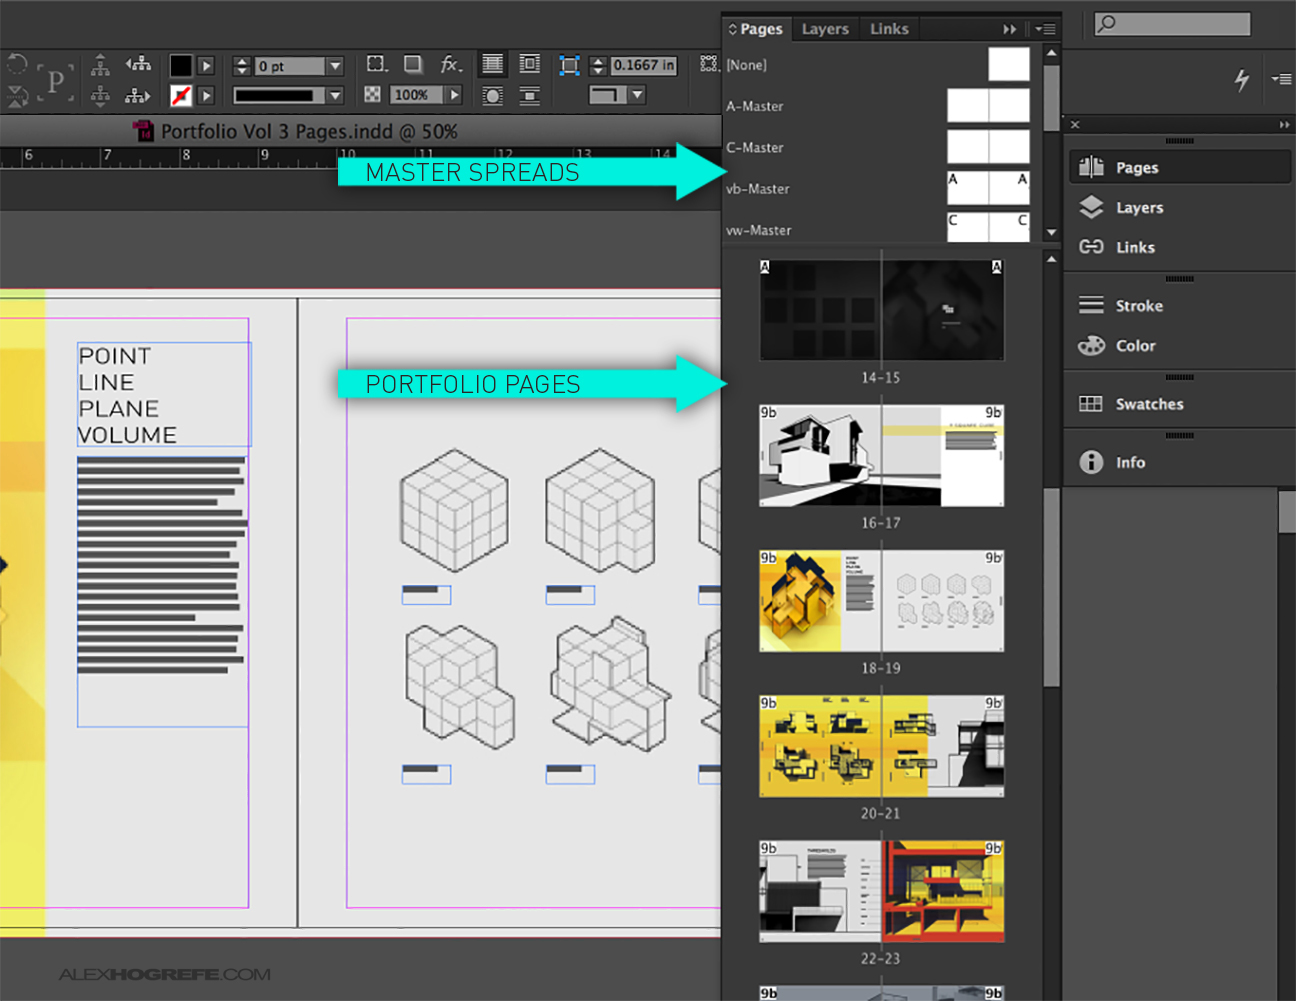
3B. Master Pages: Masters are essentially templates that you can overlay on multiple pages. When you make a change to a master, it will update all book pages that the master was applied to. This is useful if you are adding page numbers, a title, or a graphic that needs to appear in the exact same place on multiple pages. In the case of this portfolio, I really only need it for page numbers. There are situations in my portfolio where the page number gets lost in a dark background, therefore, I create a second master with white text. To view master pages, go to “Window>Pages” and you will see the masters at the top. Clicking on a master thumbnail brings up the master page where you can make changes. They can then be applied to the portfolio pages by dragging them on top of the pages you wish to apply them to in the pages palette.
4. Develop Photoshop Spreads
With the documents set up, I began the process of laying out the designs in Photoshop. I used filler text to determine general placement of paragraphs and titles. I placed all my text into a group layer of each PSD file so that I could easily turn off the layer when it was time to place the file into InDesign.
5. Place PSD Files into InDesign
As I develop the PSD files, I insert the new files into the InDesign document using the “Place” method. Placing the PSD files creates a link between the two programs so that if a change is made to the PSD file and saved, it will update in InDesign without the need to place it again.
To do this, simply drag the PSD file onto the InDesign page and align the bleed edges. The longer route is to go to “File>Place.” When the dialogue appears, navigate to the PSD and choose “Open.” Then click on the desired InDesign page to place it. Finally, adjust the location so that the bleed edge of the PSD file aligns with the bleed edge of the InDesign file.
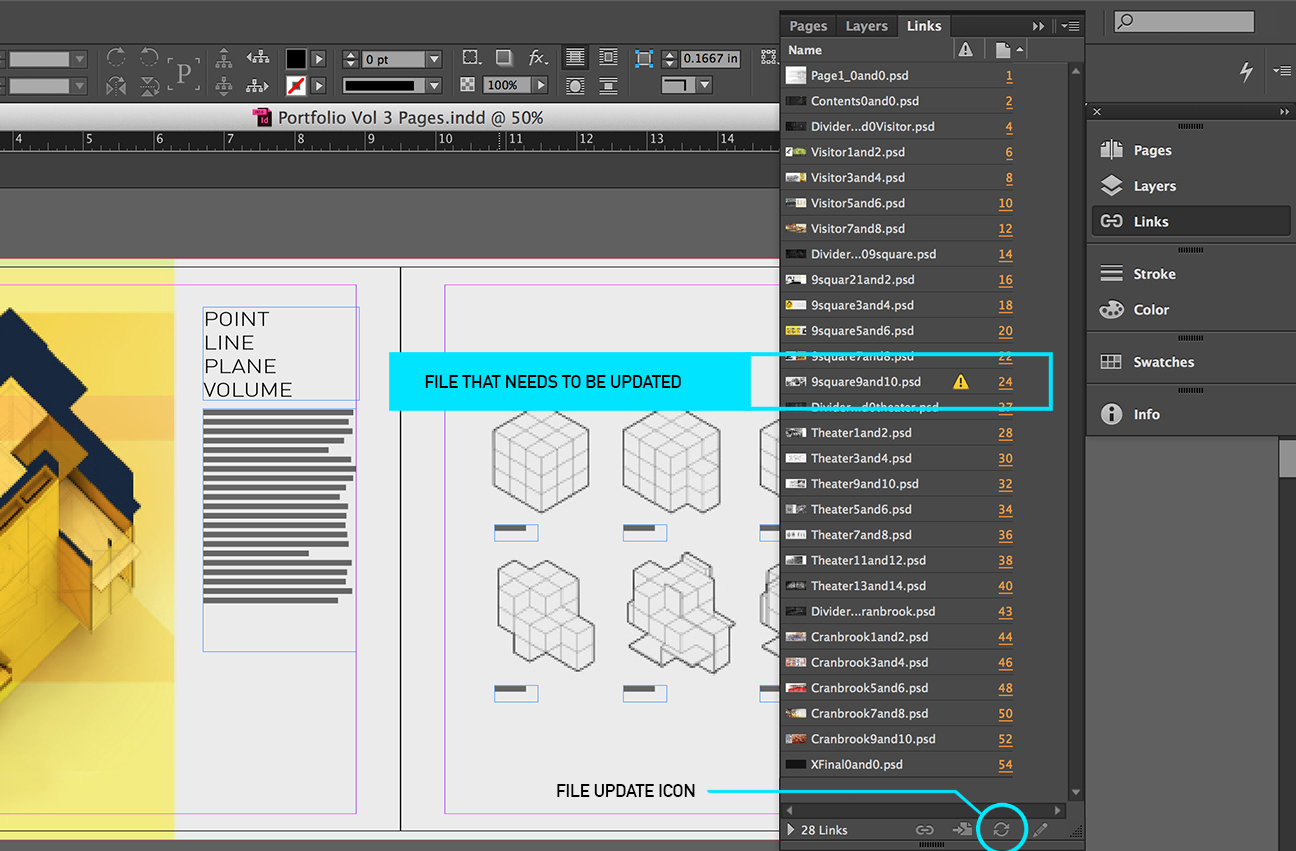
To check that the PSD file is properly linked to the InDesign file, you can make a change to the PSD file in Photoshop and save the changes. Then, move back into InDesign and see if the link is asking to be updated. A list of all of the linked files can be found under the “Links” palette which can be turned on under “Window>Links”. If a link does need to be updated, right-click on the link and choose “update link” or choose the “update link” icon at the bottom of the links palette.
6. Add Text in InDesign
Next I need to add the final written text into InDesign. As mentioned above, I prefer to add text in InDesign instead of Photoshop because it allows me to easily manage the text in one place ensuring consistency throughout the document along with easy proofreading. It also exports as a vector graphic to PDF which will yield crisper results when printing. The Photoshop files are rastorized when placed in InDesign meaning any text in the Photoshop files would be rastorized as well.
7. Export to PDF
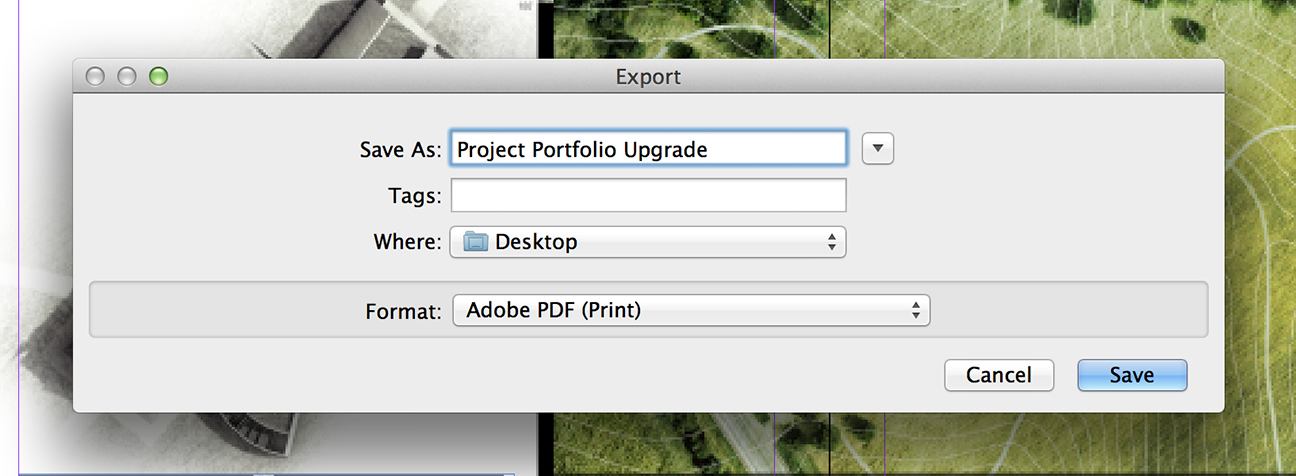
The final step is packaging the portfolio to be uploaded to the online printing company website. Most online printers prefer PDF files, but it is important to confirm this with your online printing company. Choose “File>Export”. In the export dialogue box, choose a location to save the document and be sure to select “Adobe PDF (print)” as the format, then click “Save”.
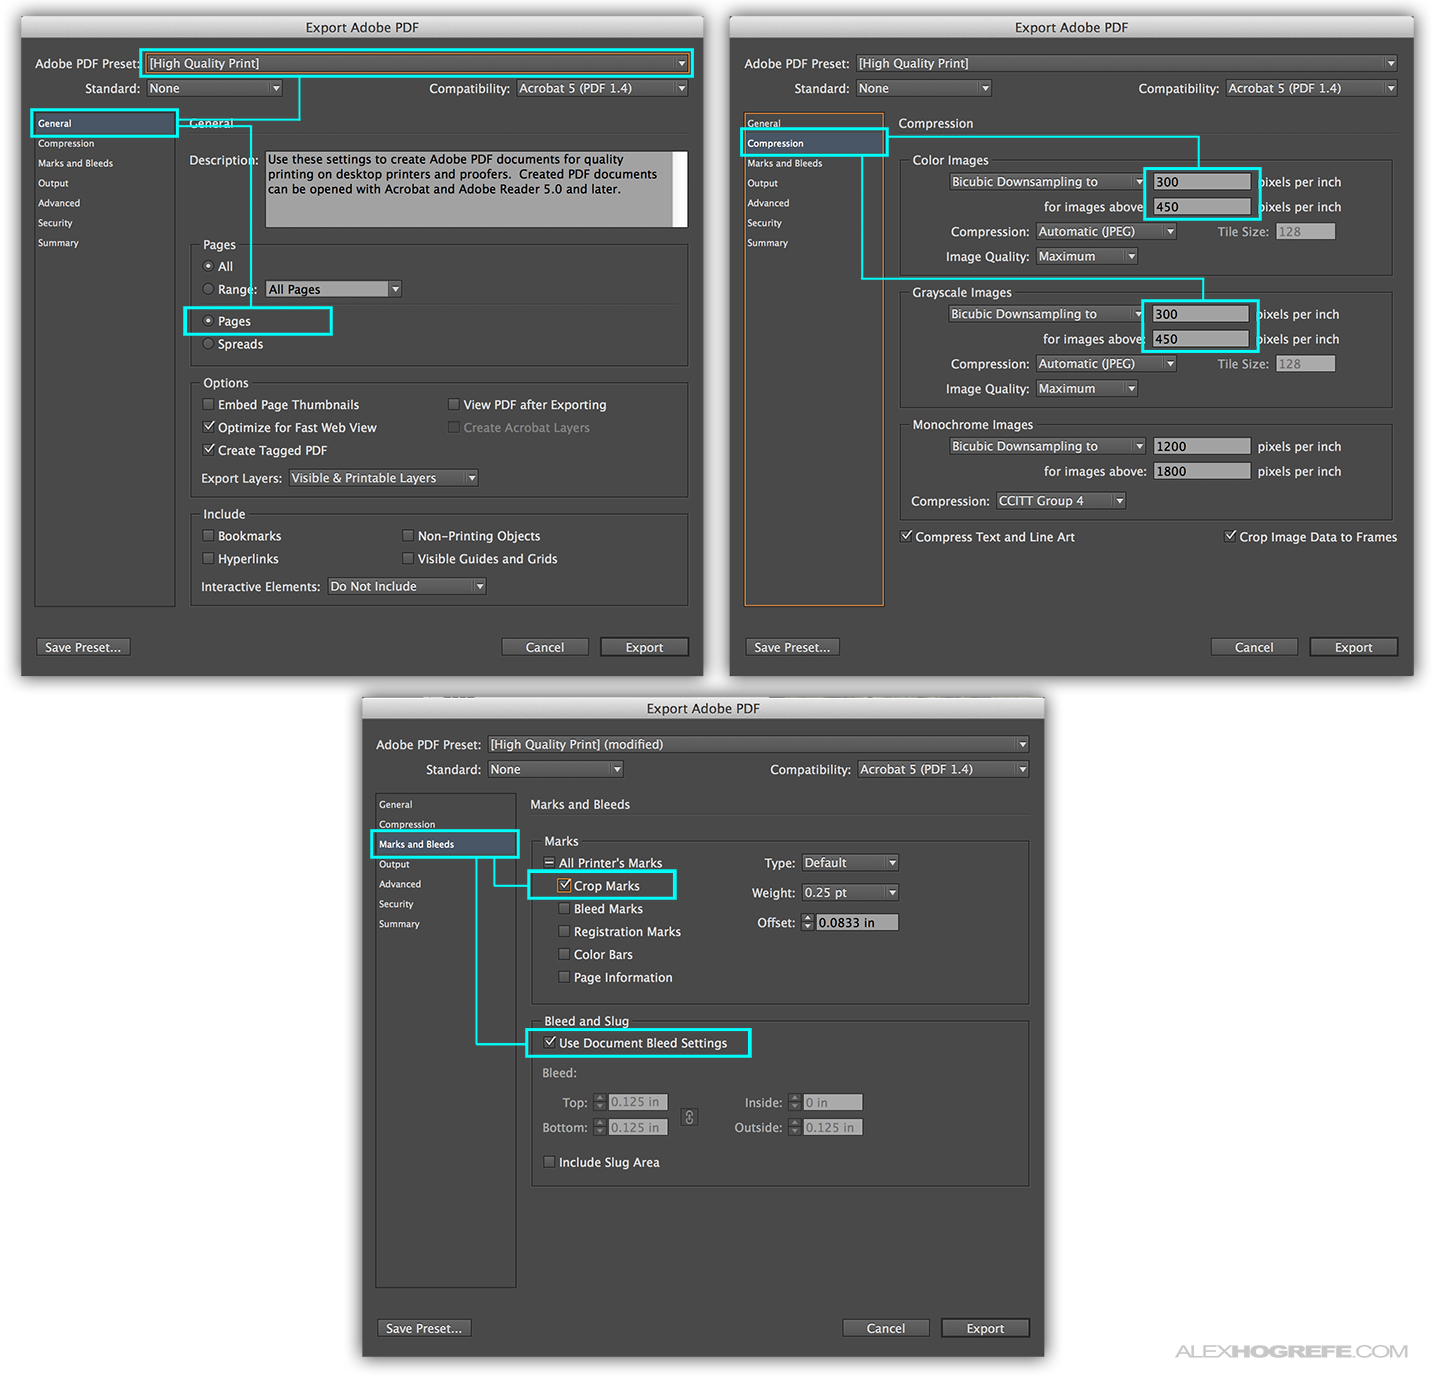
Once the PDF dialogue box appears, you will see a ton of options. This is again a time to check to see if the print company that you are using has specific settings that they want you to follow. For example, Blurb has an entire section of their site dedicated to explaining the settings they want you to use. Below are general settings I have used in the past if the print company does not already have specific requirements:
7A. Under the “General” tab on the left, set the “Adobe PDF Preset” to “High Quality Print”
7B. Under the “General” tab on the left, verify that “Pages” is selected and not “Spreads”
7C. In the “Compression” tab on the left, leave the default settings as is. Bicubic Downsampling should be set to 300 pixels per inch for both color and grayscale images. The only reason you should change this is if you need a smaller file size.
7D. In the “Marks and Bleeds” tab on the left, ensure “Crop Marks” is checked under “Marks” and that “Use Document Bleed Settings” is checked under “Bleed and Slug”. This ensures the printer can print the bleed and also know where to trim the document.
I want to emphasize that these are general settings and different situations may require different settings. While this is meant to give you a starting point, it is crucial that you follow the specific requirements of the printing company that you are using. This portfolio workflow in general is one that works best for me, but may not be best for everyone. It gives me the right balance of creative flexibility along with organization and editability. I am sure there are some things I forgot to cover in this post so I will be sure to update as I think of them.


It was lovely to read and learn. Thank you for this post.
Alex I am still getting a bit confused about spread sheets which I believe it won't work for a folded portfolio book.
I would like to see a workflow of laying out pages for folded book portfolio.
How would you do it? Are you dividing you spread sheet in two halfs in Photoshop and then you put them in to InDesign in some type of order?
for example 1 page and 2 page is two separate individual papers in the book. Do we have to work this manually or is InDesign capable of doing that for us.
Hi Alex,
i just wondering how u did the pdf to be some kind like a magazines look. it has some sort of magazines type of glaring at it? thanks for your inspiration Alex 🙂
Hi Alex,
Nice to read this great portfolio setup tutorial but I have a same question with Eddy as well.
Thank you
Hi Eddy and Kyra,
Each spread is one file in Photoshop, but will be two pages in the final printed book facing each other. When you bring the PSD into Indesign, it will cover both sides of the spread. You do not need to divide the PSD into two pages before bringing it into InDesign. Assuming you chose the "facing pages" option, InDesign will display the facing pages together and thus allowing you to place the PSD over both pages. When its time send to the printer, you tell InDesign to export each page as an individual page in the export settings. I hope this clarifies things and let me know if you have any more questions.
Thank you very much for this post! InDesign is something I don't think enough students take advantage of (myself included), so seeing a workflow that describes the process in detail is quite helpful. I've been using Illustrator exclusively to build all of my spreads for my CV and portfolio, then print each page as a pdf and combine them in order in Acrobat to create a master pfd. It's tedious, and I had to be very particular when building pages so I don't mess up things like page numbers and grammar. With InDesign, I can only begin to imagine how much time I can save (and, in theory, put into improving the overall design).
Thanks again!
Hi Alex,
Your blog has been very helpful over the past couple years and I enjoy viewing the progress on your creative projects. Really appreciate the time you put into it.
Did you end up going with the Blurb Standard Landscape 10×8 in Photo Book?
I am currently updating my portfolio also, as I am applying to graduate Architecture schools next year. Printing is a major consideration for me in the design and creation so this post especially resonates with me.
I am looking forward to seeing more of the updated spreads you are making as well as the finish printed version. I would also like to share my portfolio with you to hear your thoughts, is there another means which I can communicate with you?
Thanks and happy new year!
Aaron
@Aaron,
I am testing out a few places. Right now, its between Blurb (8×10) and Lulu (9×7). I should be getting them back in the next week or so and will post on the positive and negatives of each. There is a lot to discuss. I started out with createspace but they only do portrait orientation and a really small landscape which is unfortunate because there prices are much lower.
To contact me, send me an email through my info page or contact me on facebook. I get a lot of emails so its hard for me to respond to all of them.
Hey Alex
This question is regarding kerkythea, when I export scenes out of SU to render in kerkythea the resolution (size) is at a certain dimension normally around 11×19. How is it you are able to have such large renders that maintain print quality? When i change the resolution in kerkythea the image that would have been rendered using SU's scenes resolution changes. Thanks
@Jason,
When you change the resolution in Kerkythea, Your rendering will still align with the Sketchup exported images in the vertical direction. The only change is that the different resolution in Kerkythea will change the proportions of the rendering, meaning it may crop the left and right of the image, but the images should still line up vertically. One other note, I often increase the resolution in Photoshop so that I can add higher res textures which ultimately creates a higher res image overall.
Don't know if anyone else noticed it, but did you get yourself a Mac, Alex? And as always, your tips are amazing.
@Juancamiloarq,
Haha, yes I did move to the dark side. I just couldn't find a computer with better hardware, screen color, resolution, and design than the retina. I was wondering if anyone would notice.
Thank you so much, Alex. Gob bless you. Such a helpful site. I am so excited to get into your blog. I will go through your tutorials step by step before school starts.
Thank you million again,
All the best for you,
Aik
Thanks very much for the quick reply Alex.
I have taken a more in depth look at Blurb's InDesign plugin and it looks very helpful and easy to manage. And the 10×8 size seems better than the lulu's 9×7. I can't wait to see how the prints come out, especially the colors, lights/darks, and where the cut line is compared to how you sent it to them and how it was viewed on your computer.
I will be sending you an email within the next couple weeks.
All the best!
Aaron
Hi Alex,
I've been following your blogs since last year and all the posts were super helpful for my projects/portfolio so thank you!!
I use the same workflow as you and I was wondering why did you choose CMYK when you set up the Photoshop file? Is InDesign usually in CMYK by default?
I sometimes get pop-up notice when I throw images between PS and ID regarding converting CMYK to RGB or vice versa and I'm always confused with them.
Thanks again and hope to hear from you soon 🙂
Best,
Yunong
Alex,
I've been following your blog for almost 2 years now! Thank you so much for all that you've shared and taught, beginners like me. I'm hopefully coming to the end of my portfolio, and this post will get me through with the printing!
Thanks again for all the inspiration!
hi alex!
I am a Chinese arch student. I am keep paying attention to you for a long time coz your blog is very helpful . Thank you for those creative ideas.
I have a question on computer . windows or macos,which one do you think is the best for arch student especially in their apps.
Minor correction: 1/8" is 0.125" not 0.0125"
@asjosh,
I prefer windows just because that is what I grew up using. Most arch offices here in the US use windows as well. I recently bought a MAC for the hardware but am running windows via bootcamp. Many if not most students use a mac OS who are going to arch. school here in the states.
@Cielo,
Thanks for the catch. It has been updated.
Hey!
I love your posts and you have given me some great tips and inspiration for my own work.
I am currently setting up my portfolio for grad school and I have a question regarding importing my vector paths in illustrator into my photoshop portfolio template. I have made some of my line drawings in illustrator for my designs and when importing them to ps they get werry blurry and not so crisp (which is the way ps works i guess) How did you get your line work crisp fpr your portfolio using ps and indesign to then import for example to a blur book portfolio?
Cheers! And thx for a great page!
Hi Alex!
Im a keen follower of your blog in South Africa and have been using kerkythea on my PC and now have just upgraded to mac (like you!) and see that kerkythea wont install on my mac?! Very upset about this, how did you install it, please help!
Thanks very much, amazing help
Can you discuss how to setup templates for the portfolio cover including setting up guides, margins, bleeds, etc. in both Photoshop and InDesign to account for the book/ binding thickness?
I seem to remember seeing that discussed on your site somewhere but can't seem to find it anymore…
Thanks!
Just to clarify, I am interested in how to deal with the book SPINE in developing templates specifically for the COVER.
Thanks!
@Chris,
I discussed the Blurb workflow here: http://www.alexhogrefe.com/blog/2013/12/30/architectural-portfolio-workflow.html
If you are going through blurb, you simply download their InDesign template and it will calculate how big the spine will be based on the number of pages.
Lulu also has something on there site that calculates the size of the spine based on the number of pages.
hi alex, you tell the printing shop print exact the same size you have here. Or will they compress your size when you print? what exact blend functions helpful here?
Hey Alex,
Just wanted to let you know how helpful your tutorials have been, and how awesome of a teacher you are. If you’re ever in Denver let me know, I definitely owe you a beer for all the help!
Hey Alex,
while creating a photoshop template .. should the background be white or transparent.. will it affect during printing .. Thanks ..
quick question, I like the size you use 6″x9″ but blurb only has 8″x10″ for landscape and I feel this is too Boxy for me. How did you print your 6″x9″?
Alex-
First thing thanks for all the great info you have shared on your website! It has been super helpful.
Two questions for you:
I noticed for your InDesign and Photoshop files you formatted them to be 8″ x 9.5″ while the Blurb print format is 8″ x 10″… Why is that?
The other thing is about architectural job interviews. Do most firms look to keep a portfolio you submit or is this something you bring to an interview to get back at the end? Seems like it would get pricey submitting a portfolio to each and every firm you apply for.
Thanks!
Hi Alex,
First I want to let you know how helpful your tutorials have been, and how awesome of a teacher you are.
About the portfolio I followed all your instructions and workflow but I have an issue to solve. As you know the maximum size the architectural firms want is 5 or 10 mb (with 300/450 pixel per inch for color images, etc), but in my case the size is 85 mb (25 spreads/50 pages) so that I wish you can advice me something to address this issue without losing the graphic quality of the portfolio.
Thanks you in advance and again you’re very helpful.
Hello where you got the texture corten steel, it would be good if you can share us, I like your works.!