Not everyone has the capabilities to render huge models with a ton of lights. I am one of those people where more times than not I have to manually add light to my illustrations because I don’t have the computing power. At first, this method can seem tedious. But, when you think about the time that it takes to insert lights into a model and then the time that it takes to render so many lights, knowing how to do this in Photoshop can be a great resource to have as a backup. There is a typical workflow I use that consistently yields clean, realistic results without much effort. I am using the urban snow scene that I posted a few months back as the base case for this tutorial. The model was large, and there were way too many windows to try to render. The steps I used to Photoshop the light are outlined below.
1. SAVE THE REFLECTIONS
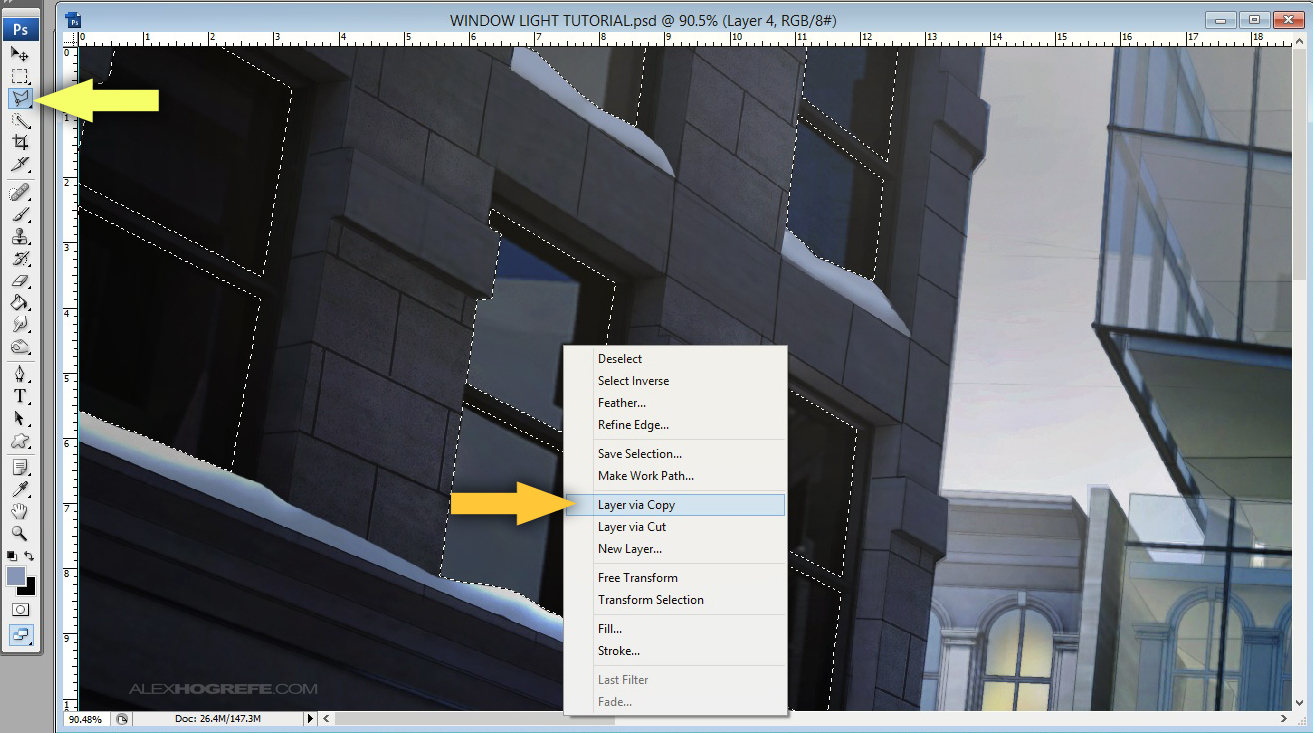
For scenes like the one above, I rendered the glass of the surrounding buildings with a strong reflection. This allows me to copy the reflections to their own layer and use them later on as an overlay. To copy them to their own layer, select the “polygonal tool”, then select the glass of the windows you intend to light. Right-click on the selection and choose “Layer via Copy”.
2. PAINT IN THE BASE LIGHT
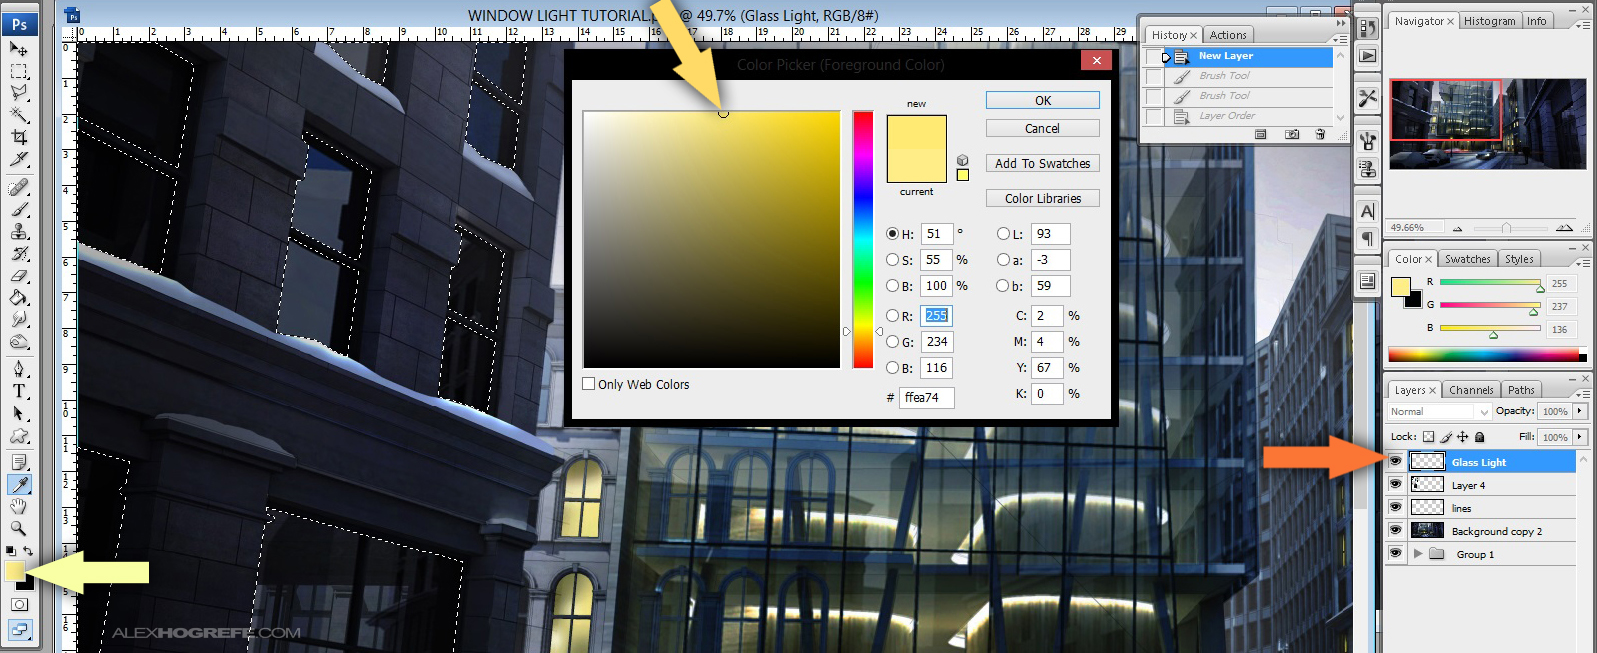
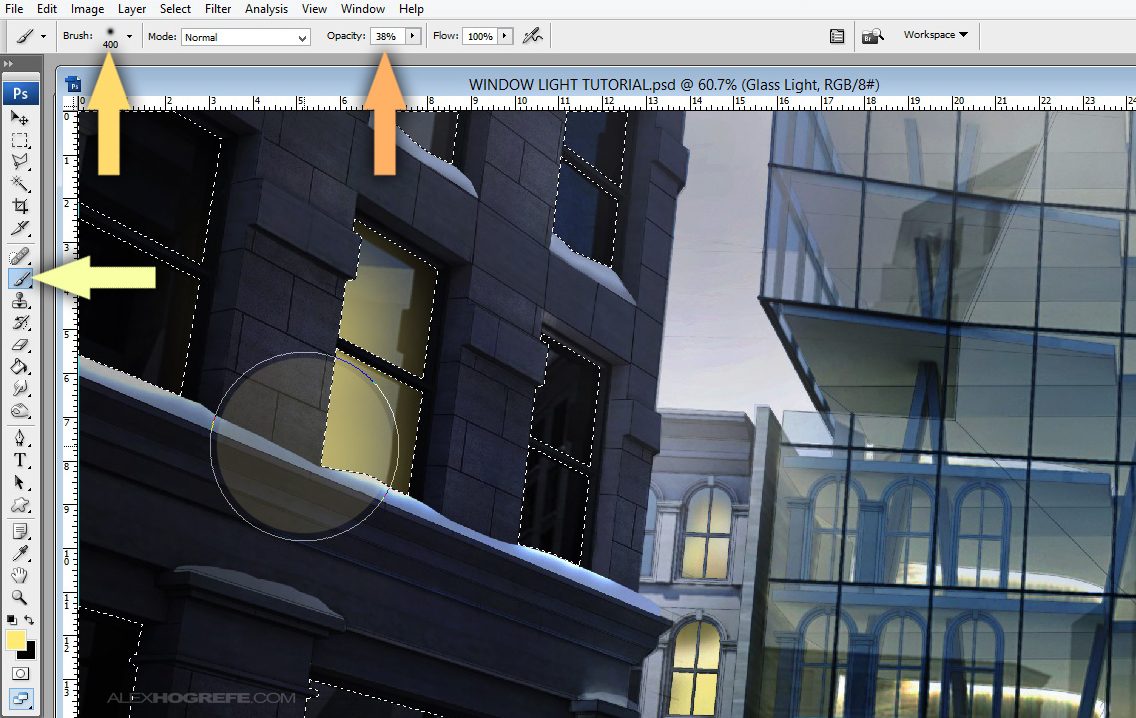
Next, I created a new layer called “glass light”. Again, I selected the glass part of the window. To speed things up, you can ctrl+click the reflections layer in the previous step instead of using the polygonal tool to reselect all of the glass. With the glass selected, choose the “Brush” tool, select a soft yellow paint color, select a “Soft Round” brush, and lower the opacity of the brush to around 15%. Begin painting color with most of the light at the bottom of the window fading away as you move towards the top of the window.
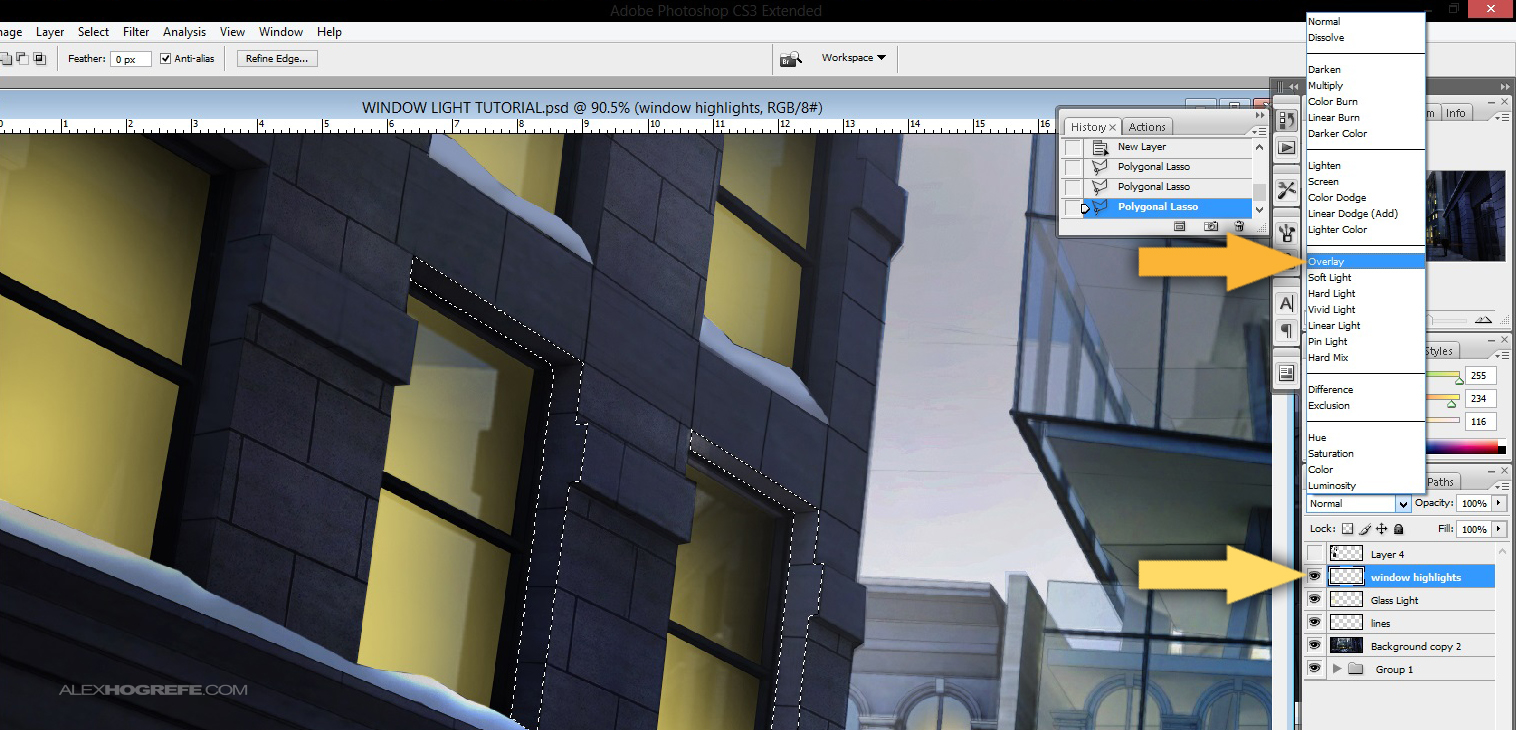
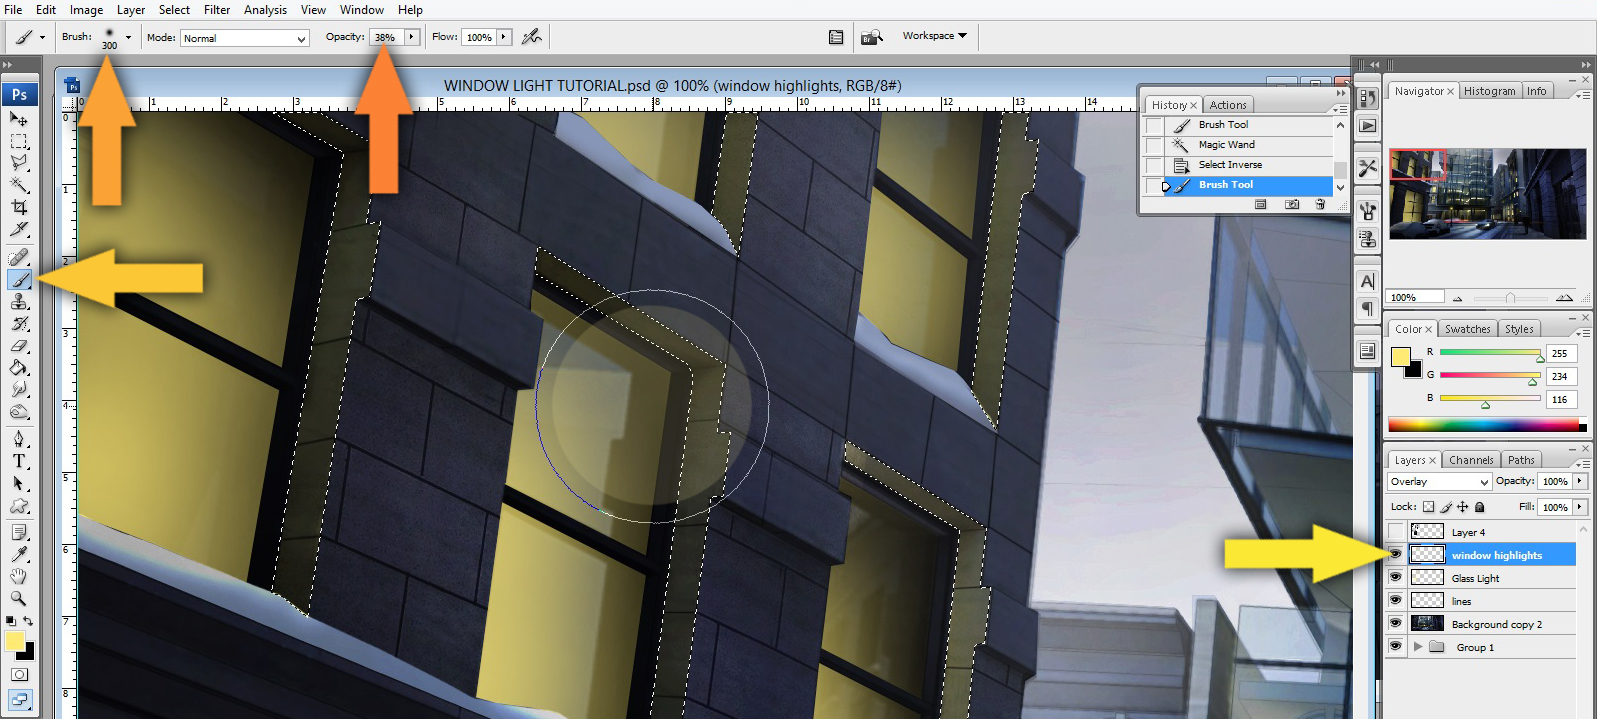
3. HIGHLIGHTS
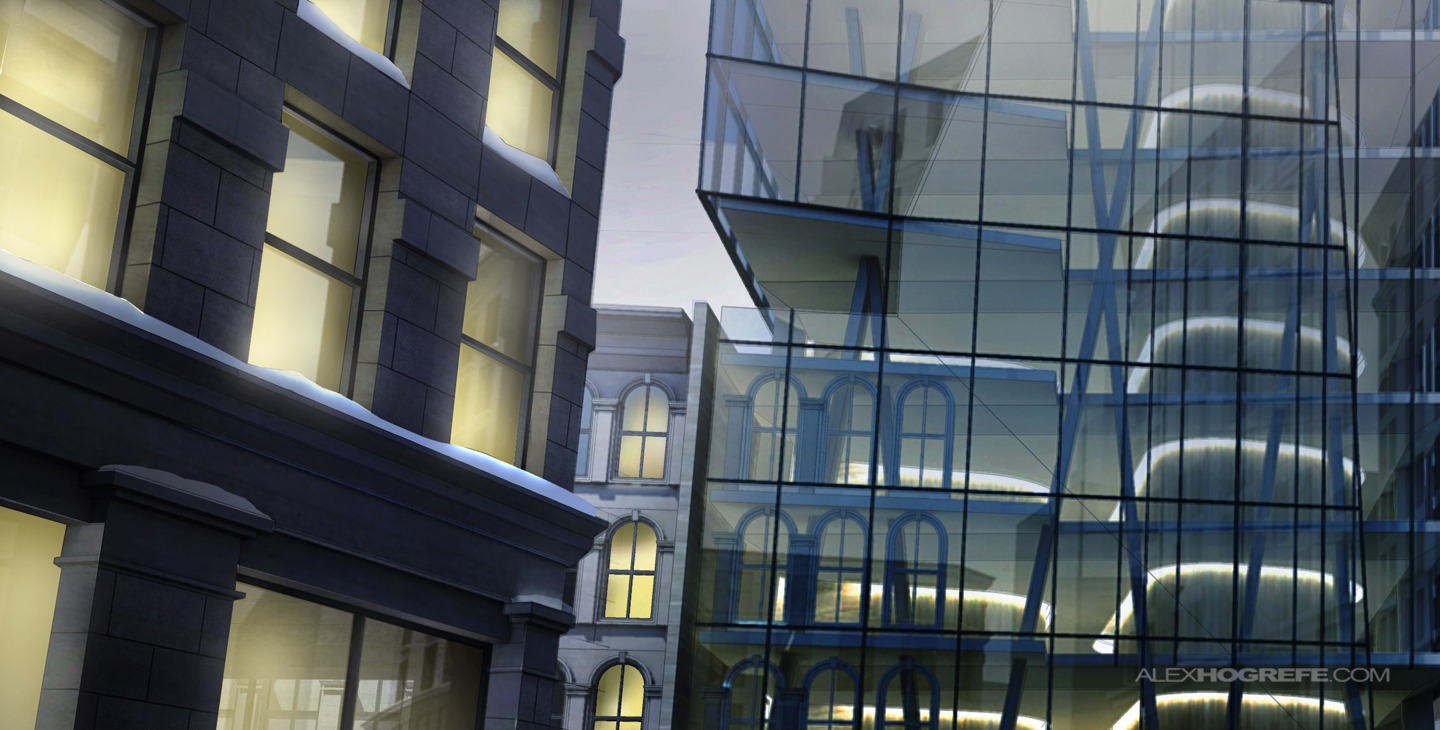
This is one of those steps that is easy to forget or to treat as not important. In reality, it is the most crucial step in creating successful lighting. Without it, the light looks flat. Begin by creating a new layer and setting the blend mode to “Overlay”. Select only the surfaces facing the window that would be hit by the light coming through the glass. A good way to determine this is by looking for surfaces that are 90 degrees to the glass. With the selections made, choose the “Brush” tool, select a soft yellow paint, select a “Soft Round” brush, and set the opacity to around 35%. Begin painting in the highlights. If the highlights seem weak, you can amplify the results by duplicating the highlight layer.
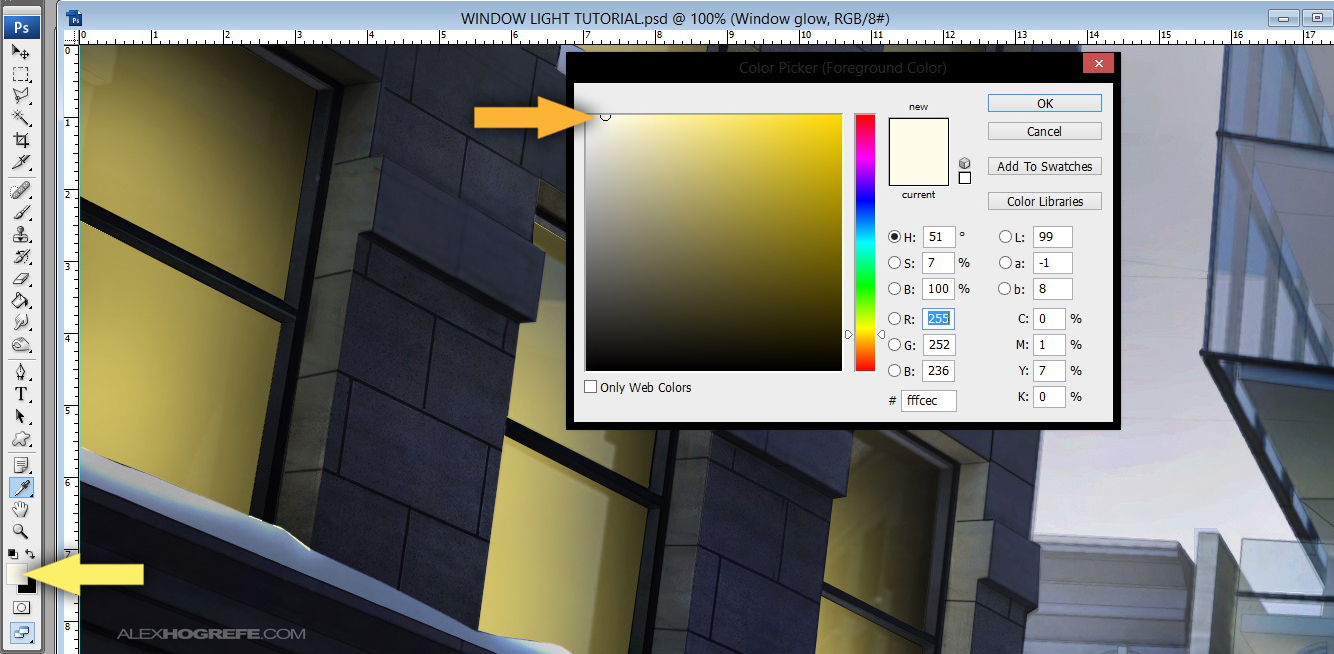
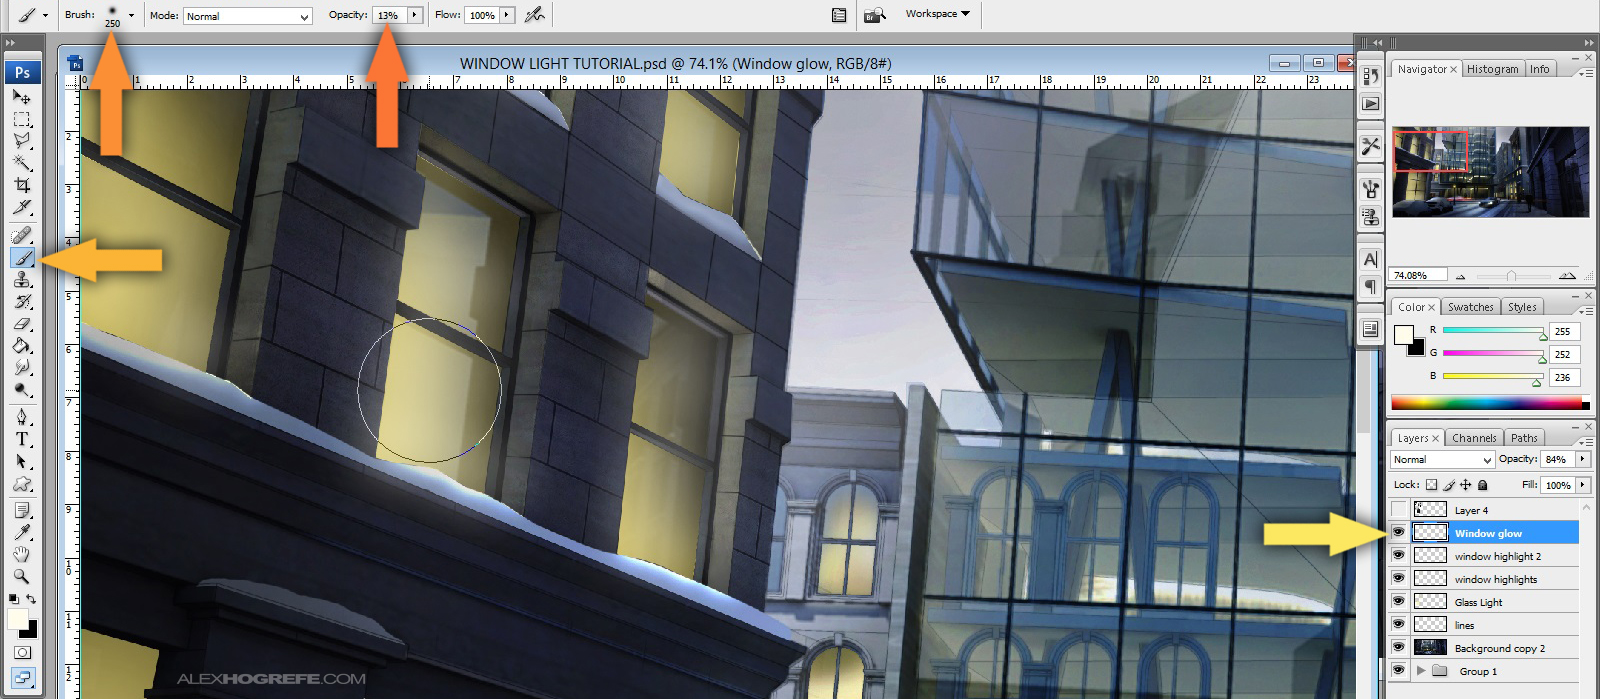
4. SOFT LIGHT GLOW
Another subtle, but important step. Create a new layer and choose an off white paint color. Choose the “Paint” tool, select a “Soft Round” brush, and set the opacity really low to something like 12% to 15%. Begin painting around the window edges being careful not to overdo it.
5. BRING BACK THE REFLECTIONS
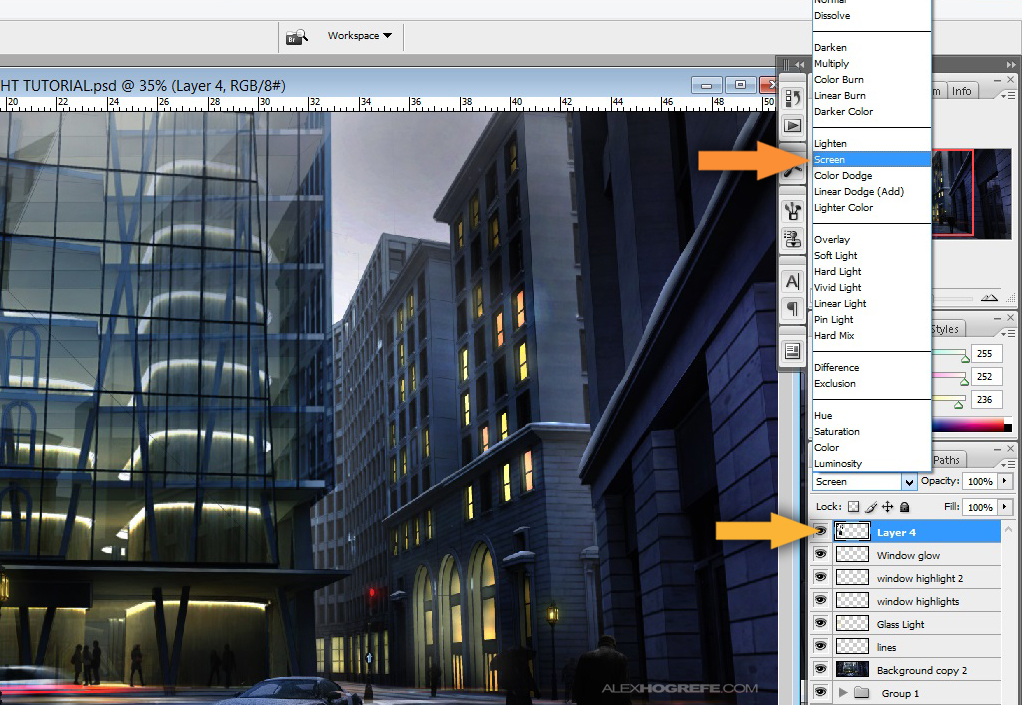
The last step is to retrieve the reflections layer created in the first step. Bring that layer to the top of the layers pallet, and set the blend mode to “Screen”. This will amplify the reflections since they were most likely diluted from the painting in the previous steps.
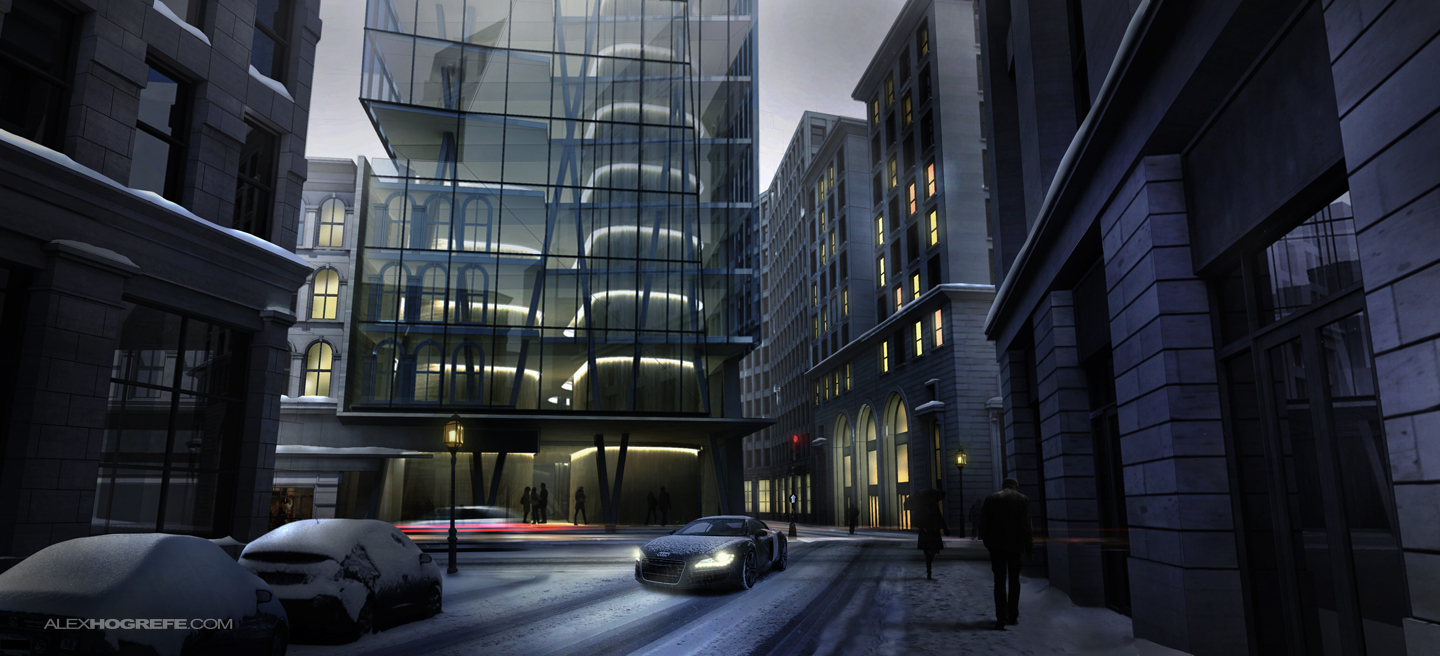
BEFORE
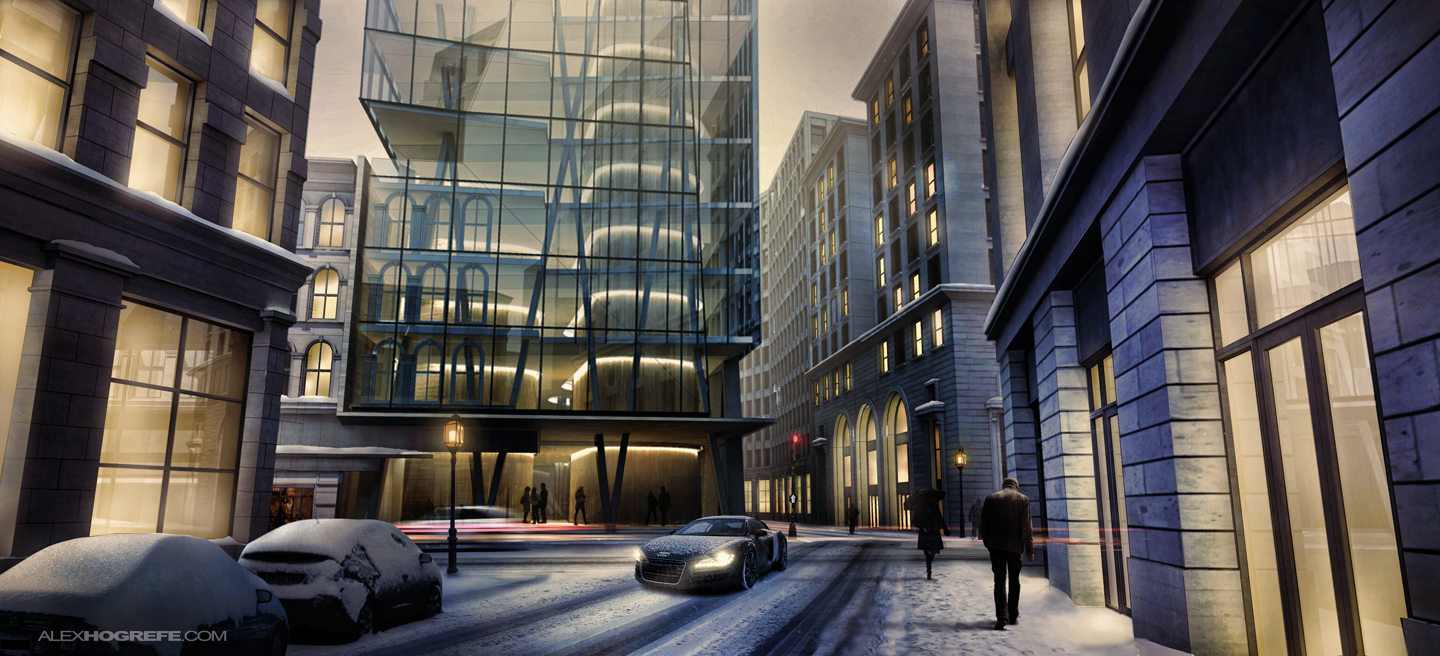
AFTER
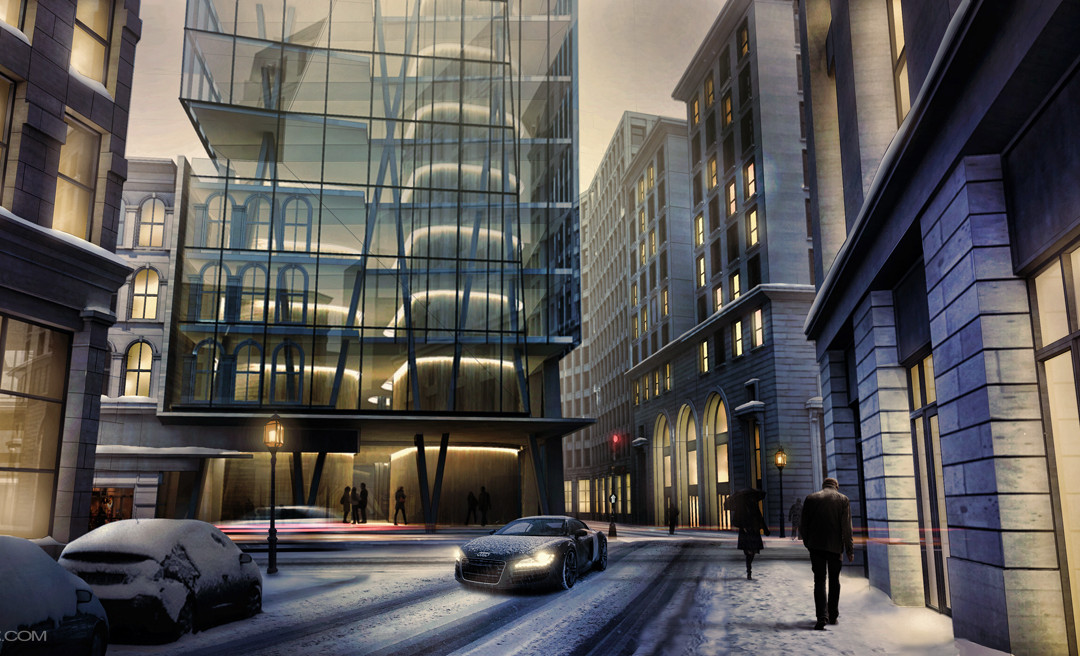


been waiting for this a long time, thx very much, also wanna know if you can give some tips on the street you did on the highrise partial rendering
nice work! thx for sharing! 😉
GREAT WORK..THANK FOR SHARING
i am one of your follower…very nice tutorial. 🙂
Hi Alex, just want to thank you for all your nice post. I have been following your blog for about 6 months and I just defended my thesis work last week successfully. It turned out to be good. I learned a lot from your blog and it is very professional! Thanks again.
Dan
Alex,
Thanks for the STEP BY STEP instructions, especially on this last post with window lighting and reflections. Very useful and easy to follow!
amazing work Alex!!!I've never seen such creative work in my country!!
i will share the blog with my classmates . and keep following!
good job
what resolution do you get the renders?
Alex, just curious what you used for lights in the tower in krykethea? they do not seem like omni lights or spot lights? thanks for the tutorial, always looking for ways to cut down render time
@ Nick,
I place simple rectangles throughout the building in Sketchup. Then I paint them a color (doesn't matter which color). Then in Kerkythea, I tell that color to emit light which is done under the material editor. I find this route much easier and much faster than trying to place lights in Kerkythea.
Love the simplicity of it all. Really clever way to avoid rendering meltdown!
Alex, when you render the image do you use all-layers at once, or do it separatly?
For instance,do you render the reflection layer aside from the other layers?
Hi Alex,
I am one of your silent followers. Your work is excellent, and you generosity admirable.
Thank you very much for sharing your knowledge.
@Hugo,
I render everything at the same time typically.
@Alfie,
Thanks for following!
Alex, great tutorial! Also nice to see a tutorial which explains why, and not just how, one makes the changes.
One question. What creates the shadows of people on the pavement (sidewalk) in the original render?
Cheers…..Scotty
Alex
Great work and thank you so much for sharing……….can you explain how you created the glass curtain-wall on the main building…..Regards
These delhaes construction are very difficult to Disciples my understanding. It is very complex and interesting, but I did not get this stage of development yet.
Awesome tutorial! Thank you very much!!!
Lovely post! Thank you so much for showing how to better renderings in Photoshop – most of the times we get so pressured to get everything right in the renderings softwares that we forget how important the post-rendering is! 🙂
Like it thanks for the tutorial the picture looks much better with higher resolution.
which renderer do u use??
@alex
do you have a tutorial for adding some light in SU V-ray? Specially for the picture above, i’m intrested on the way you put the lights on each level. all of your works absolutely awesome and helpfull. Thx a lot.
Thanks for share…thats was great work. Very helpfull reduce my rendering time.
the night scene tutorial has proven to be helpful, however the problem I am having is producing those blurred cars with the light trails as shown in this finish tutorial. In my current project would like to try something like this but not sure exactly how to pull it off.
Hi! I absolutely love your tutorials and they have been so helpful for me on my M.Arch journey. I was wondering if you could post a tutorial on how to create reflectivity or shine to a material or texture that is multiplied over the wall in photoshop whether it be glass or a metal. The dodge and burn tool haven’t been giving me pleasing results and layer overlays with a soft brush haven’t either. Kerkythea also seems to be crutched by this task because it doesn’t have exact materials in its library. It would be tremendously helpful! Thank you!
Thanks a lot
Hi Alex, just wondering what you use the layer “Lines” for. Thanks and keep doing that great job.
Thank you for providing such information. This is very generous of you providing such vital information which is very informative.
Thanks for sharing