It has been a while since I have created a good ole tutorial. This is a really important one if you don’t already know or use Smart Objects in Photoshop. Smart Objects bring a whole new level of ability to edit in Photoshop. At Design Distill, we use them in every image we create. They have streamlined how fast we can create images, and more importantly, allow editing to be much quicker, cleaner, and consistent. Smart Objects take some getting use to and have some limitations, but are something everyone should be integrating into their workflow. Below are a few examples of how they can be used.
So what is a Smart Object in Photoshop? When you create a Smart Object, you are telling Photoshop to save the original characteristics of the source image. When you edit a Smart Object such as adjusting the levels or hue/saturation, Photoshop will turn these into Smart Filters allowing you to undo these changes later. Scaling and distorting a Smart Object also does not degrade the layer as shown a little later on. Another advantage is that copies of Smart Objects create instances of each other. This is similar in concept to how blocks work in AutoCAD or components in Sketchup. Updating one instance will update them all. Most importantly, changes to a Smart Object are non destructive which is crucial for sharp and editable Photoshop files.
1. Creating a Smart Object
Option A
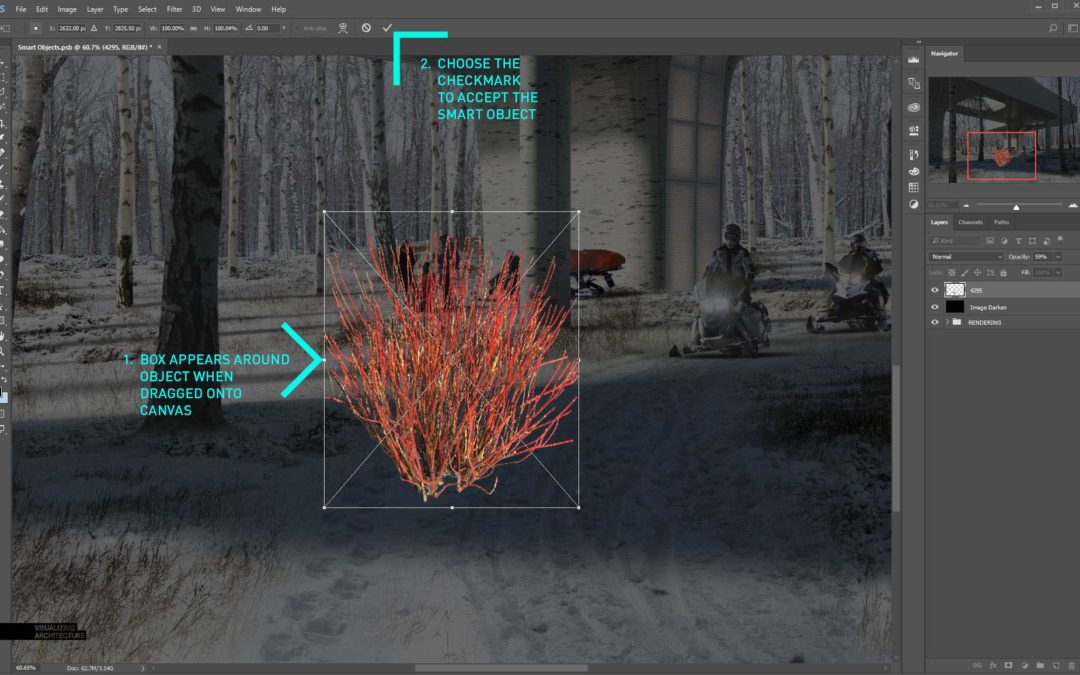
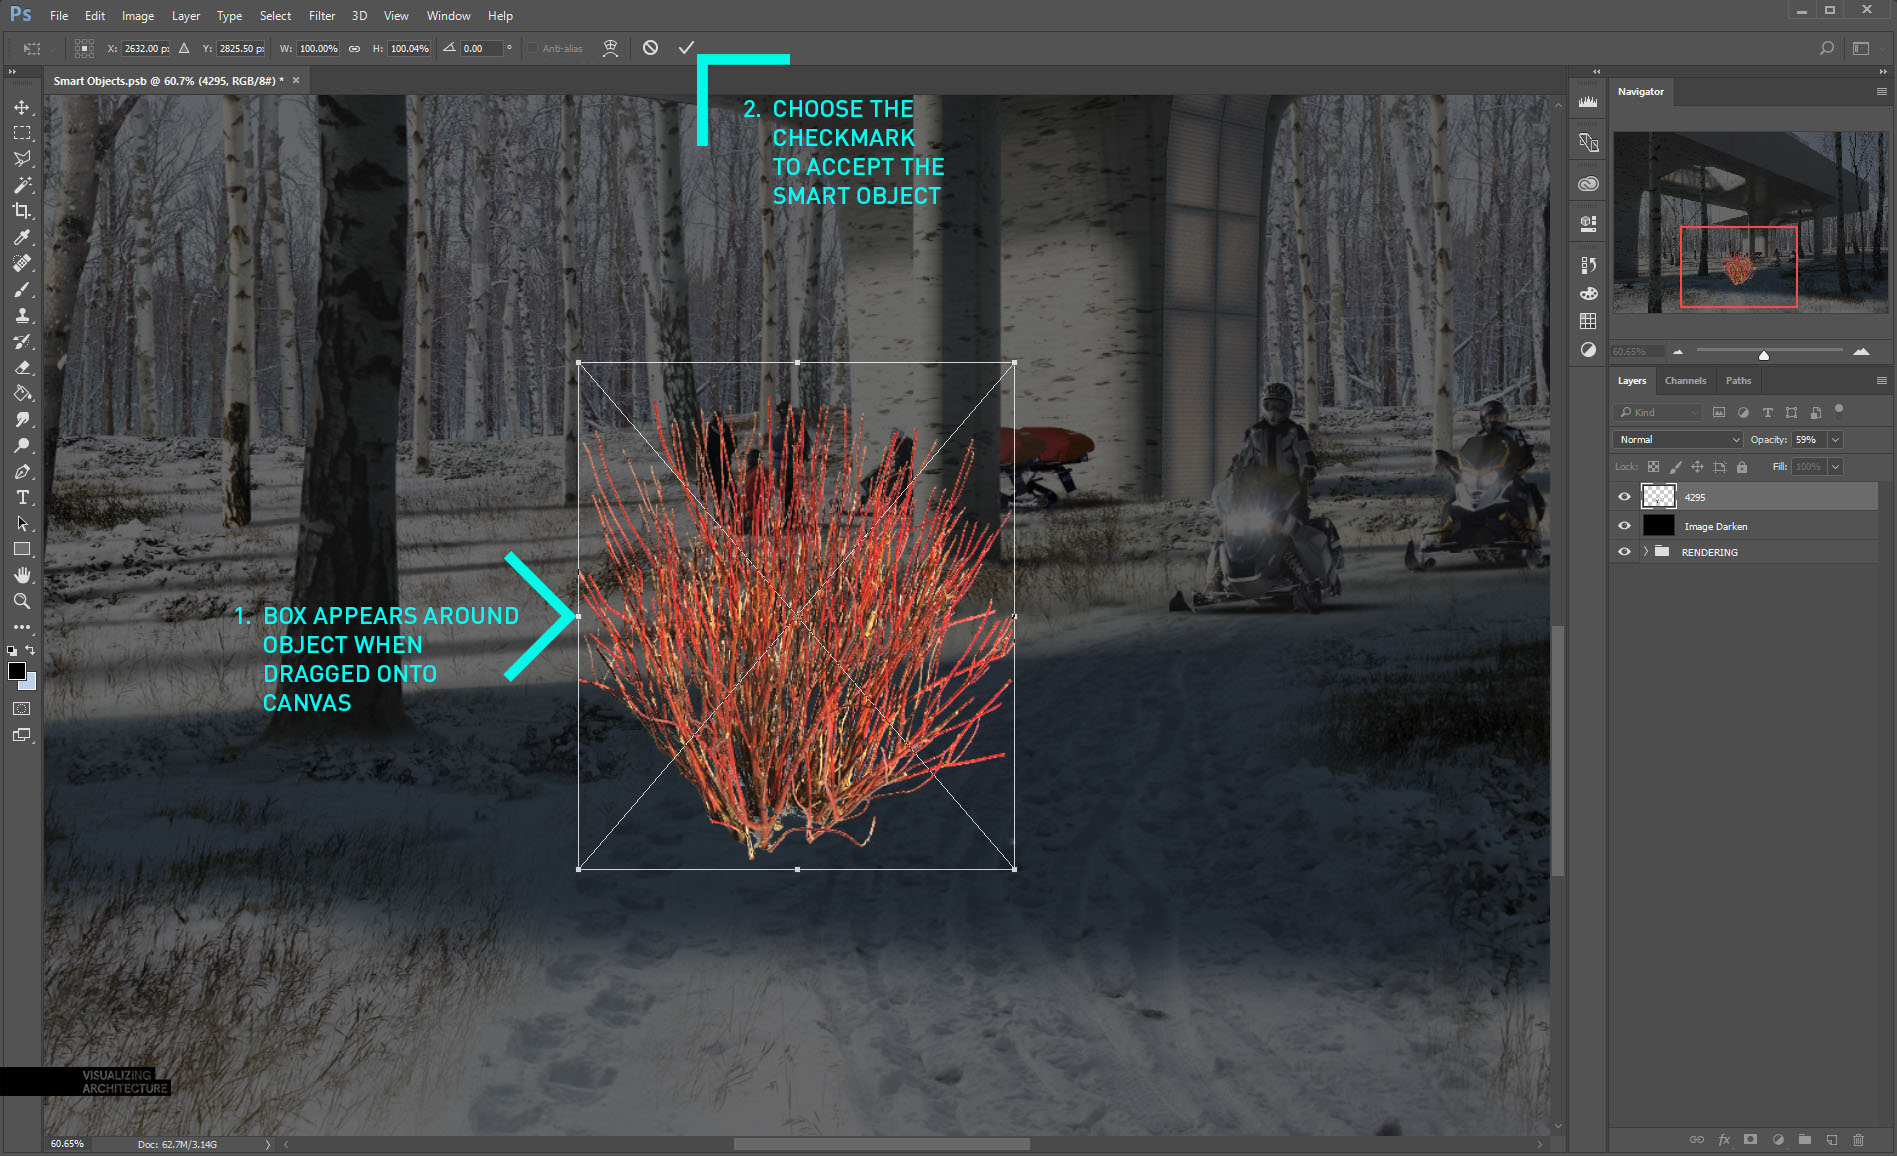
There are a few ways to create a Smart Object. The first is by simply dragging a file directly into a Photoshop file. I am using Photoshop CC so this method may not work on older versions of Photoshop. When you drag an image file such as a .jpeg or .png into an open Photoshop file, the image will come in as a Smart Object and have a bounding box around it. Hit the check mark at the top to accept the Smart Object into the file.
Option B
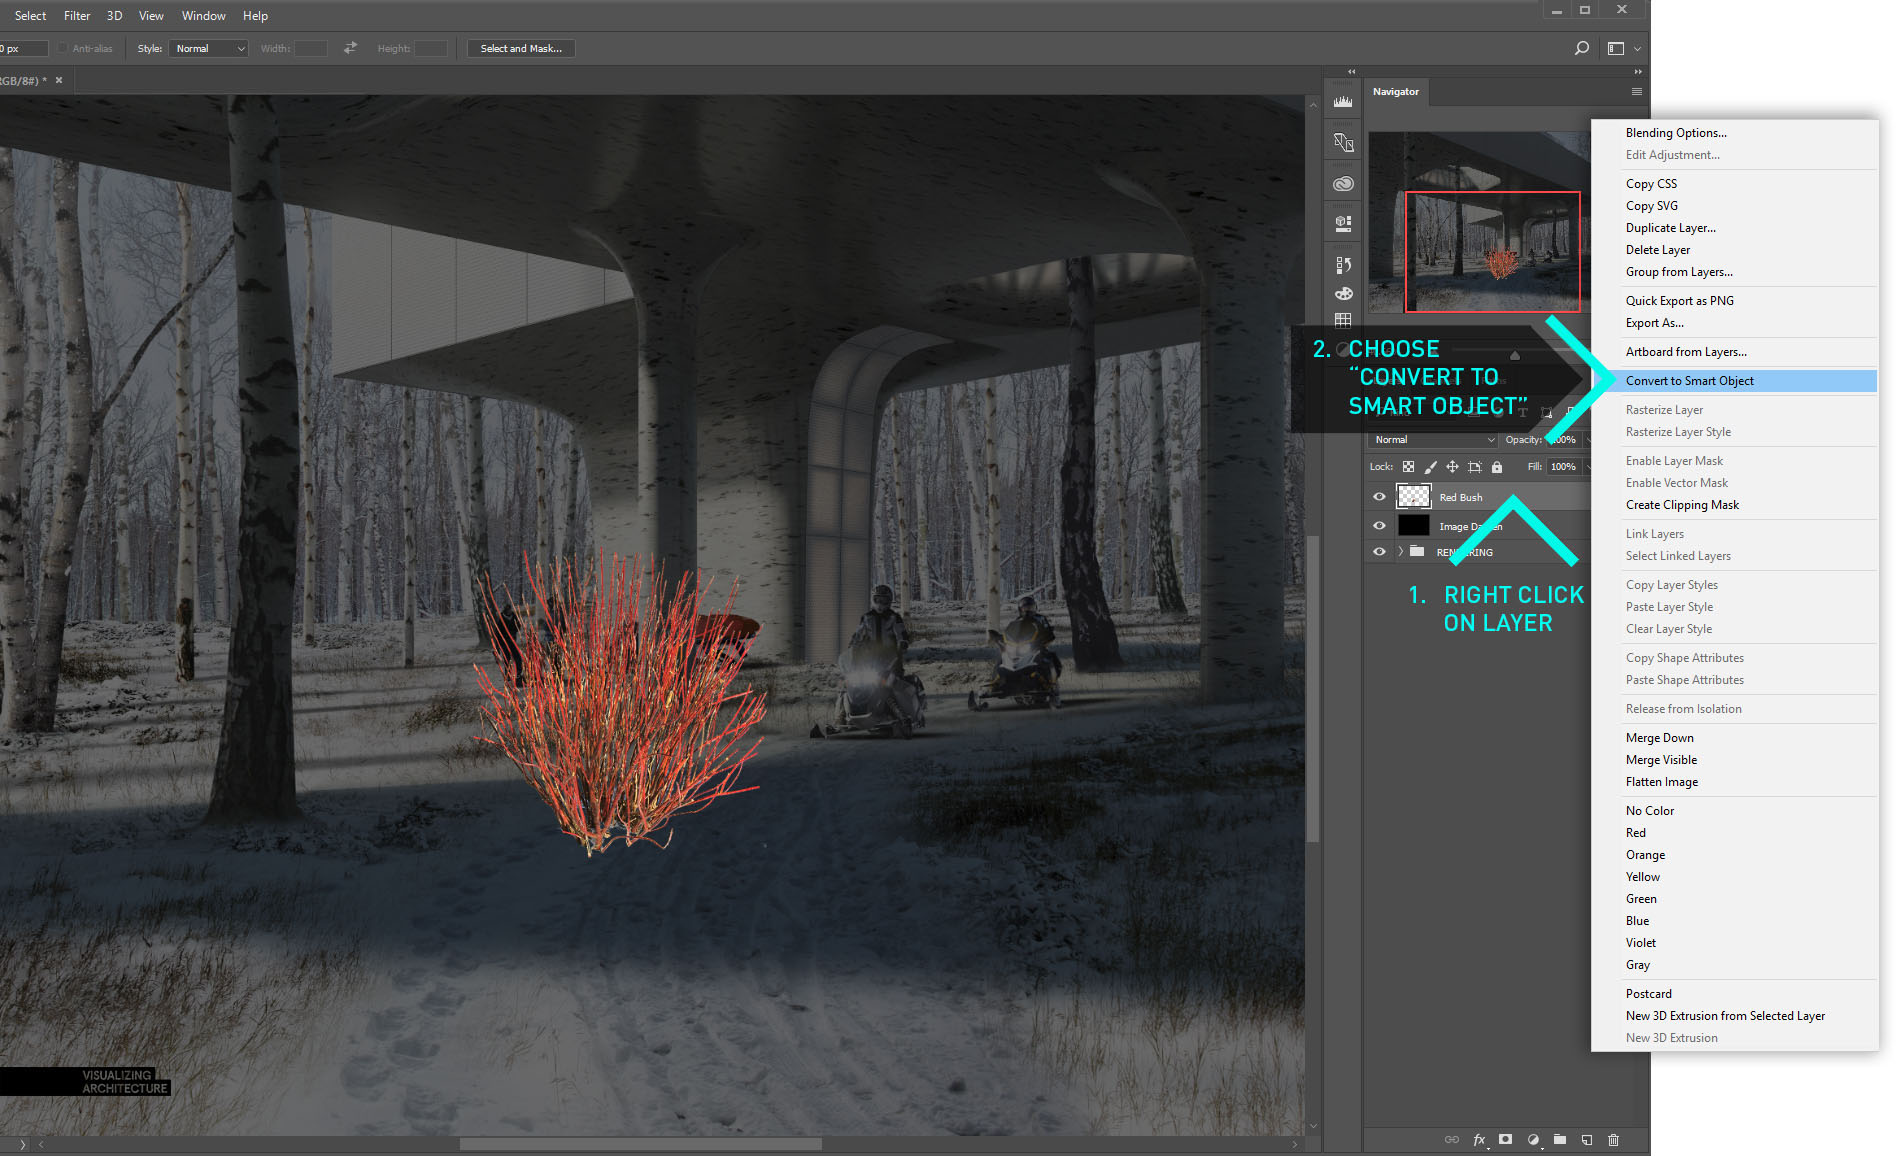
In some situations, you may already have a layer in Photoshop that you want to convert into a Smart Object before making adjustments such as toning or scaling. To turn a layer into a Smart Object, right-click on the name of the layer in the layers palette and choose “Convert to Smart Object”.
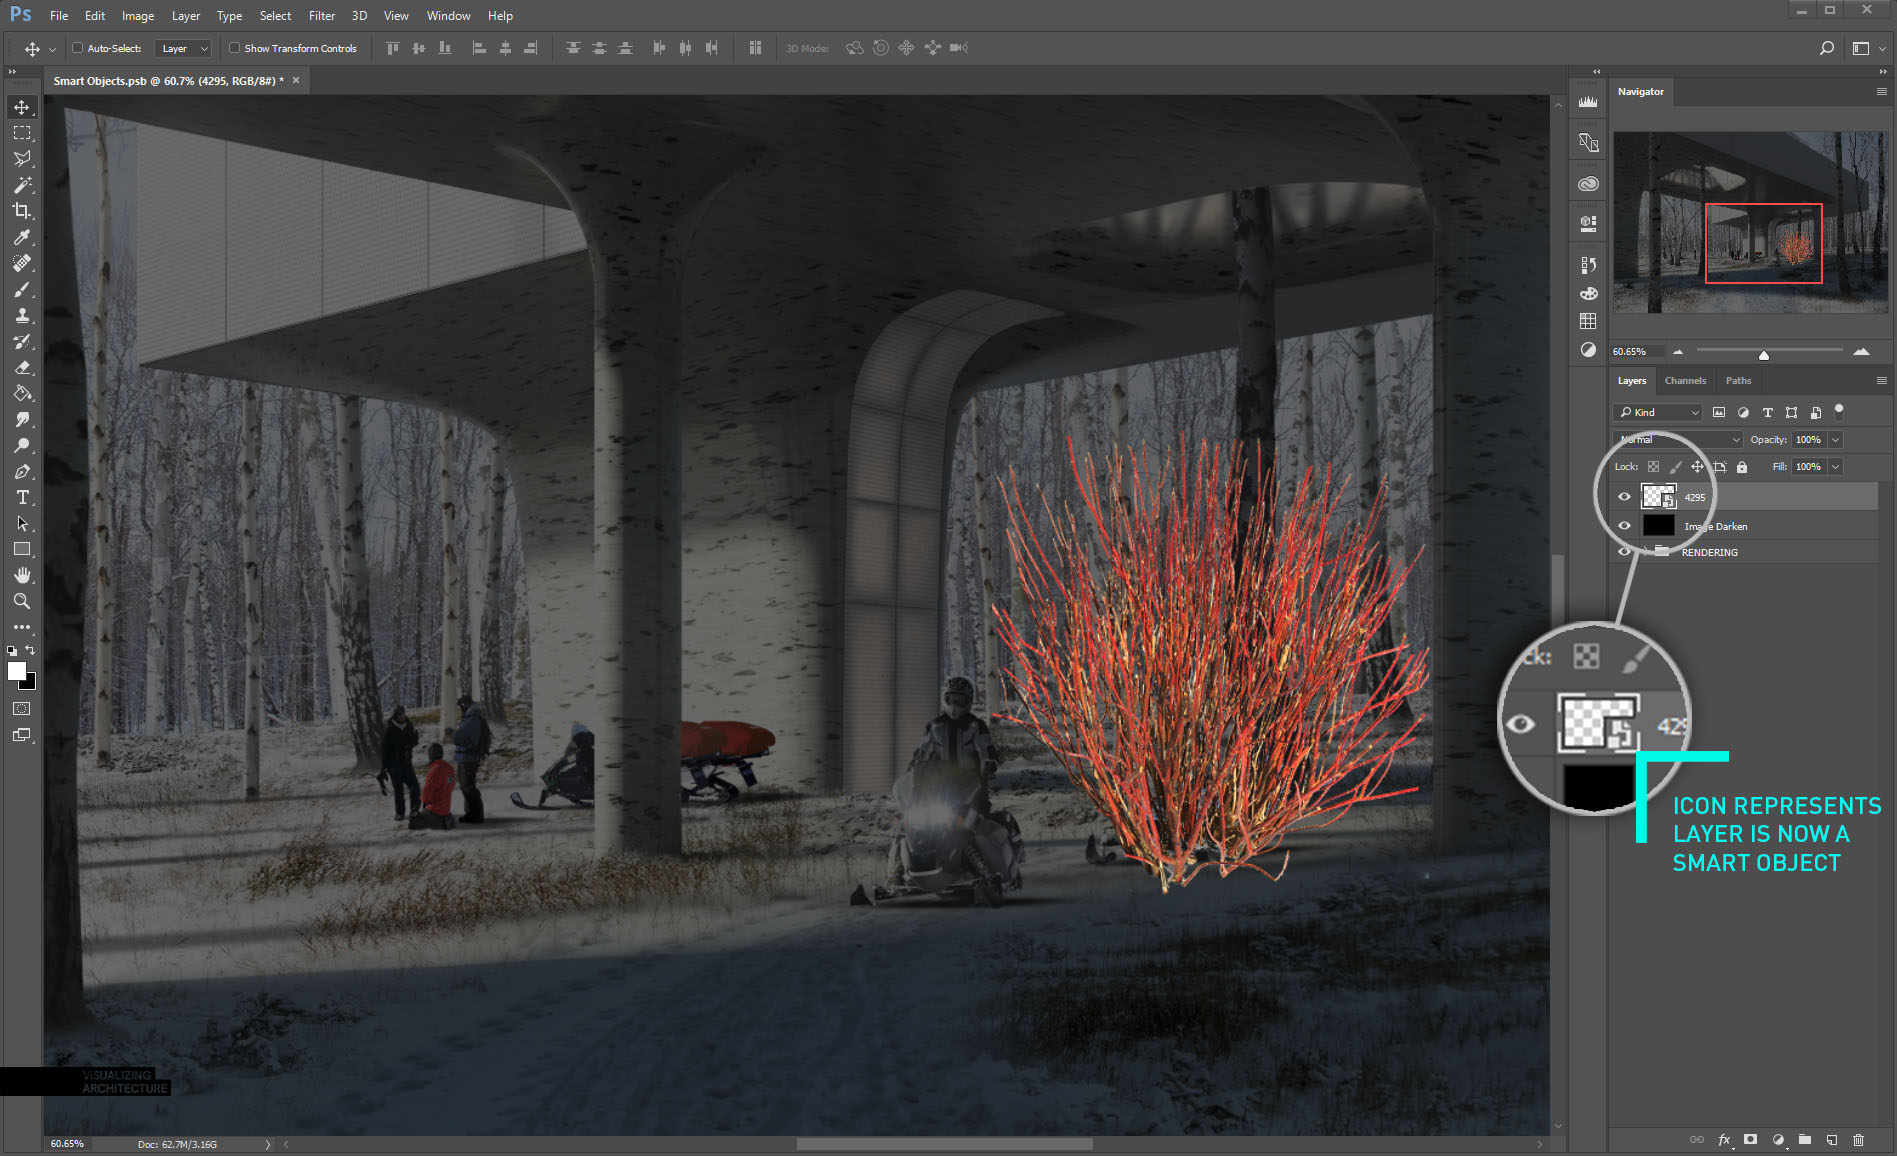
After choosing “Convert to a Smart Object”, you will see a small icon on the layer which lets you know that it is now a Smart Object. Photoshop has now saved the state of the layer and changes made to this layer will now show up as Smart Filters underneath the layer in the layers palette. Changes up to this point will be able to be reversed back to the state of the layer at the time of the conversion to a Smart Object.
2. Scaling
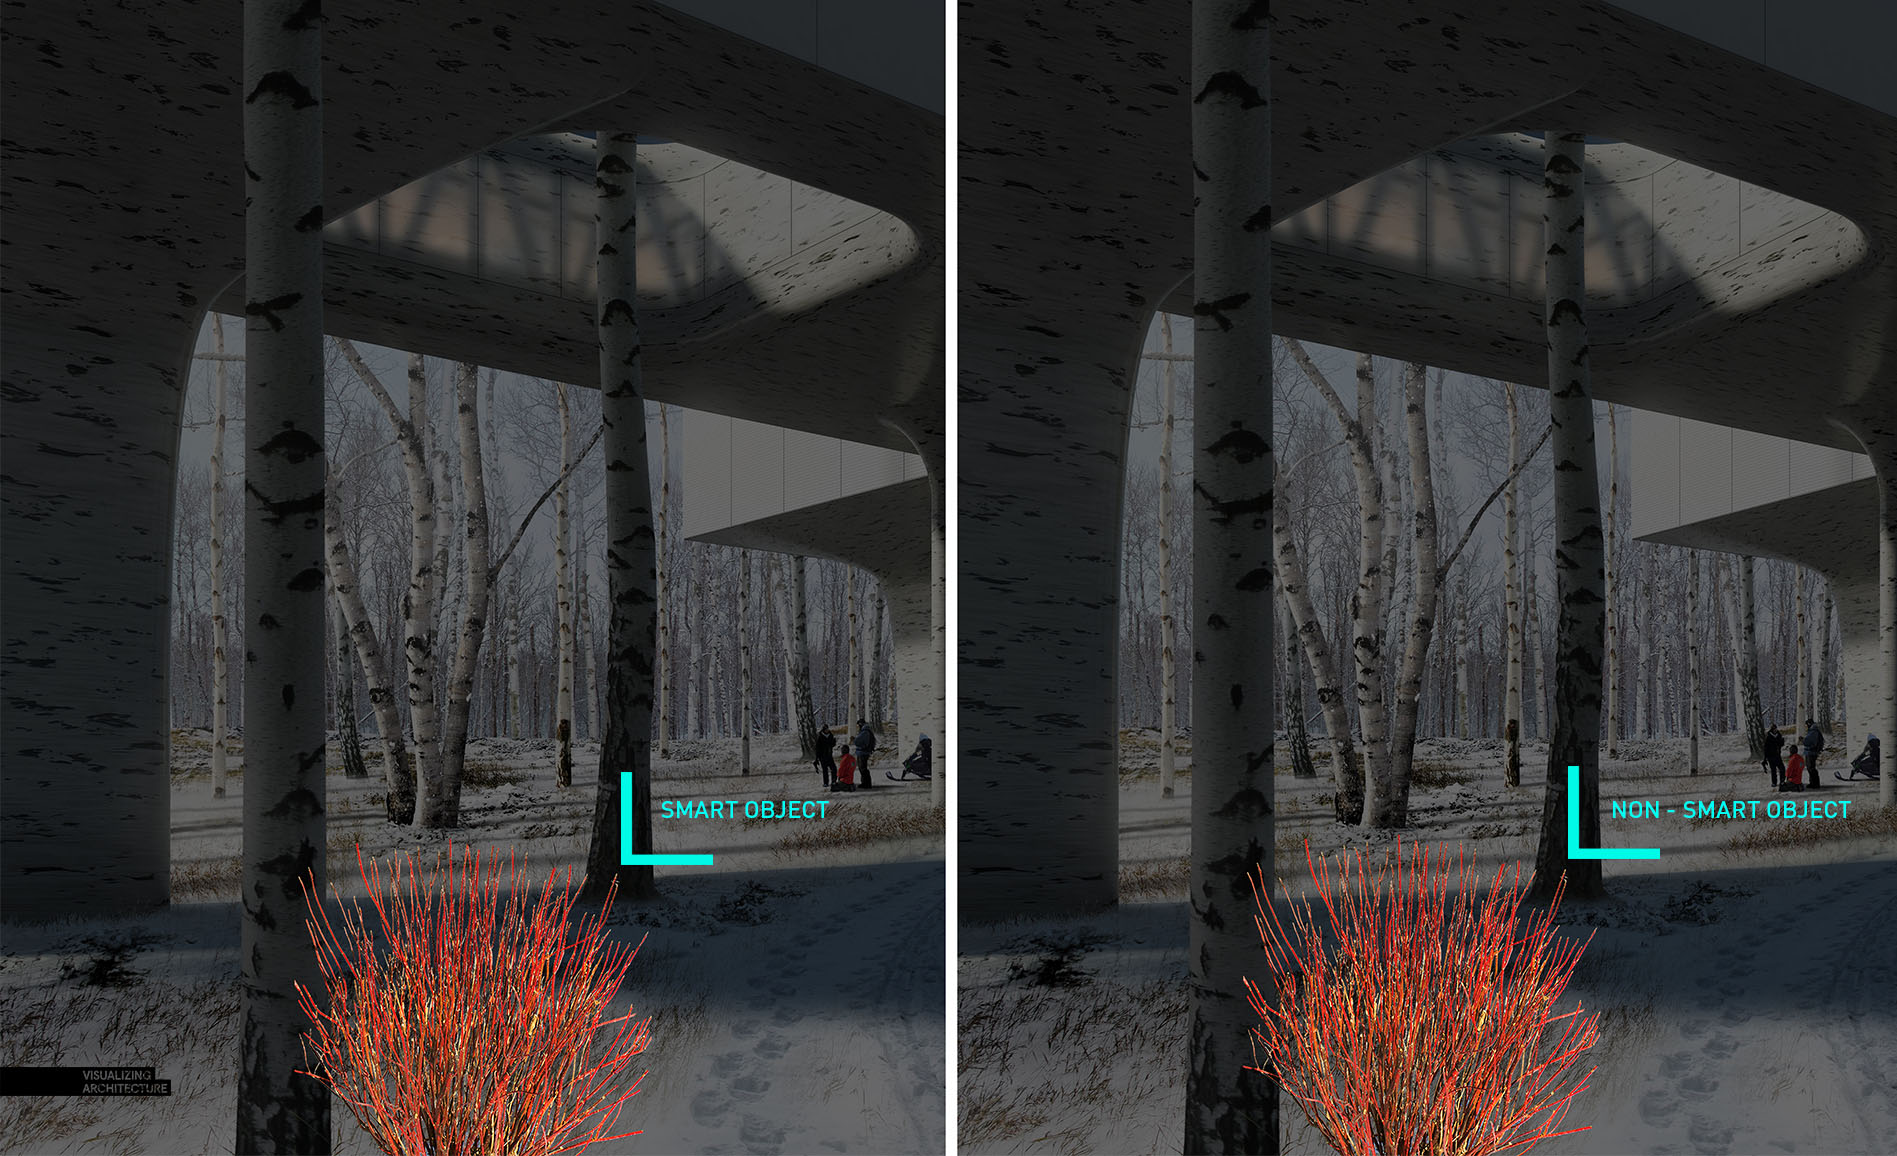
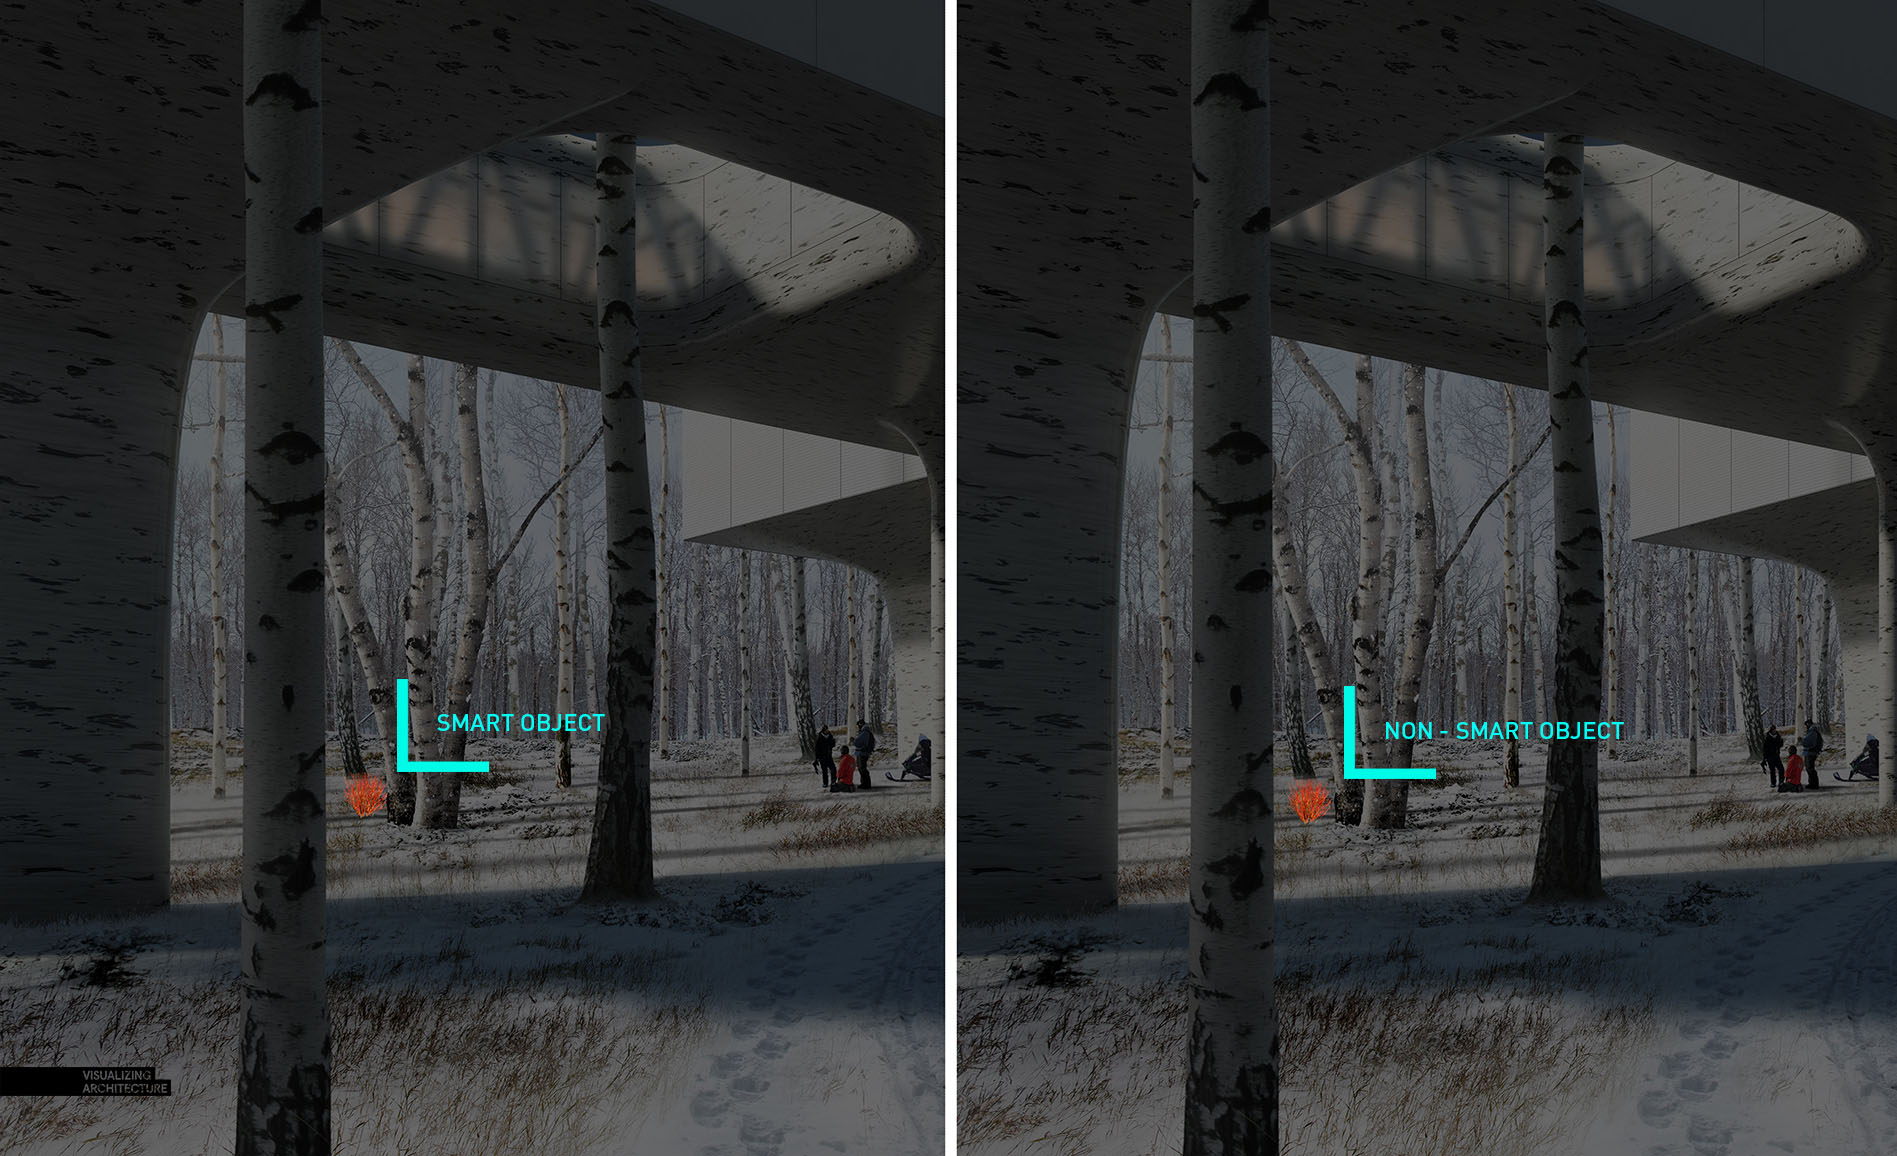
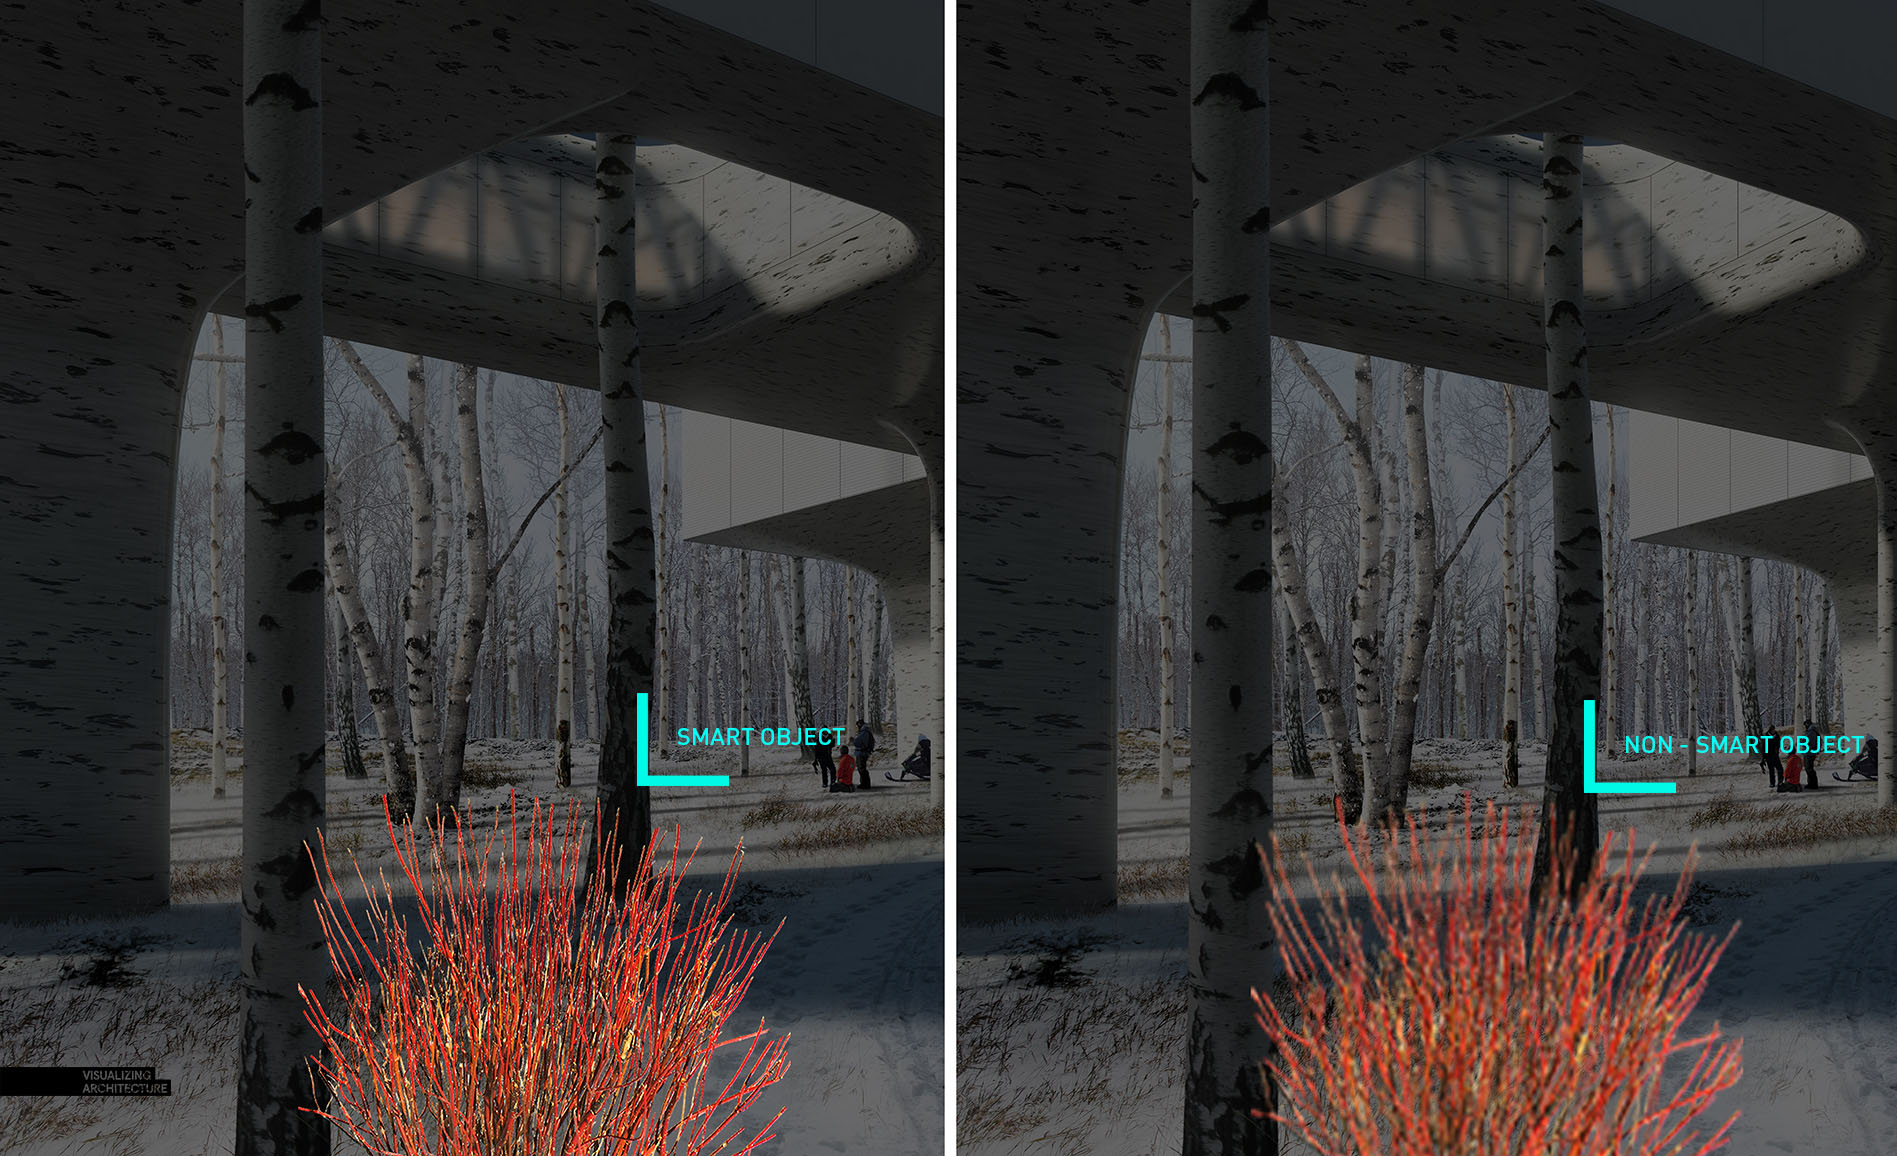
Scaling is one of the biggest reasons to use Smart Objects in Photoshop. This example shows two red bushes, one is a Smart Object, the other is just a simple rasterized Photoshop layer.
Often in architectural visualization, objects such as plants and entourage are scaled many times when trying to place them in a composition. In this case, I decided to push the red bush into the distance, thus I needed to scale it much smaller.
When both bushes are scaled back up, the Smart Object maintains the original sharpness because it is still referencing the original stored information of the image. The non-smart object’s quality has been significantly degraded. The more times that the non-smart object is scaled, distorted, and rotated, the quality will continue to degrade. The Smart Object will always maintain the original sharpness no matter how many times it is manipulated.
3. Smart Filters
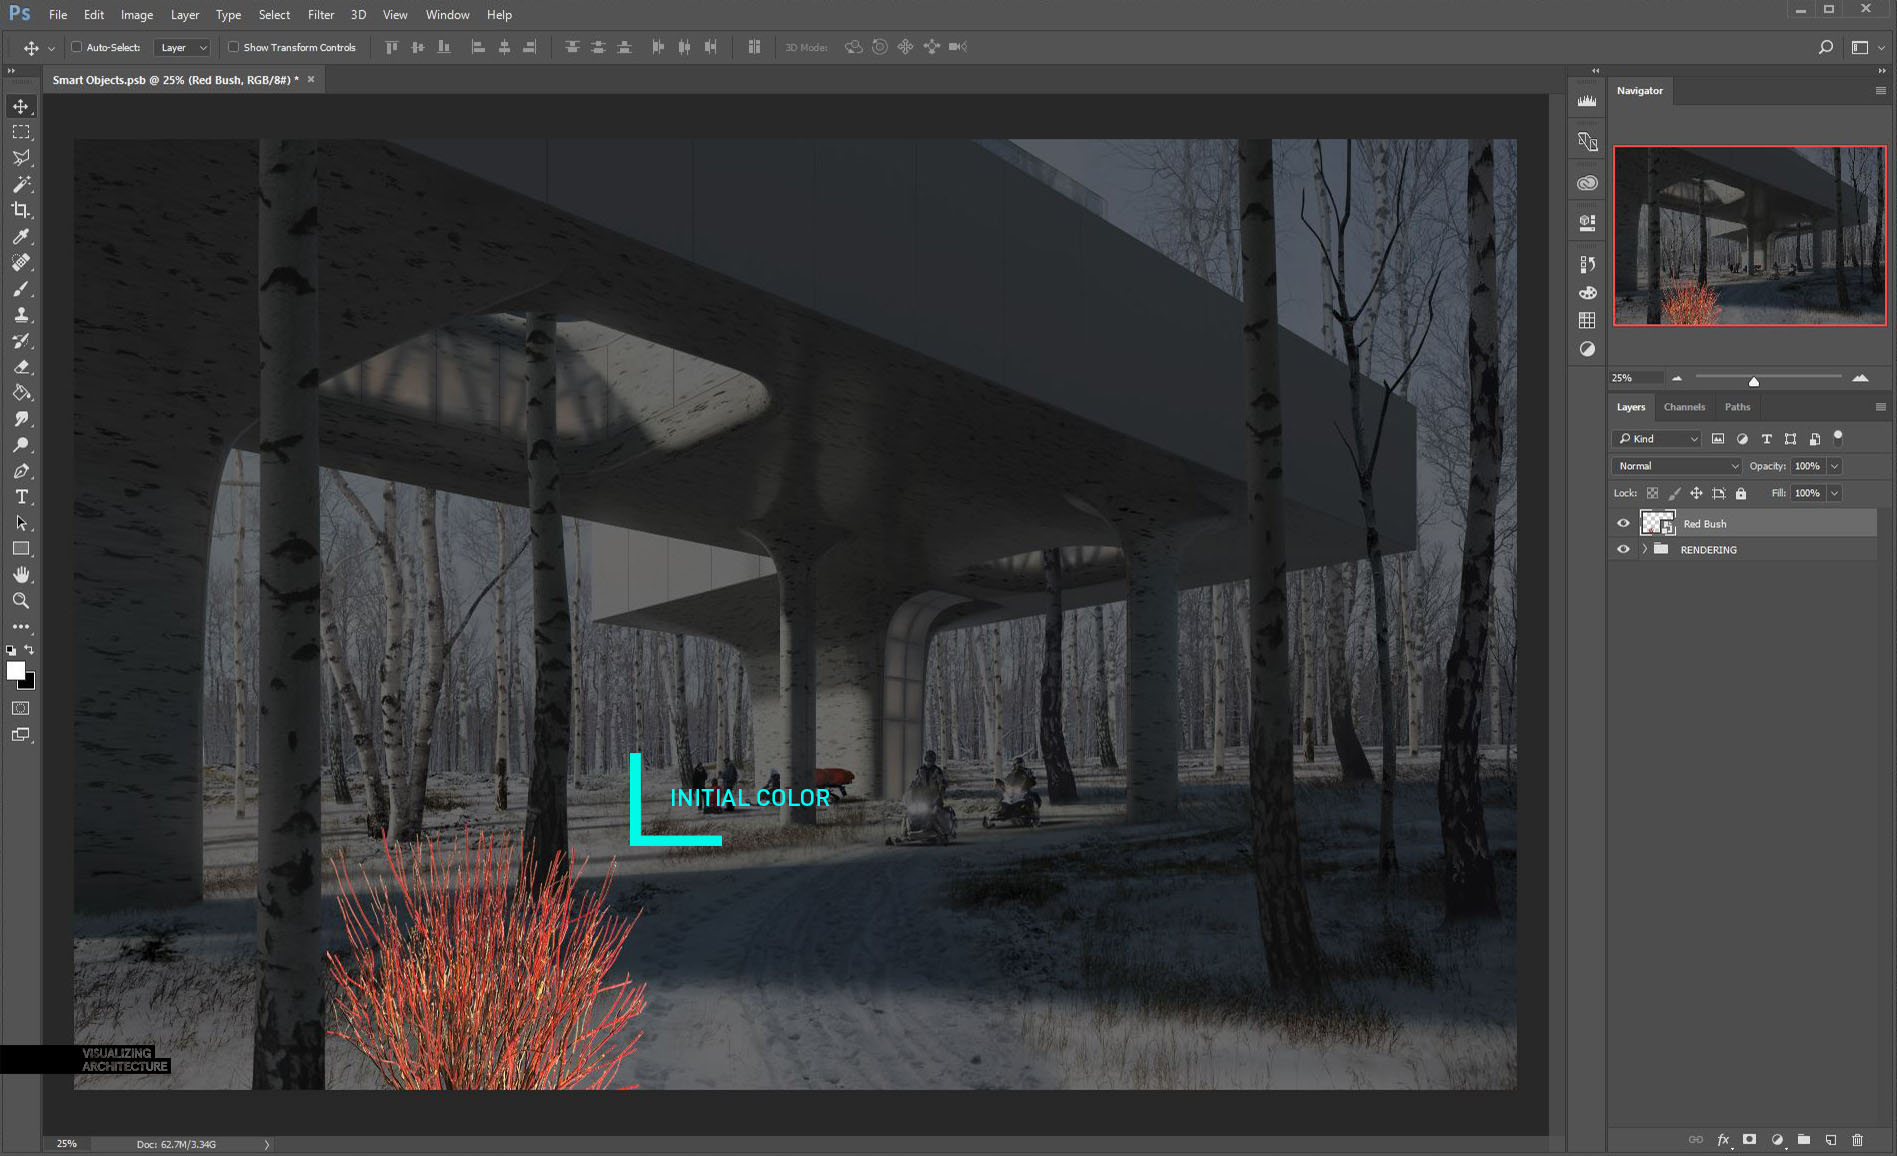
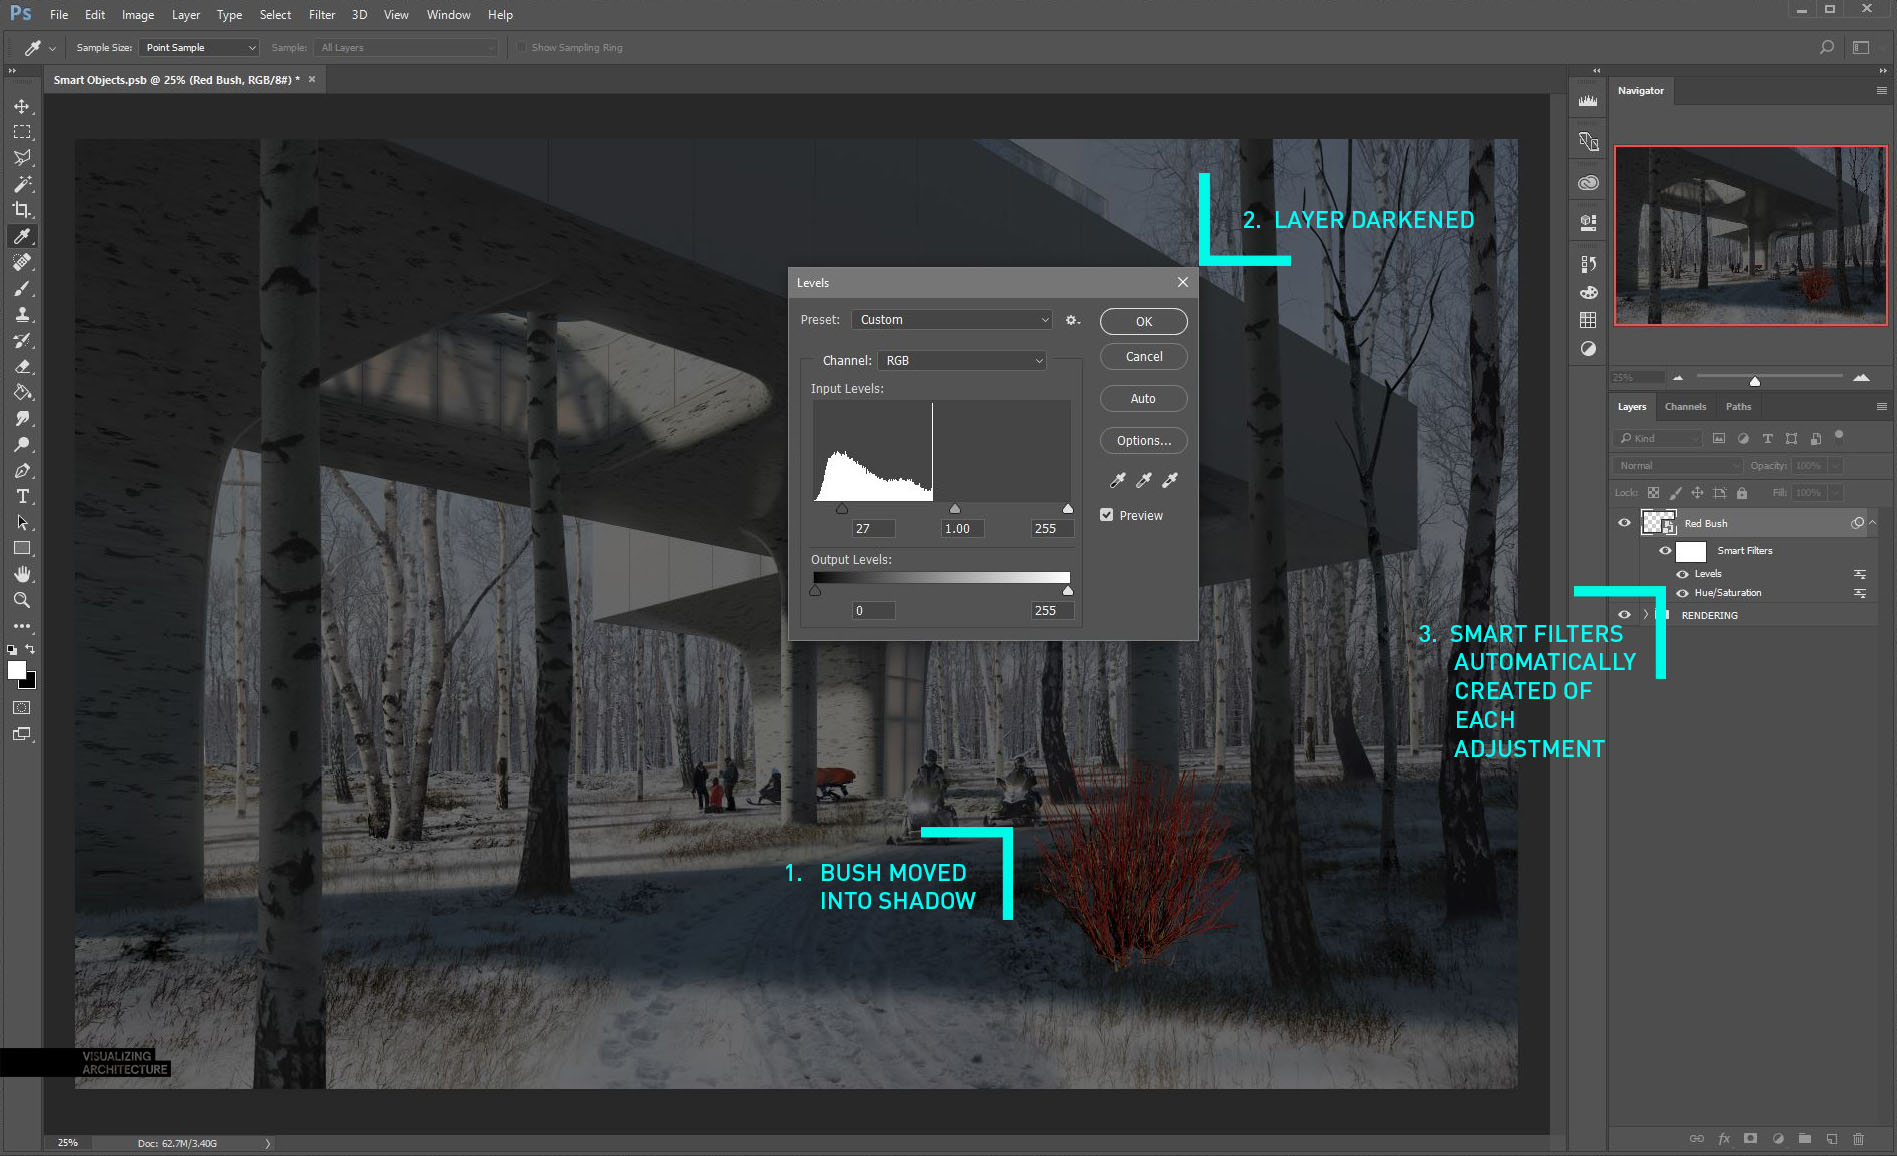
Similar to resizing, elements like vegetation, entourage, and base files often require lots of toning adjustments. With Smart Objects, the toning adjustments are automatically turned into Smart Filters. This means all of the color adjustments, level and curve changes, and other tone adjustments are saved right next to the layer, allowing you to tweak, add to, or fully remove the adjustments at any time. In this example, I added a red bush and turned it into a Smart Object.
Later on, I decided to move the bush into the shadow, so I darkened the bush using “Hue/Saturation” and I adjusted the “Levels”. You will notice under the “Red Bush” layer in the Layers Palette, that these adjustments appeared in the order in which they were created.
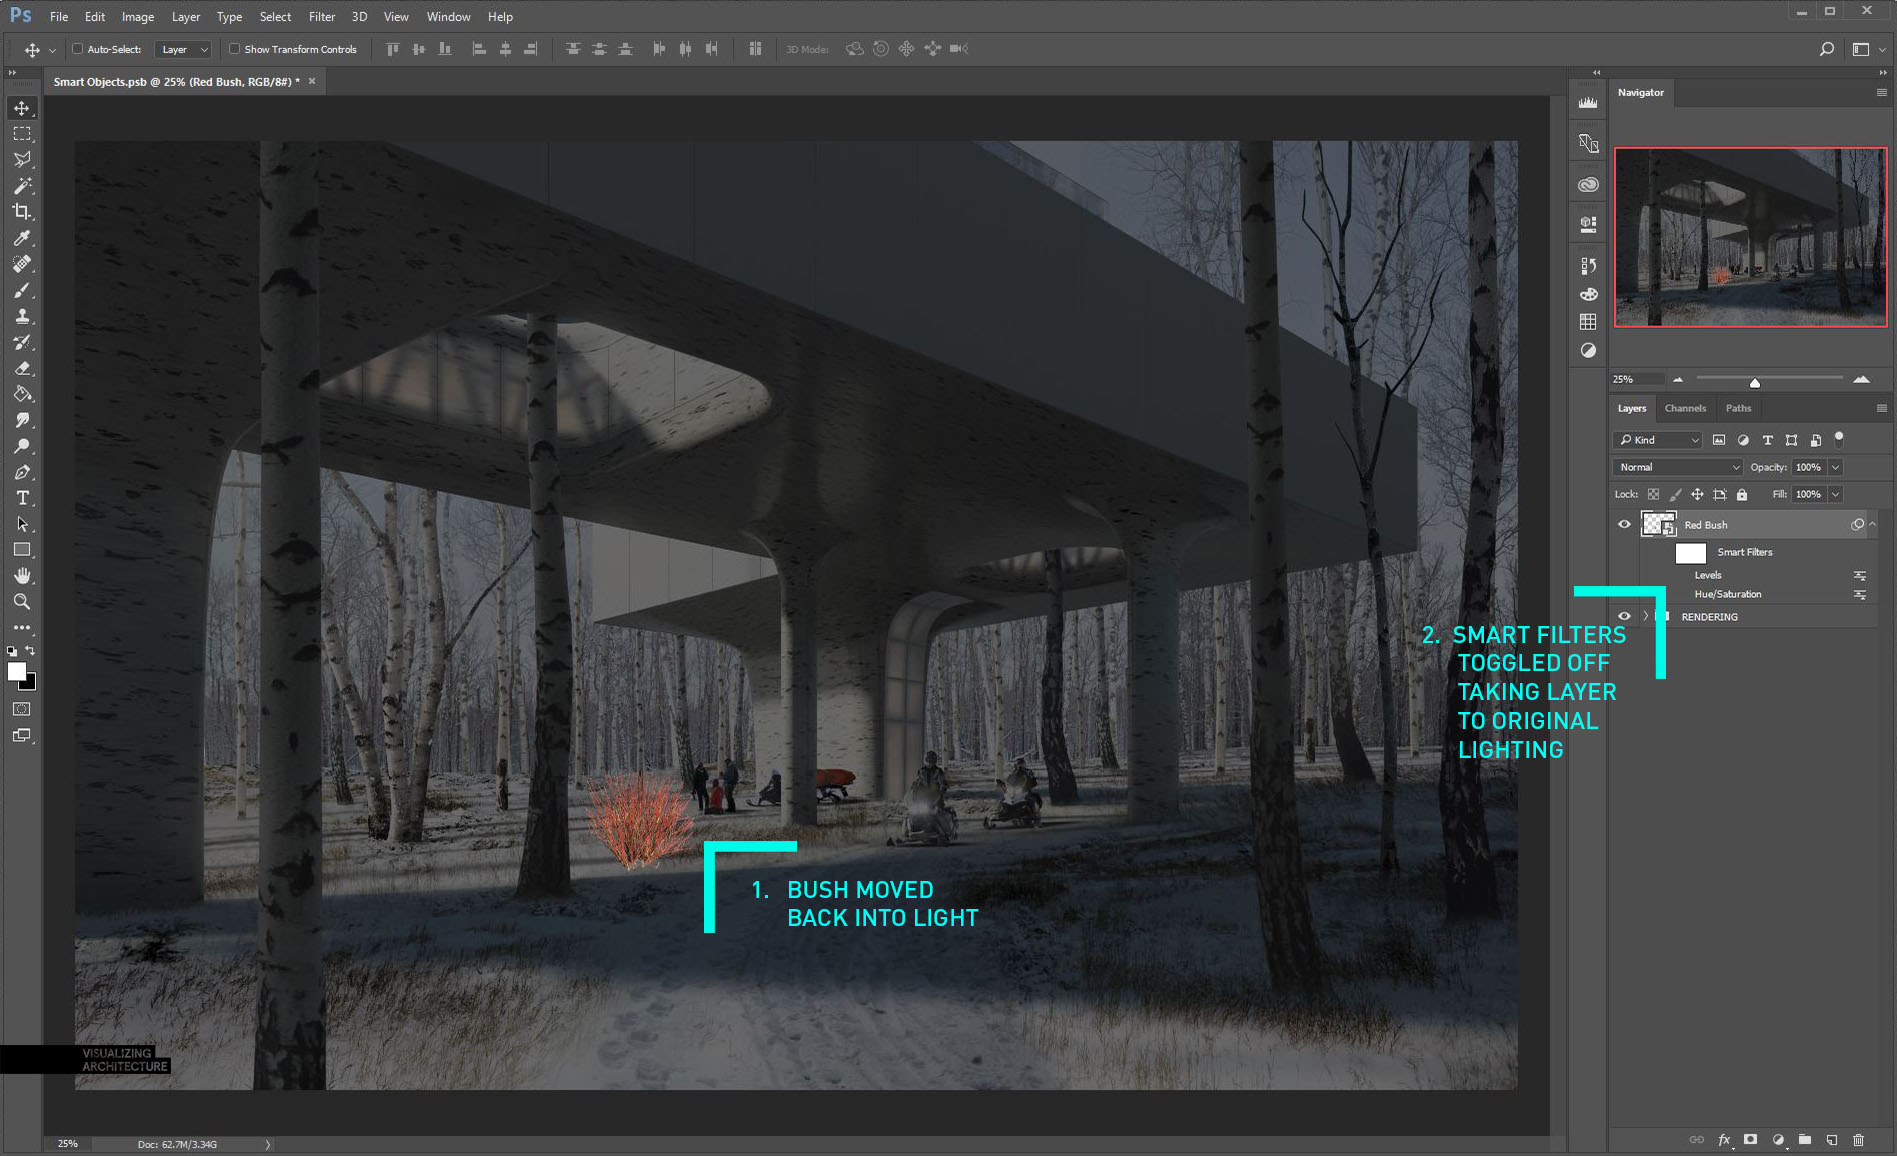
Later, I again decided to move the bush back into the light. I wanted to revert back to the original tones of the bush, so I simply turned off the Smart Filters. You could also delete the filters altogether. If the bush was not a Smart Object, it would have been very difficult to get the color back to its original tones and I would have most likely needed to reinsert it again.
4. Copying As Instances
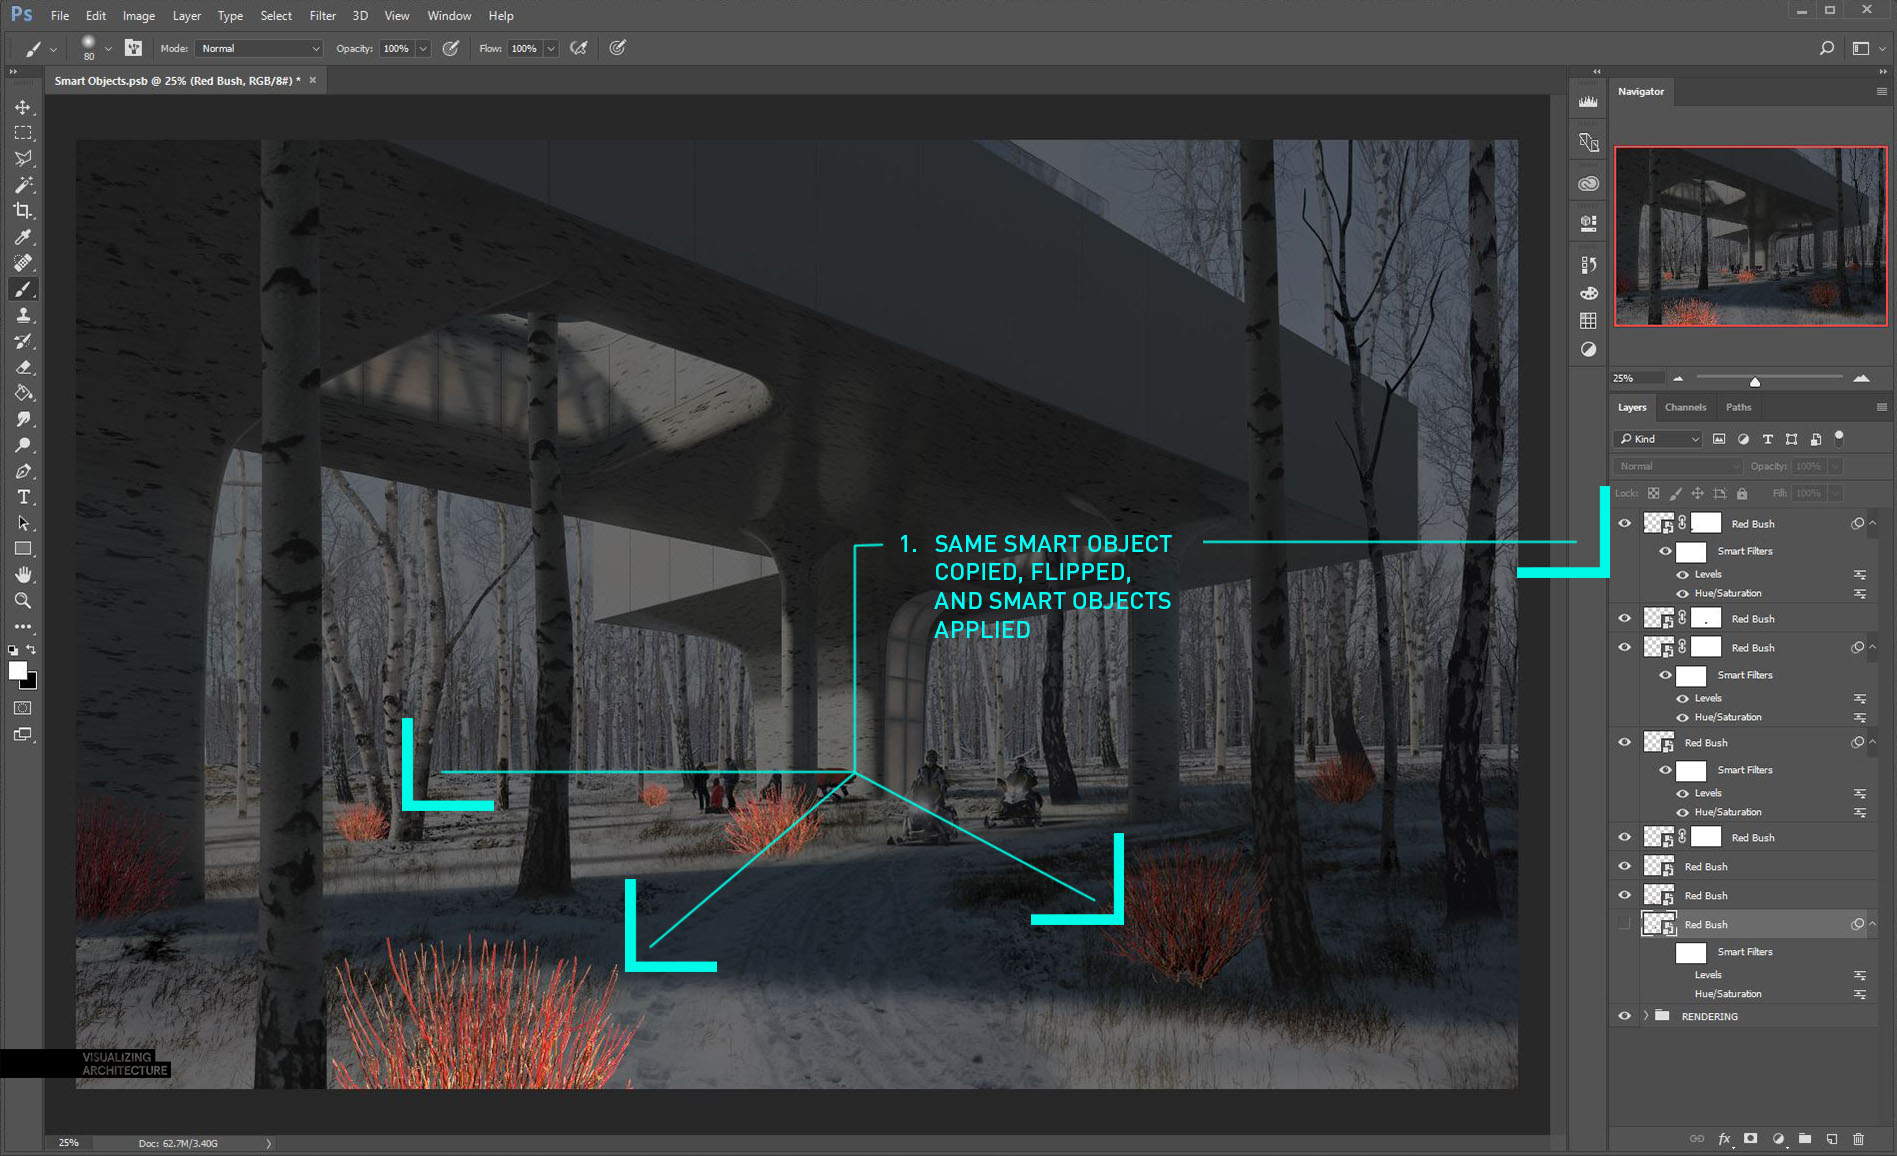
You can use Smart Objects as instances of one of another similar in concept to blocks in AutoCAD or components in Sketchup. This means after a Smart Object has been copied several times, the image can be replaced with a new image, and all of the instances of that Smart Object will automatically get updated. In this example, I copied the red bush several times by holding down the “Alt” key, clicking and dragging. For the bushes in the shadows, I added some Smart Filter adjustments to darken them. I also horizontally flipped the bush on several occasions.
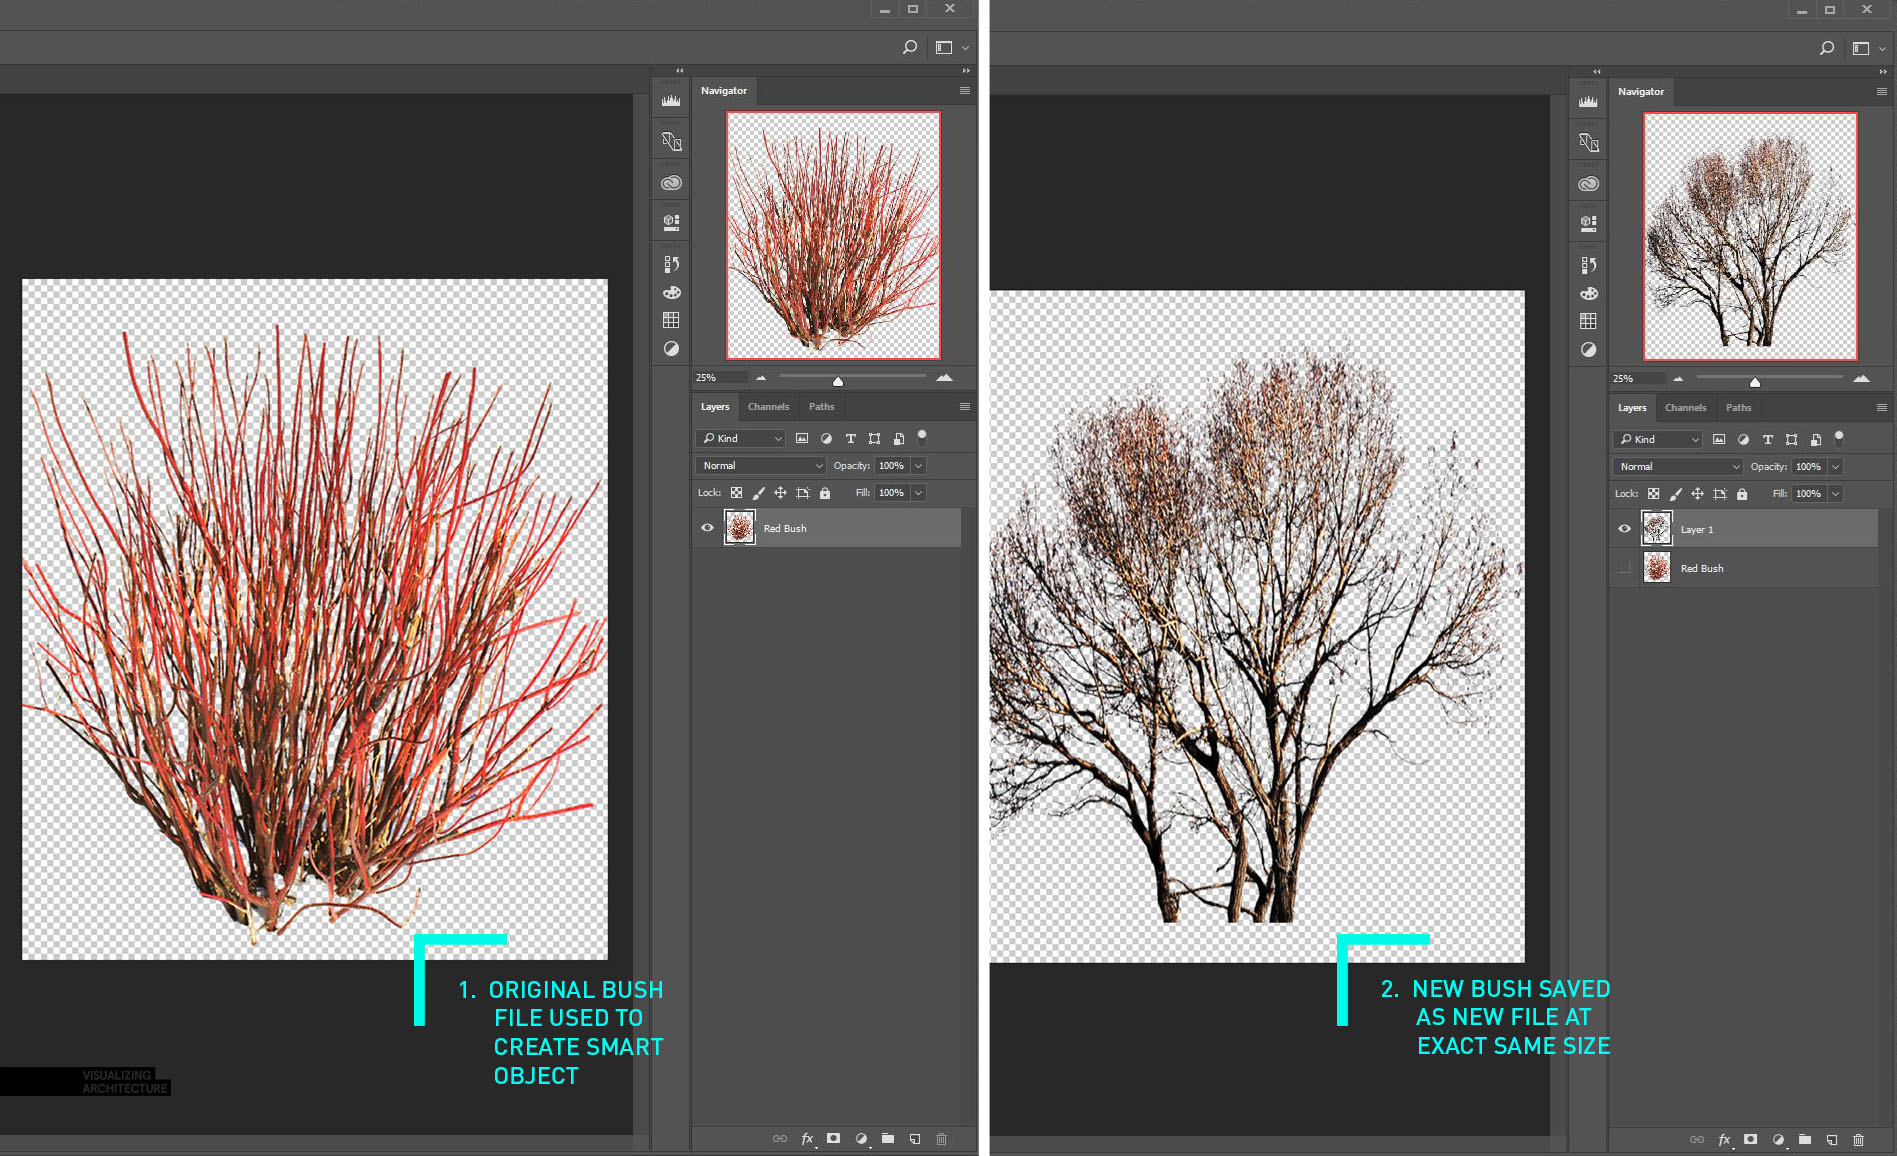
Next, I want to replace the red bush with a brown bush. To do this, I first opened the original red bush image, turned it off, and brought in the new brown bush. I then save the brown bush as a new file. It is important that the new image file is exactly the same size in pixels to the original image file used to create the Smart Object.
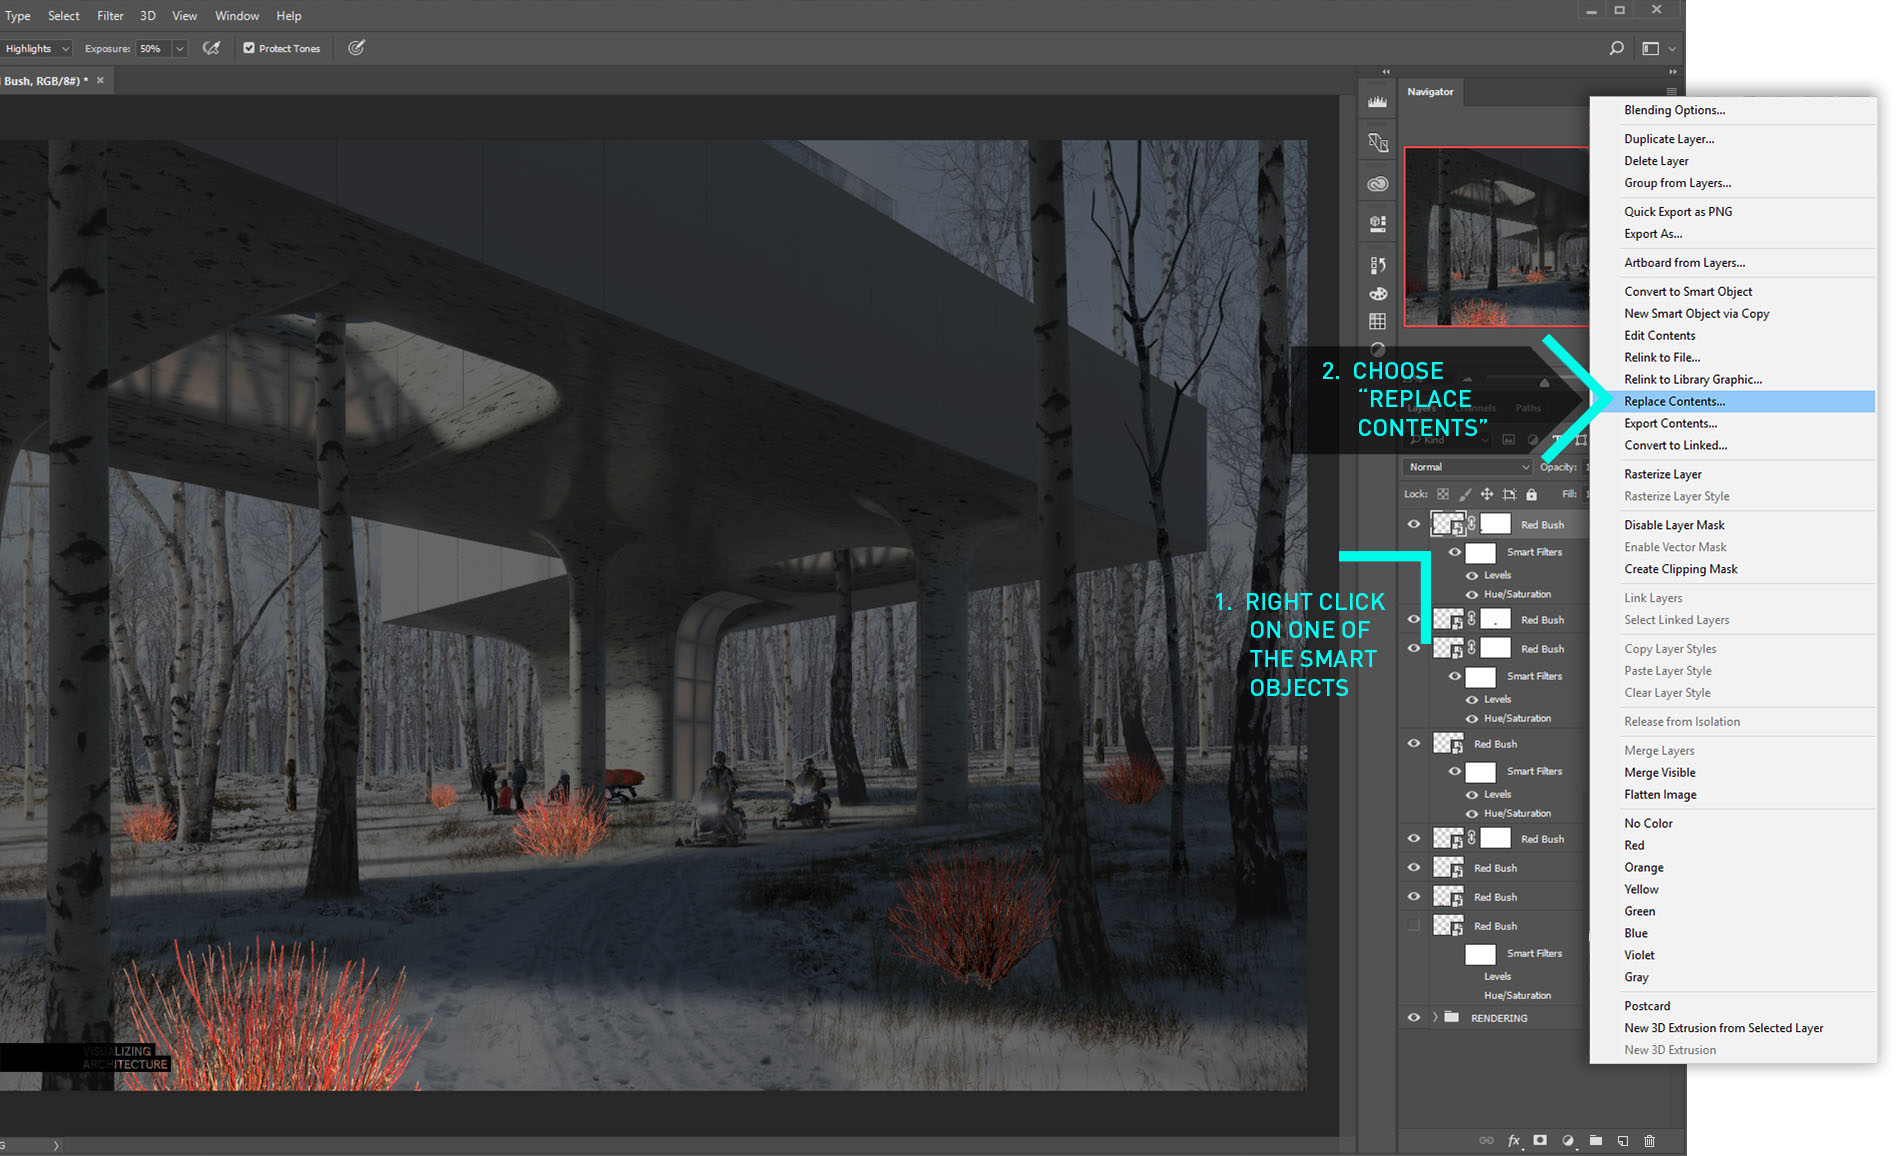
Back in the illustration file, right-click on one of the Smart Object instances in the layers palette, and choose “Replace Contents”. In the pop-up window, browse to the new image that will replace the current Smart Object file. In this case, I am browsing to the new brown bush file.
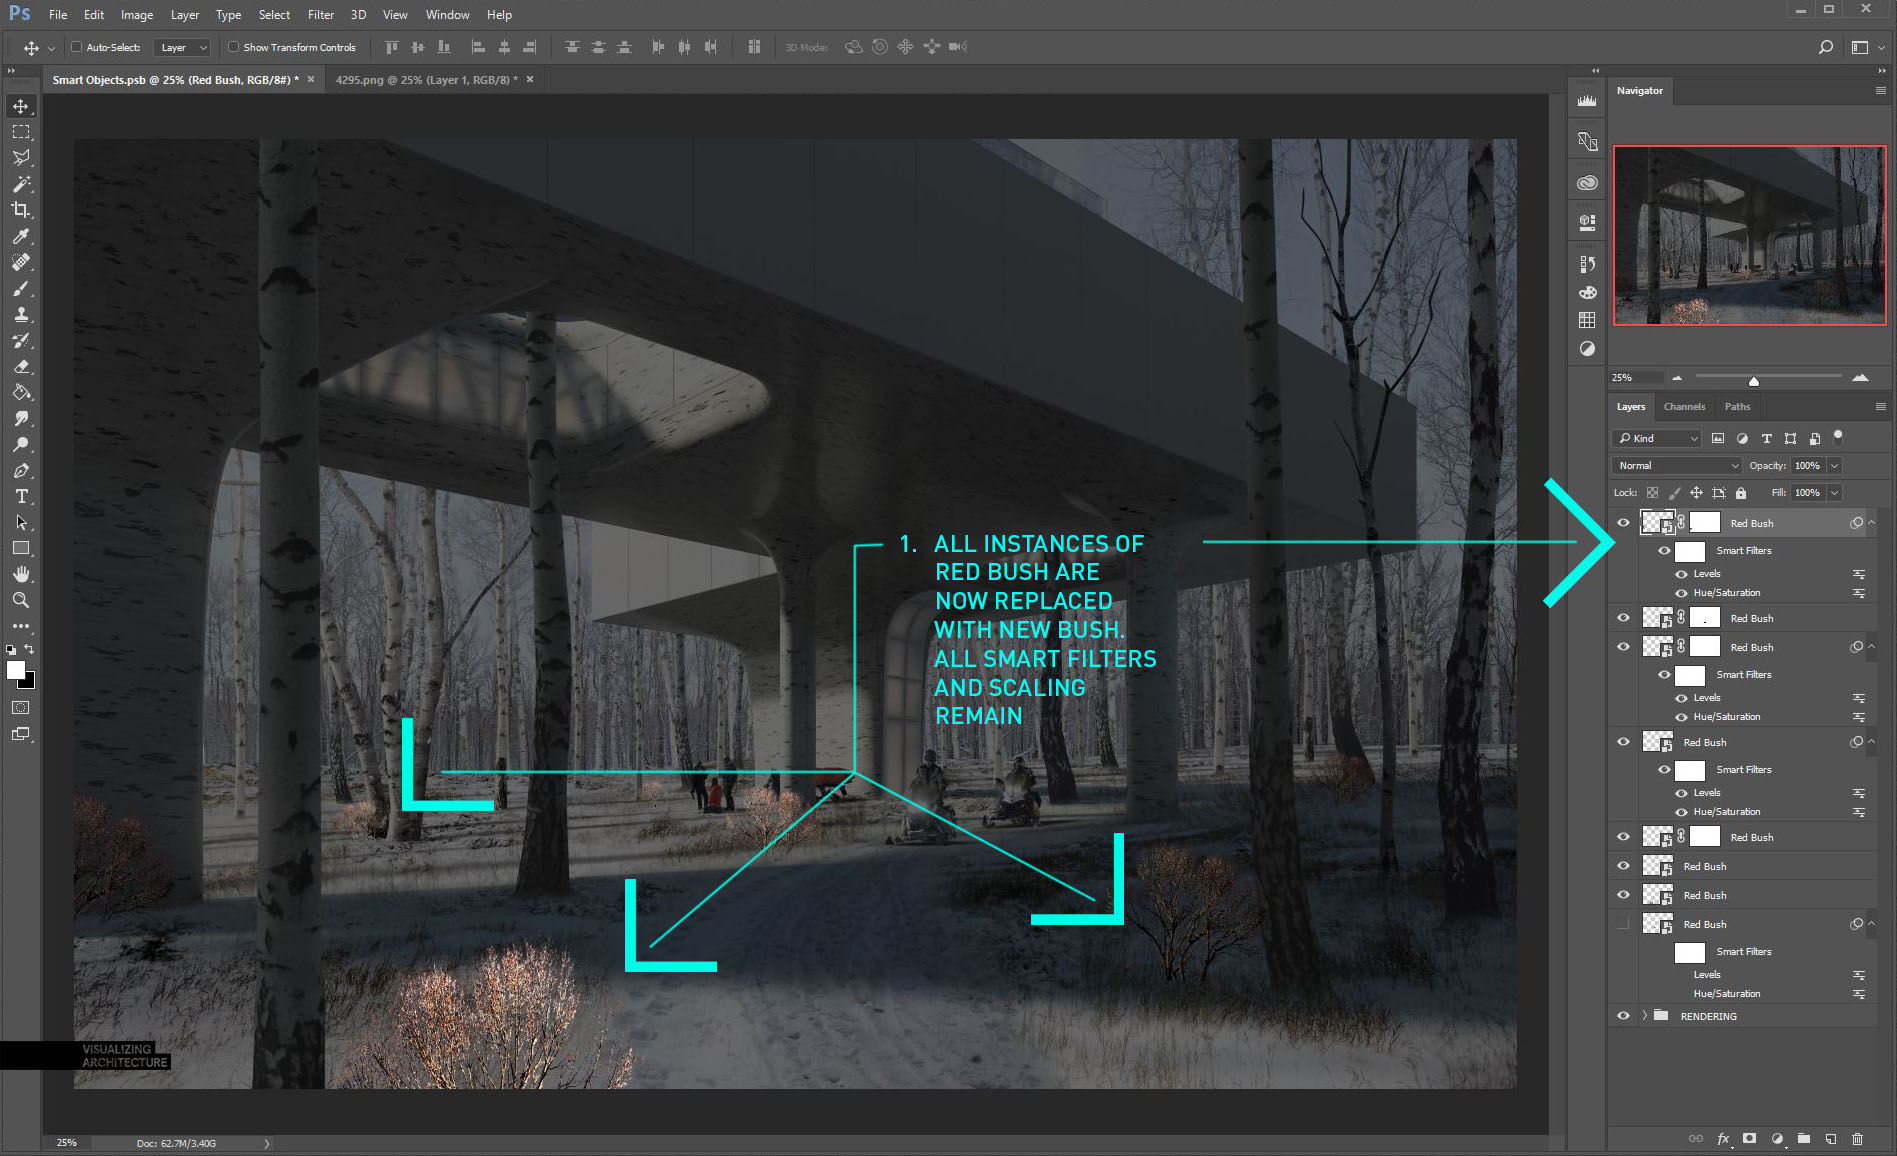
All instances of the red bush have now been replaced with the brown bush. All of the scaling, Smart Filters, and horizontal flipping remain.
6. Turning your base files into Smart Objects
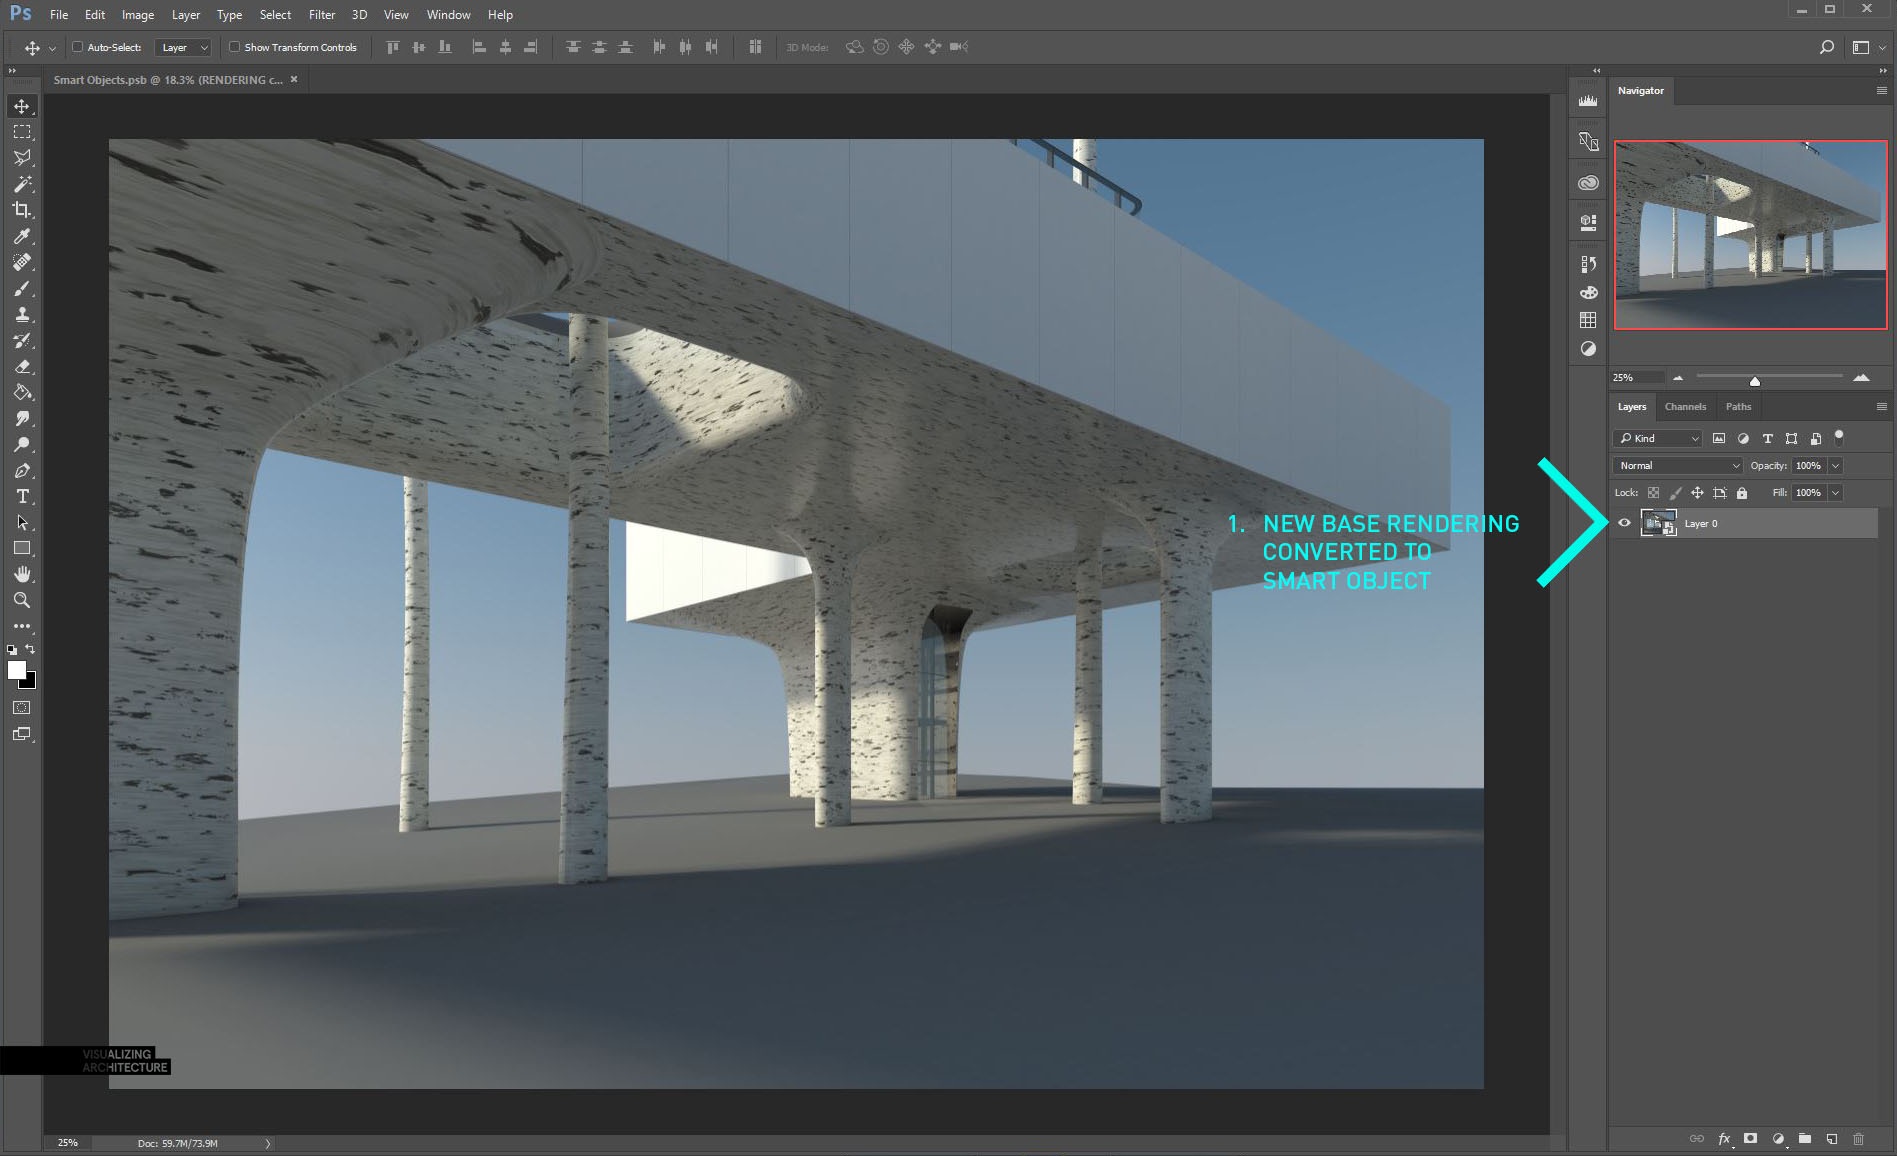
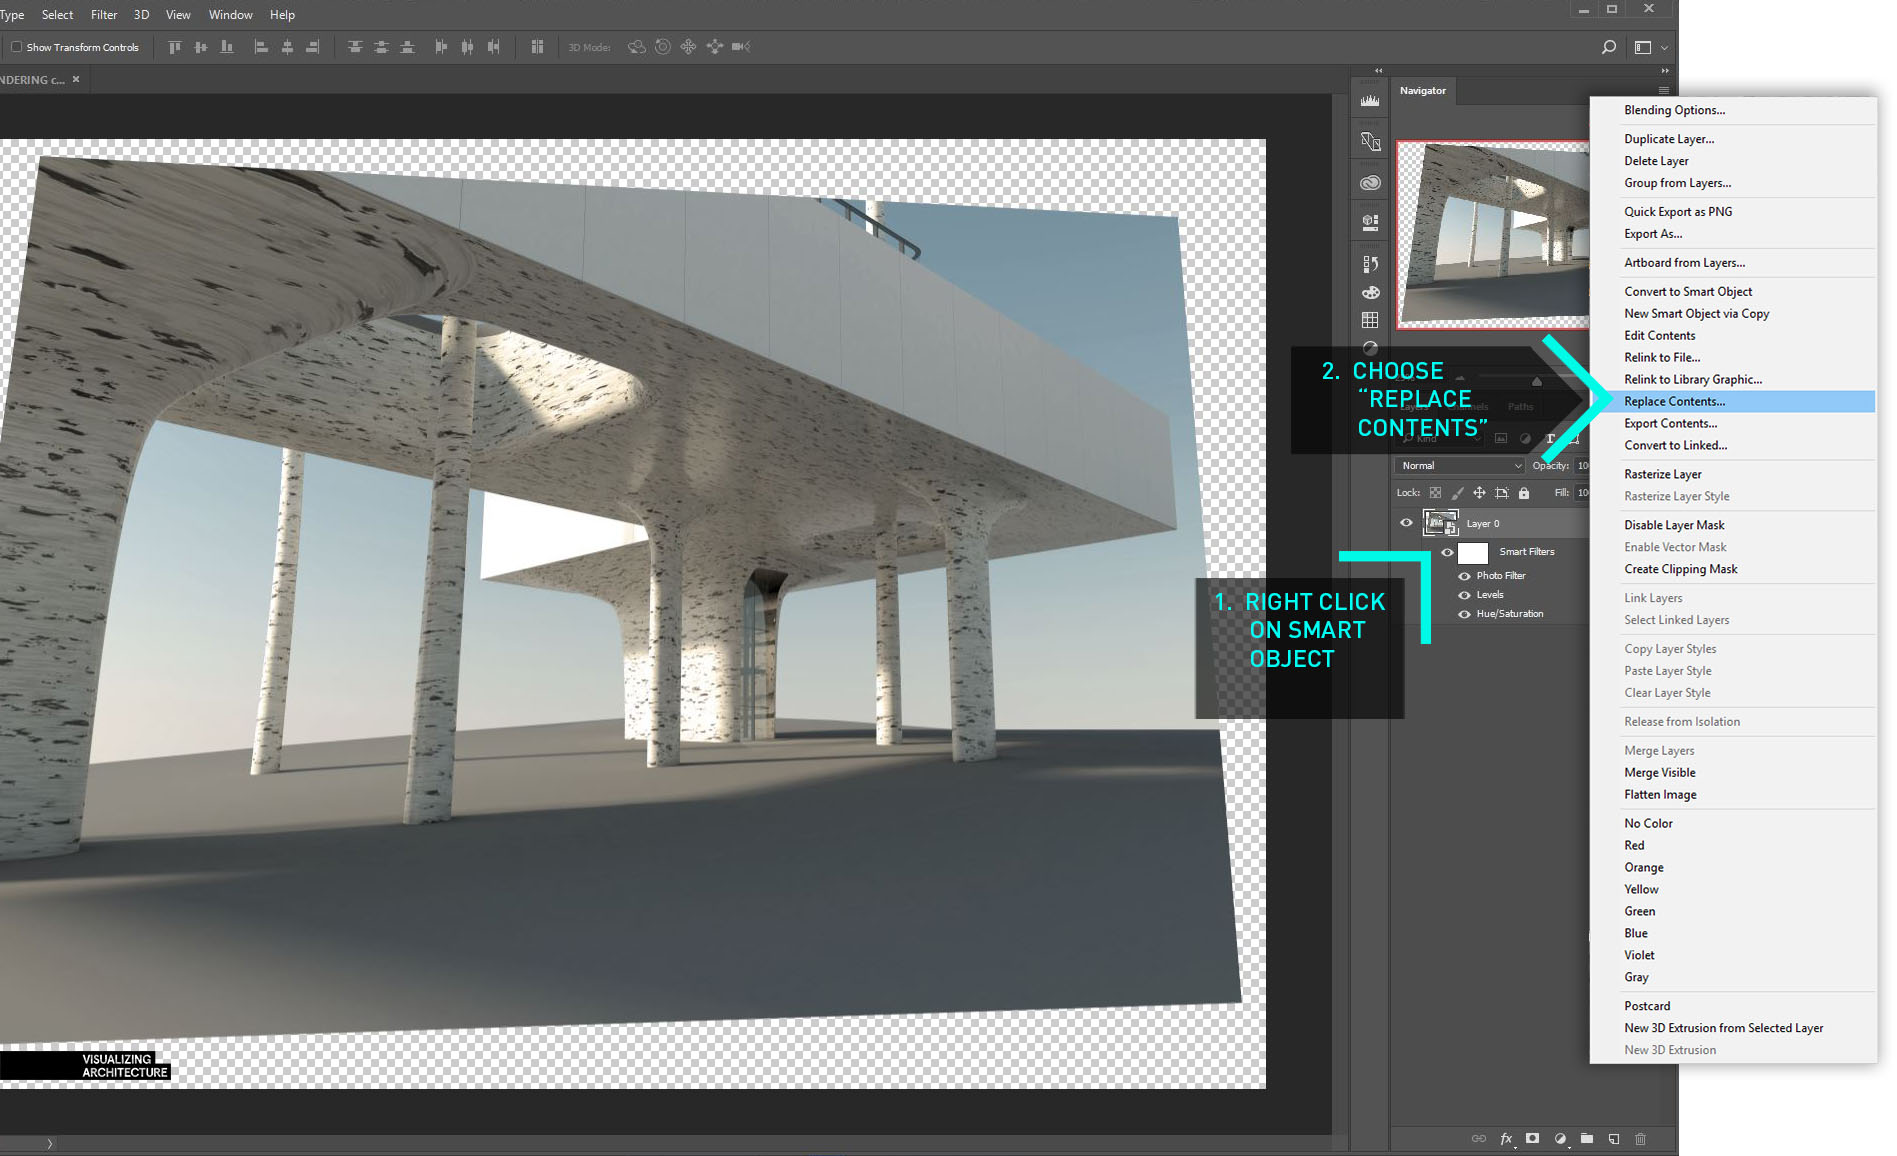
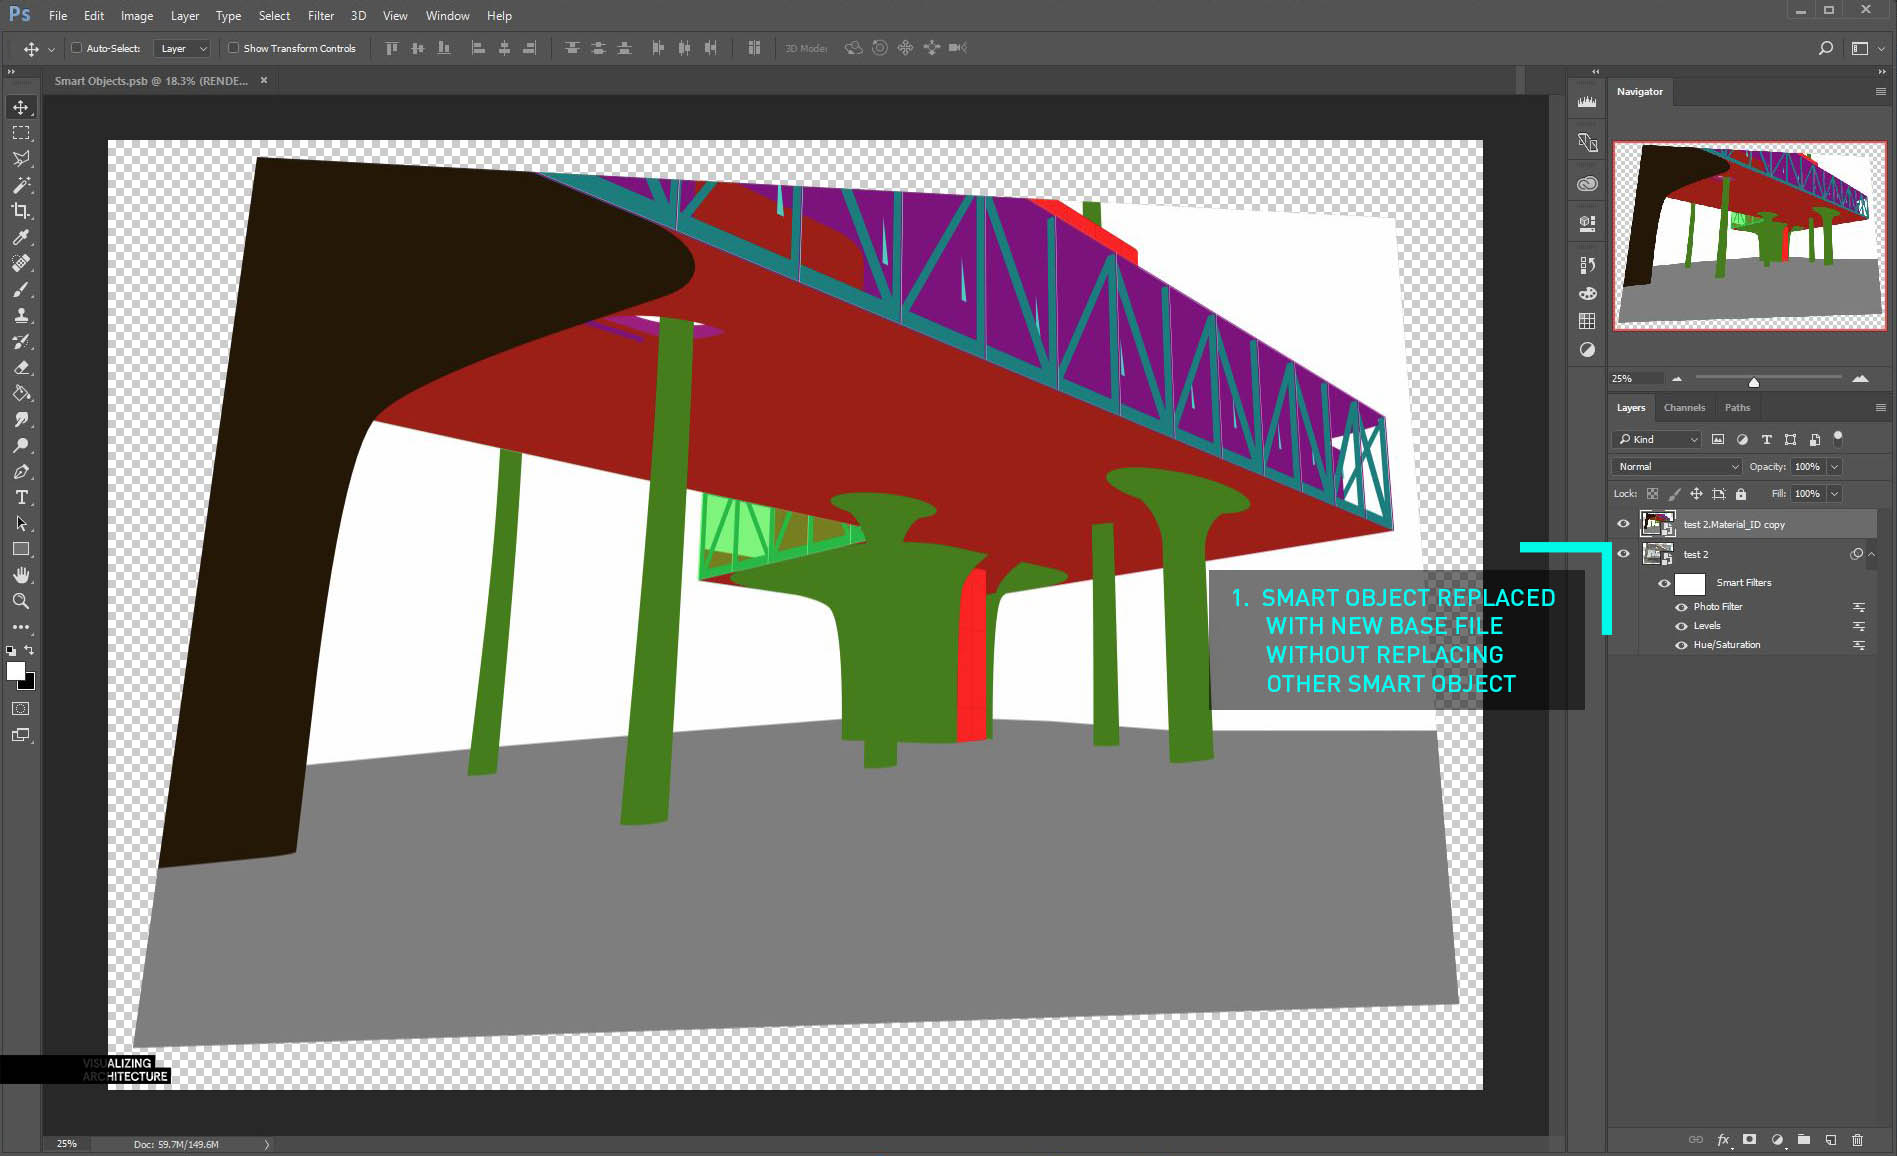
Bringing in all of your base rendering files as Smart Objects can save a lot of time later on down the road if you plan on making a lot of edits. For one, there are many times when the base renderings need to be distorted to match a photograph or drone image. It can be next to impossible to exactly match how a base rendering is distorted with a new updated rendering. With Smart Objects, this is no longer a problem. At Design Distill, we are constantly making changes to the model, and then rerendering new base files to be updated in Photoshop. Using Smart Objects, we simply replace the old base files with the new ones and all of the color adjustments and scaling gets carried over. In this example, I have brought in a base rendering of my research lab design. The first thing that I do is turn it into a Smart Object by right-clicking on the layer name and choosing “Covert to a Smart Object”.
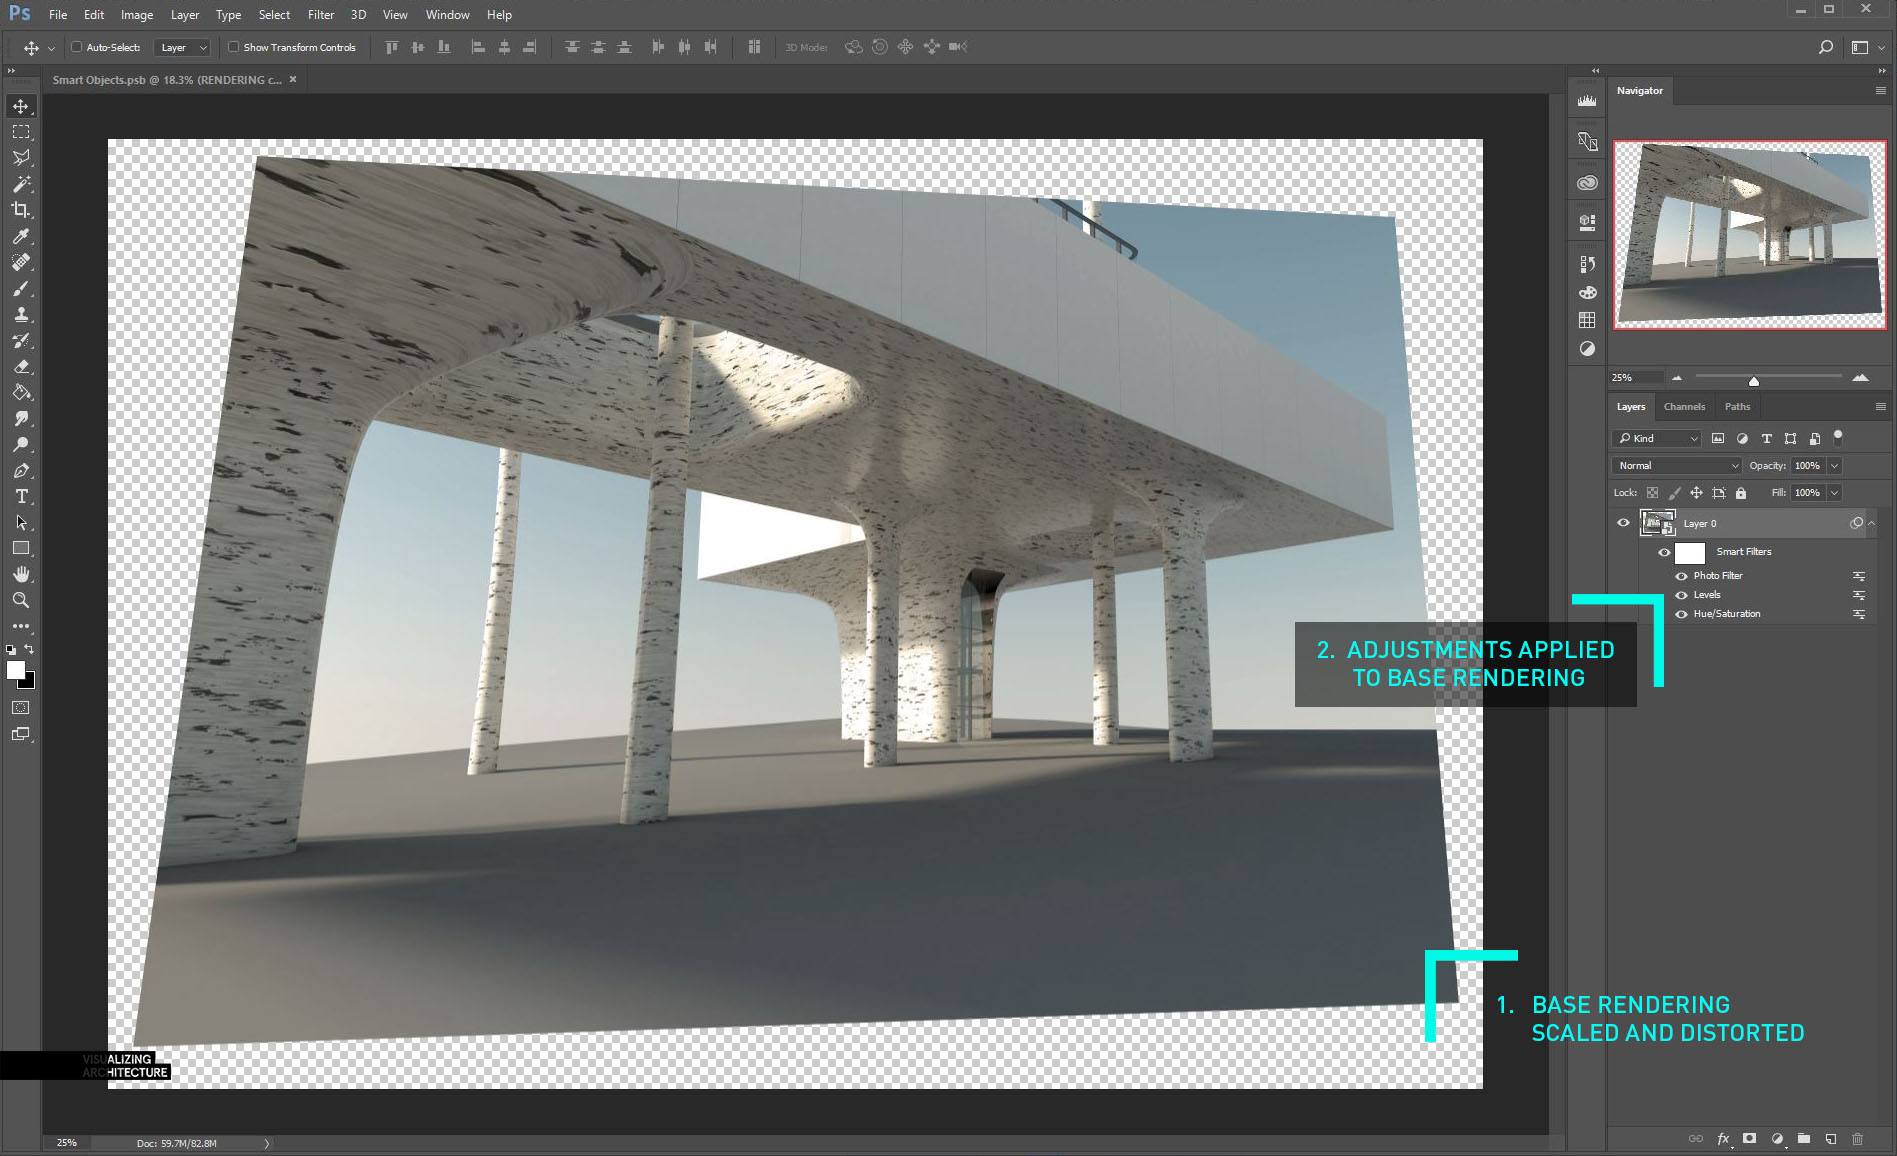
Next, I distorted the base rendering similar to how I would if I was trying to match it to an existing site photo. I also added some color adjustments which are shown as Smart Filters underneath the layer in the Layers Palette.
Next, I want to replace the base rendering with a new rendering that I created that shows the exterior panels turned off. To do this, I right-click on the layer name, and choose “Replace Contents”.
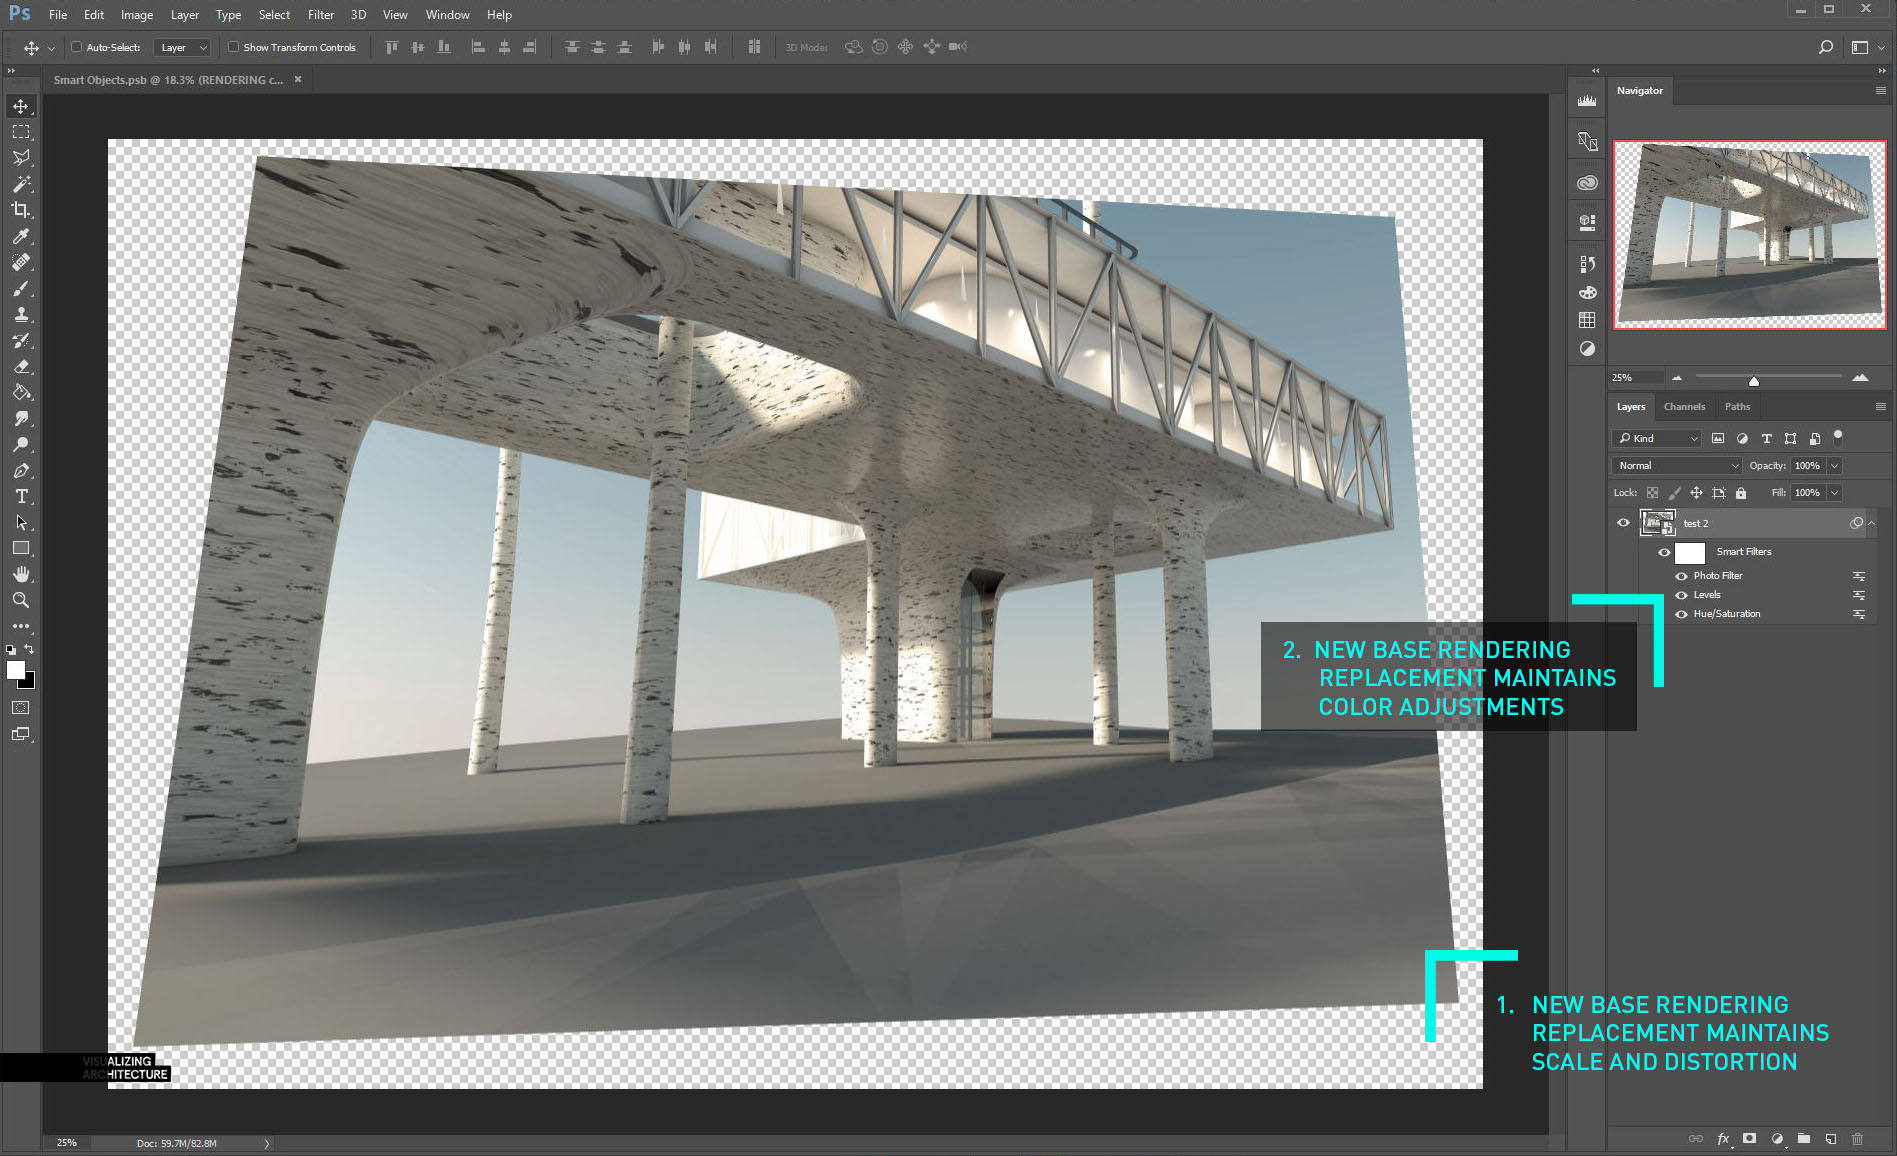
The original base rendering has now been replaced with the new rendering showing the panels turned off. All of the color adjustments remain and the image is distorted and scaled exactly like the old rendering. If Smart Objects weren’t used here, I would have had to guess the exact color corrections and eyeball the best I could to match the distortion and scaling.
6. Creating a Unique Copy
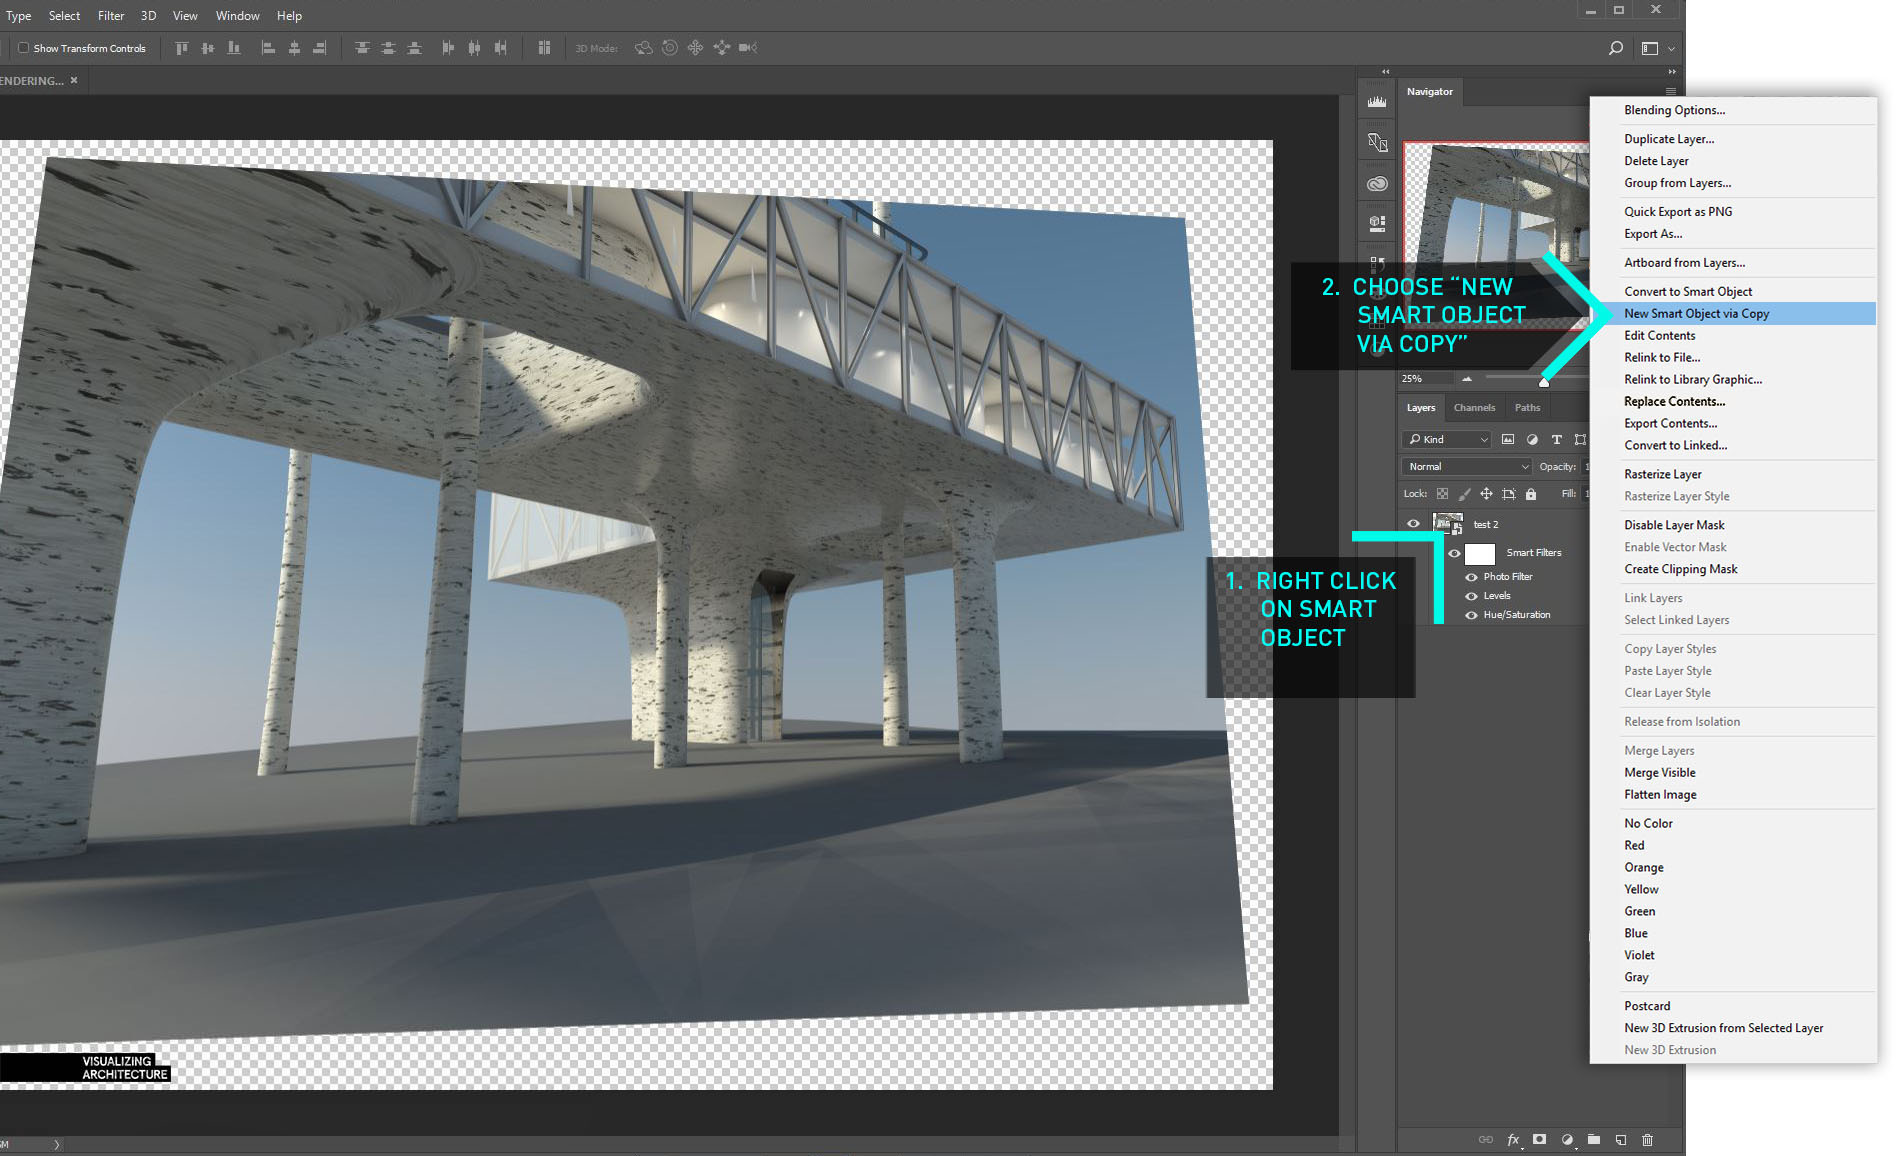
You do not always want to copy a Smart Object as an instance. In other words, sometimes you don’t want the copy to be updated with a new image when other instances of the Smart Object are updated. In this example, I want to make a copy of the base rendering so that I can reuse the exact distortion and scaling changes. But I also want the Smart Object to be unique, so that it does not replace all instances of itself. To do this, right-click on the layer name, and choose “New Smart Object via Copy”.
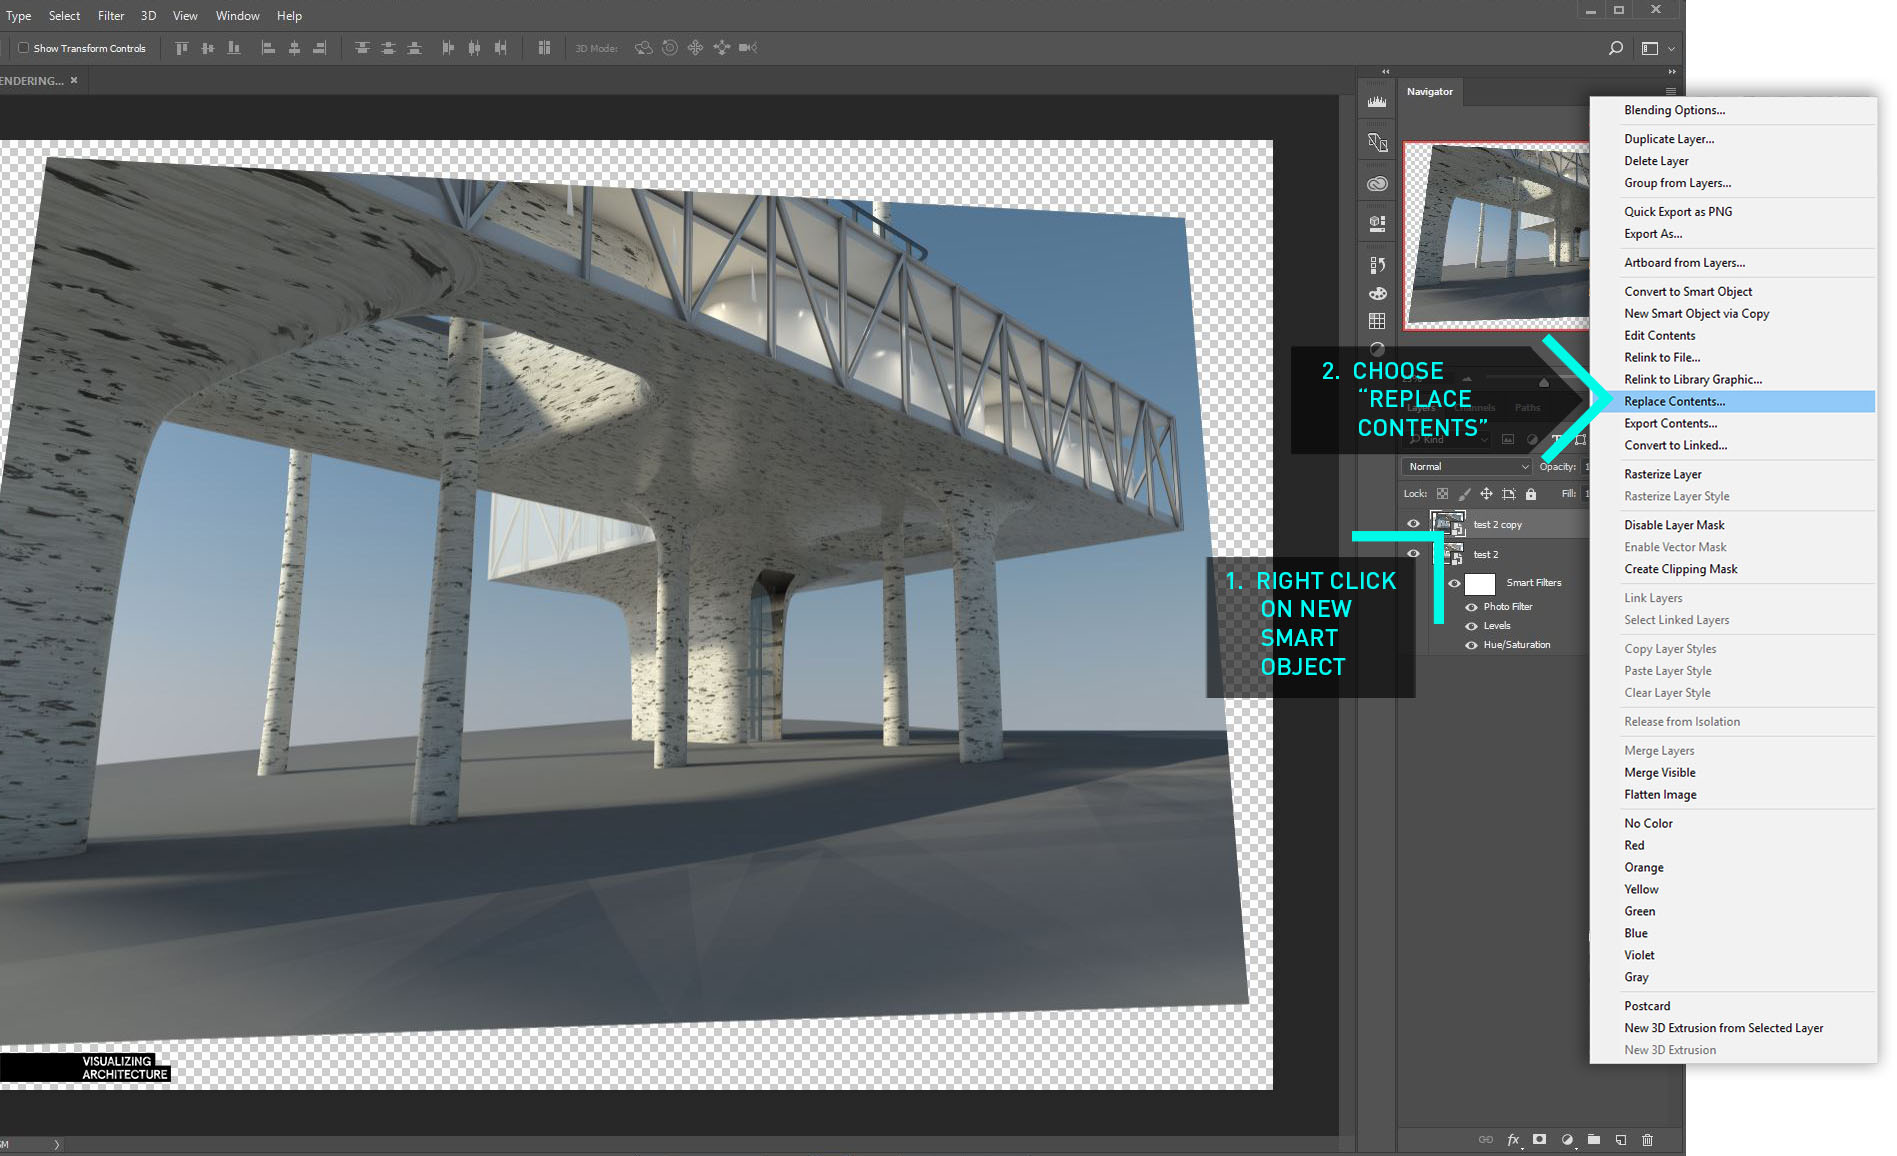
Now I have a copy of the first Smart Object along with all of its scaling and color adjustment properties. I only need the scaling adjustments and not the color adjustments, so I deleted those Smart Filters. Next, I right-clicked on the new layer name and chose “Replace Contents”. I then browsed to the new image that I want to replace the existing rendering with. Again, it is important that both the old and new images are exactly the same size in resolution.
What I am left with is another Smart Object layer of my Material ID Channel that is distorted exactly like the other base rendering. I can use this same technique with all of my rendering channels ensuring they are all exactly distorted and scaled the same way.
As great as Smart Objects are, there are also some negatives. With Photoshop files that have hundreds or even thousands of layers that are Smart Objects, the file tends to run slower than layers that are all rasterized. There have been times where many of the Smart Objects in my file needed to be rasterized to help Photoshop run more smoothly.
Also, you can’t use tools like Burn and Dodge, Clone Stamp, or Paint Brush on a Smart Object nor can you use the Eraser Tool. Instead, you have to use masks to erase or rasterize the layer to use some of the other tools. To rasterize a Smart Object, simply right-click on the layer name and choose “Rasterize Layer”.
There are obviously many uses for Smart Objects, and I only covered a small number of them here. If you have a unique way that you have implemented them into your workflow, please leave a comment below. Im always looking for new ideas.


smart object is really a great tool, also when doing 2d drawings. plotted pdf can be imported into ps and replaced easily by simply replot to the same path. only problem i found is that sometimes when i export drawing/rendering at same scale, when reload modified content, the scale/reference location is different, not sure why is that so.
I have same questions. how to make “Hue/Saturation” and “Levels” to a smart object?
i have the same question how to make “Hue/Saturation” and “Levels” for a smart object ?
Smart objects first proved their worth to me about 10 years ago. I would often have an aerial photo to which I would add proposed site plans. As the plans developed, updating the aerial was made effortless by the use of smart objects.
I now use them extensively in my “sketch” renderings.
I essentially duplicate the .psd from one project folder to the next, using it as a template and simply update the main layers: lines, shadows, & clay render.
Hi, Alex!
Thank you for this tutorial.
But I still have one question. While using a smart object I am not able to adjust brightness/contast, hue/saturation, levels, curves and so on. In your screenshots I see them within the smart filters list. So how are you doing that???!)
May be it is possible with adjustment layers? Or there is an another secret?.
Hi Alex!
Smart objects are a great way to help in time management in some projects, and your explanation it’s just right on point!
but if i may ask, where did you got those cutout bushes? they look amazing and exactly the sort of thing i was looking for the enviorment on a project i’m working on…
Hi Alex, I’ve been a big fan of your works and your tutorials have been really helpful. This may not be related to this post, but can you pleaseeeee make a tutorial on aerial master plan renderings?
I’m having a hard time deciding how detailed should my model go, how to put trees, how to put cars, etc. It will be really helpful 🙂
Thanks a lot and keep inspiring
Thank you very much Alex
Would you please tell me how to make “Hue/Saturation” and “Levels” to a smart object? My was showed as grey
Hi Alex, first of all thank you for your great tutorial! Have just a small note, that I use different way to have the same result – reloading placed picture (layer) – by the command “place linked”. It automatically update in PSD placed picture by rewriting original saved file.
amazing post by admin.
very good post. keep it up dear.