Over the years, I have come across many ways to extract objects out of an image. I still use most of them mainly because each method responds to certain situations where other methods won’t work. There are 7 techniques that will be explained but I’m sure there are many that I am still missing. If you know of anymore, please post a comment. I’m always looking for new ways to speed up post-processing.
METHOD 1: BRUTE FORCE
Over the years, I have come across many ways to extract objects out of an image. I still use most of them mainly because each method responds to certain situations where other methods won’t work. There are 7 techniques that will be explained but I’m sure there are many that I am still missing. If you know of anymore, please post a comment. I’m always looking for new ways to speed up my post-processing work.
Method 1: This technique is the simplest and is kind of a brute force way of separating and object from its background. You will notice that in the image below, the background is complicated with many colors and geometry, but the object that is being cut is simple in form. This makes Method 1 a good candidate to be used. It won’t take to much time or effort to erase around the box.
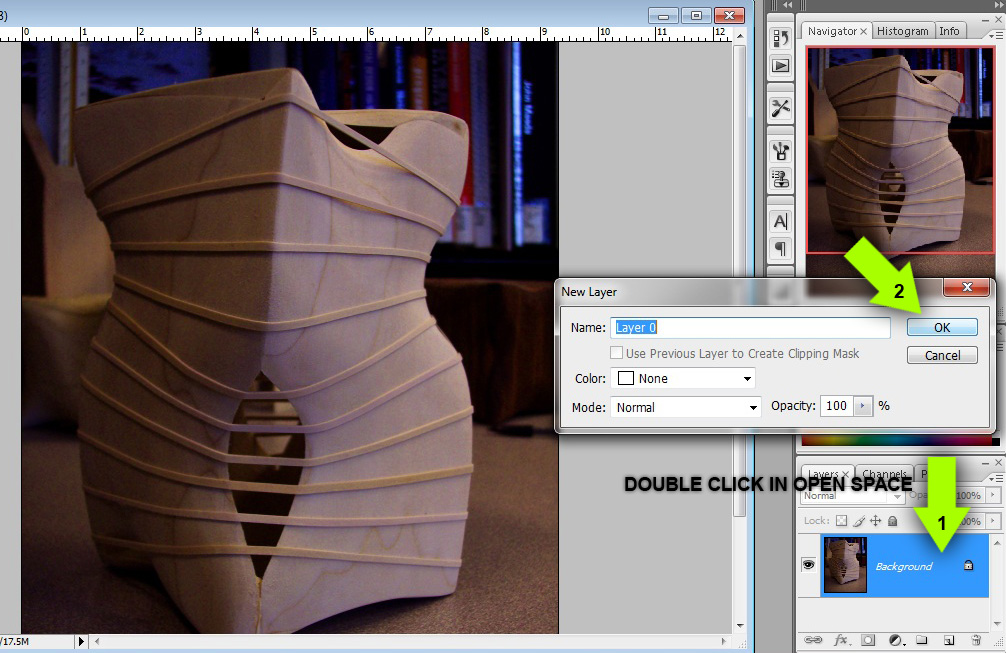
1. The first thing to do is unlock the background layer so that the background can be erased. Double click in the space next to the layer name in the Layer Palette. A dialog box will come up and choose “OK”.
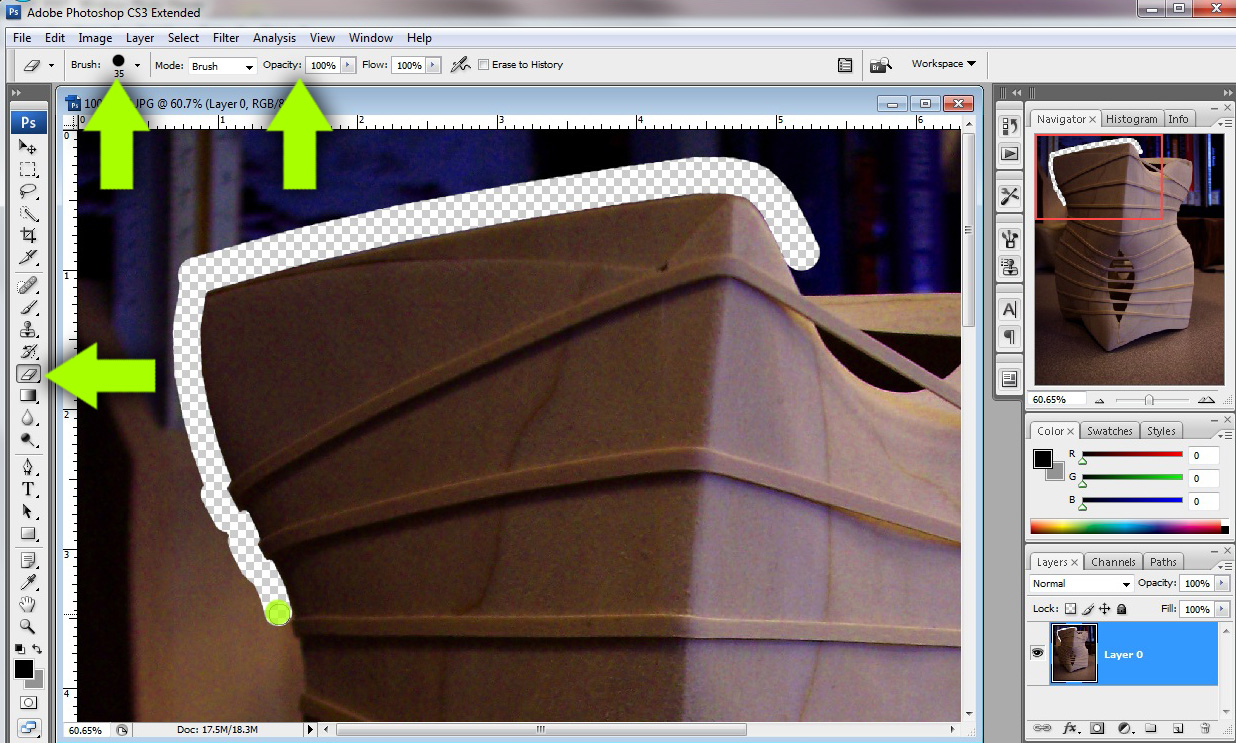
2. Select the “Eraser” tool and make sure the brush is a small size with 100% opacity. There is an important tip that makes this method a little easier. Click on the edge of the object be cut with the eraser too. Then hold “Shift” and click somewhere else along the edge. A straight line is drawn between the two clicks. Erasing using this method is much quicker and more precise than trying to free hand erase around the object.
3. Once a path has been erased around the object, increase the size of the brush and proceed to erase the rest of the background. That’s it, you are left with just the object ready to be dragged into your illustration.
METHOD 2: LAYER MASKS
Method 2 is very similar to Method 1 except for one thing. This method retains all of the original image information using layer masks so that erasing can be reversed or edited later on. I won’t use this method too often in my tutorials because it can come off as being over complicated to people just starting to use Photoshop, however, I consistently use this method for all of my illustrations. Anytime that you can save image information for use later on is always a good thing.
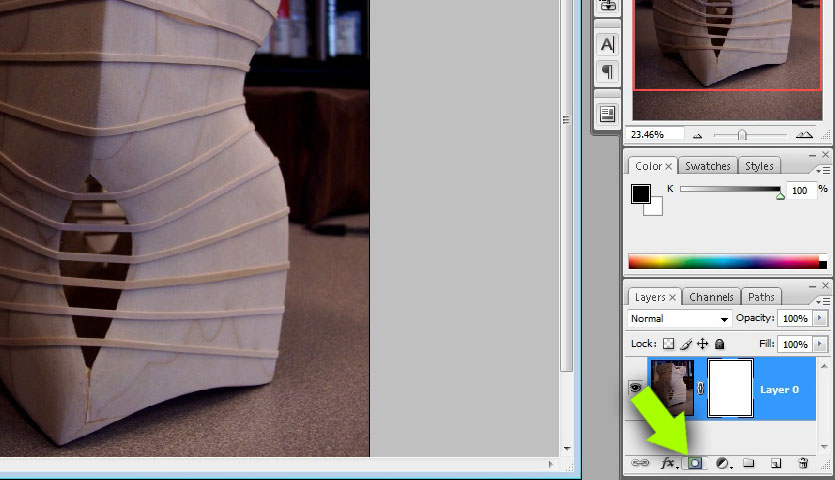
1. With the image open and the background unlocked (see Method 1), choose the “Layer Mask” icon at the bottom of the layers pallet. A white box will appear next the layer thumbnail in the layers pallet.
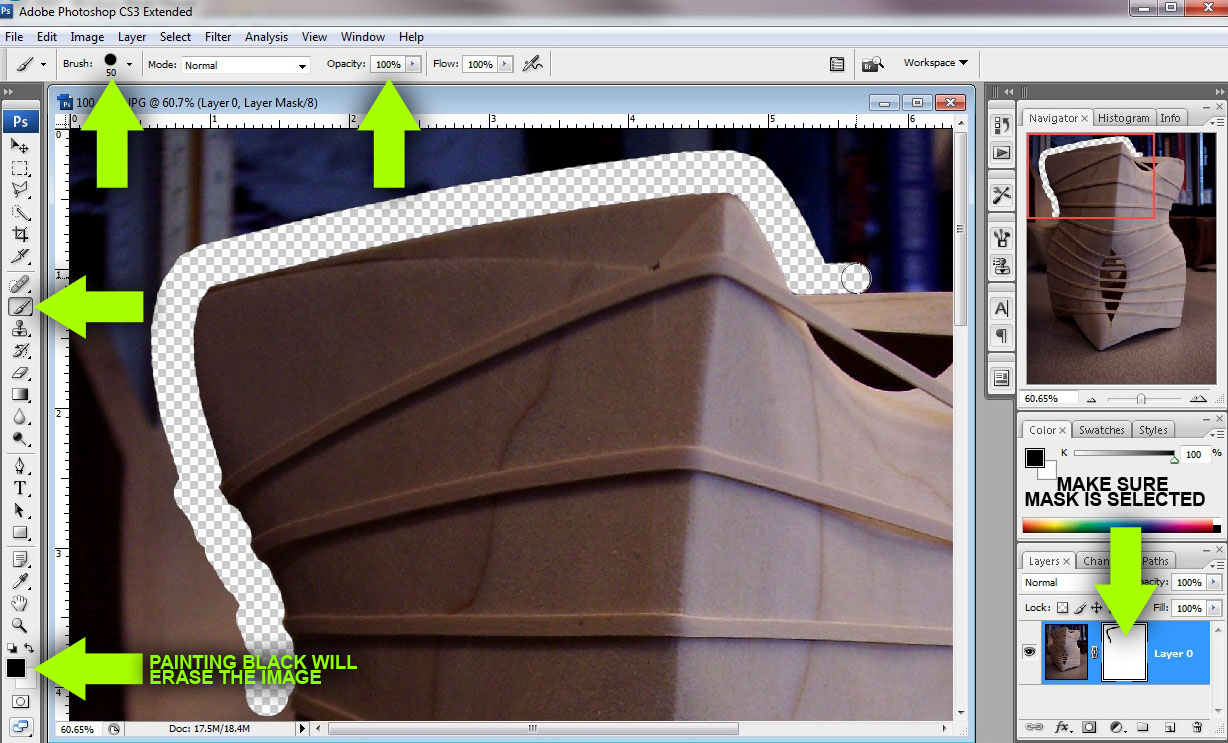
2. Make sure the mask is selected in layer then choose the “Brush Tool”. Set the paint color to black and begin painting around the object. You will notice that the background will erase away. The mask works by using gray tones. Black on the mask will make the image transparent, while white paint will keep the image opaque.
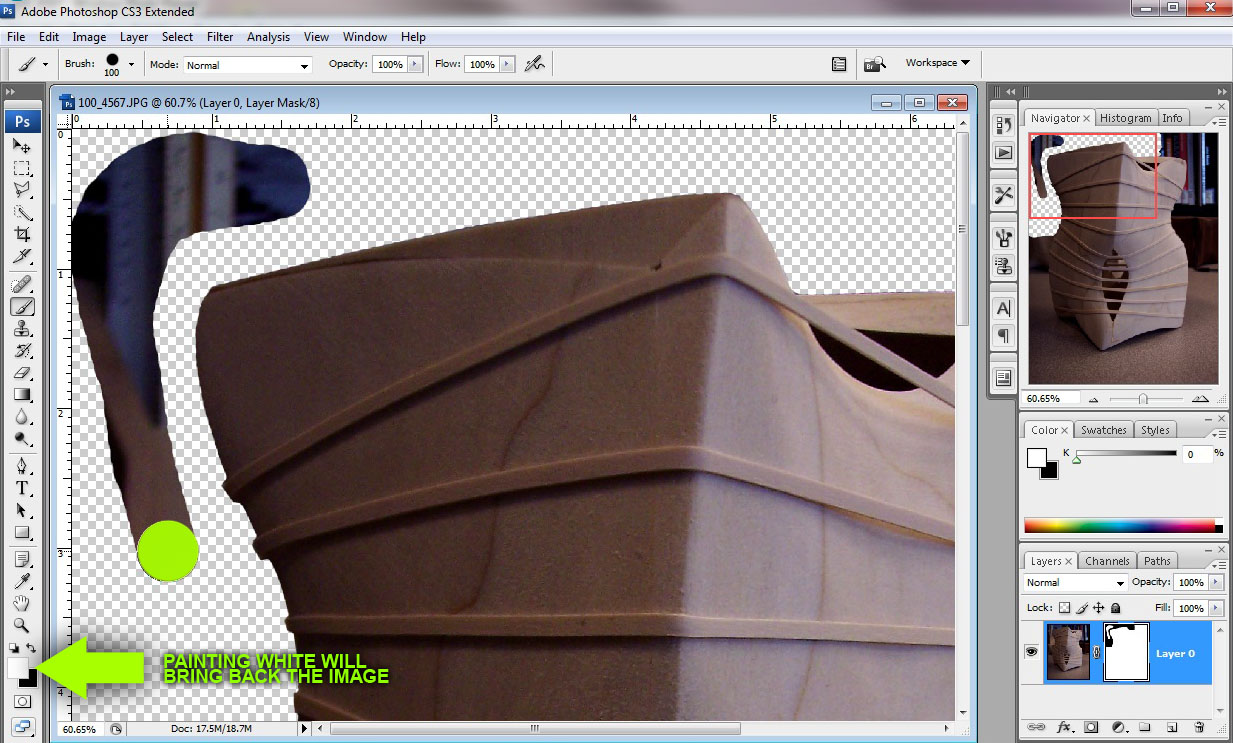
3. Continue to erase the rest of the background. If you want to bring back part of the background, simply switch to white paint and paint the areas of the image you want to reappear.
METHOD 3: POLYGONAL TOOL
Method 3 allows for sharp and precise selections. It’s also good to use because like using masks, it maintains a certain amount of the original image information.
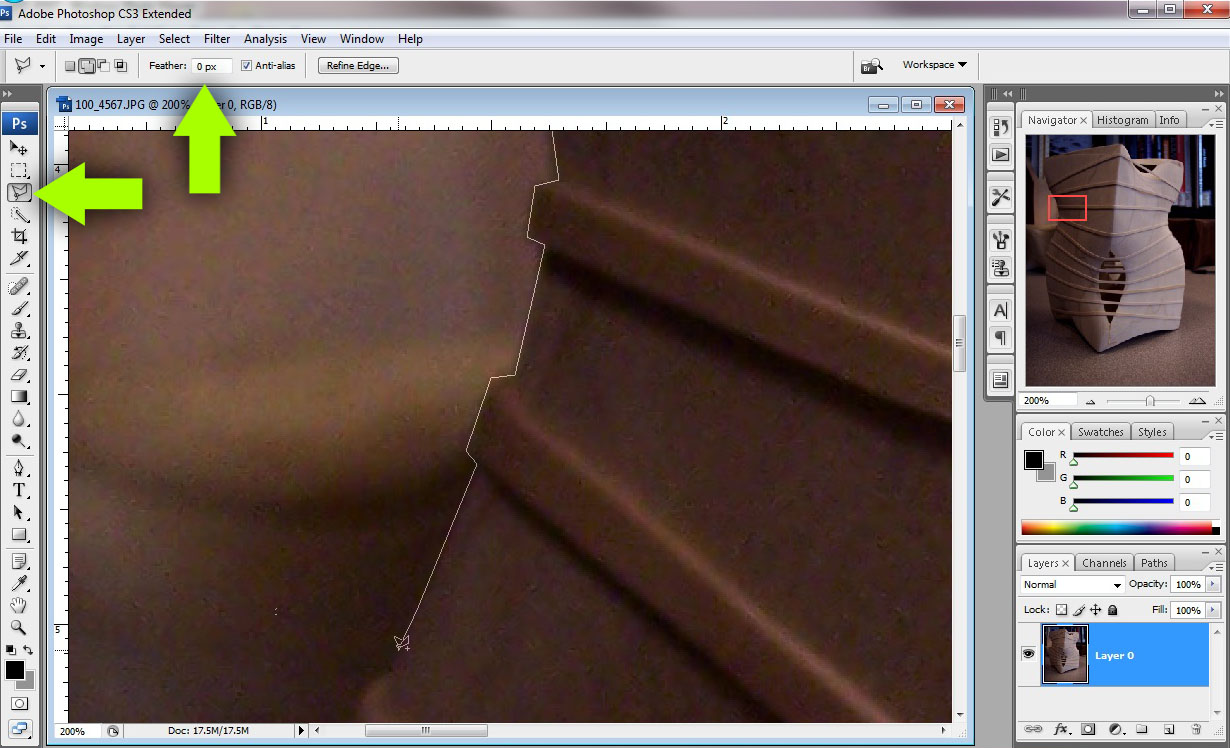
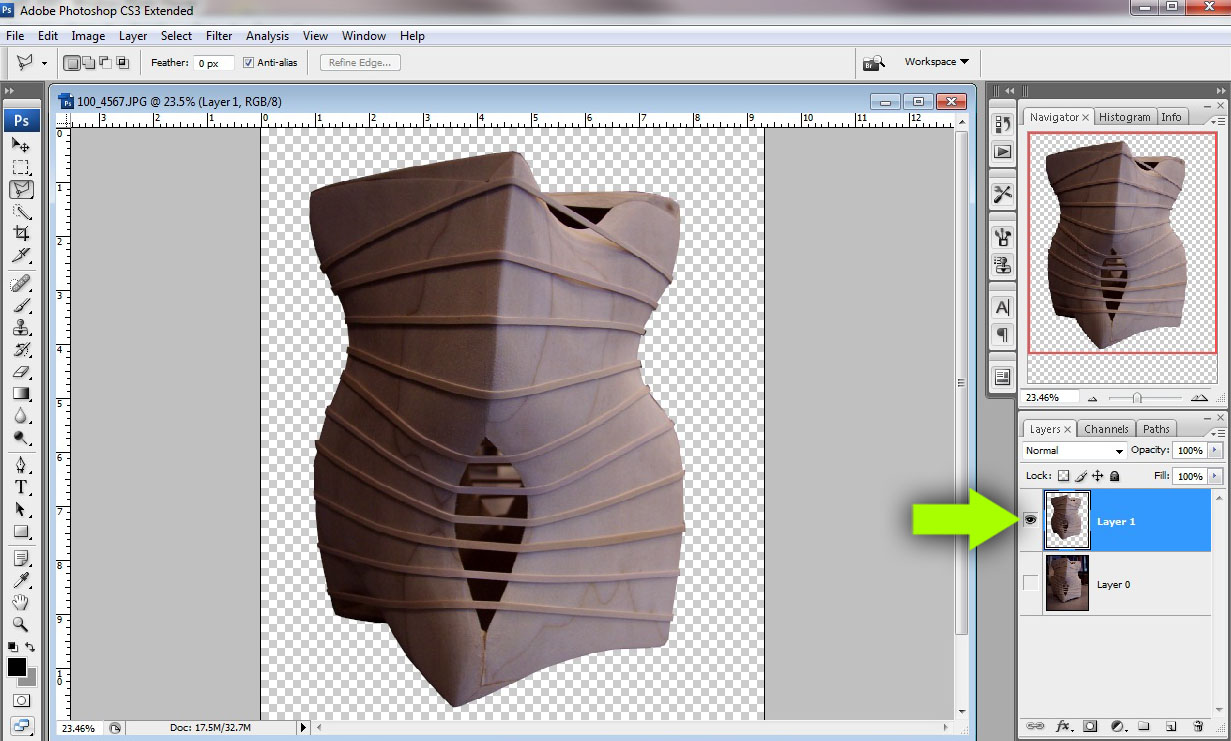
1. Open the image in Photoshop and select the polygonal too. Set the feather to 0 pixels for a sharp selection. Begin tracing the object you wish to cut out. Holding “shift” while clicking will add to selections and holding “alt” will delete from selections. Double clicking will close the selection.
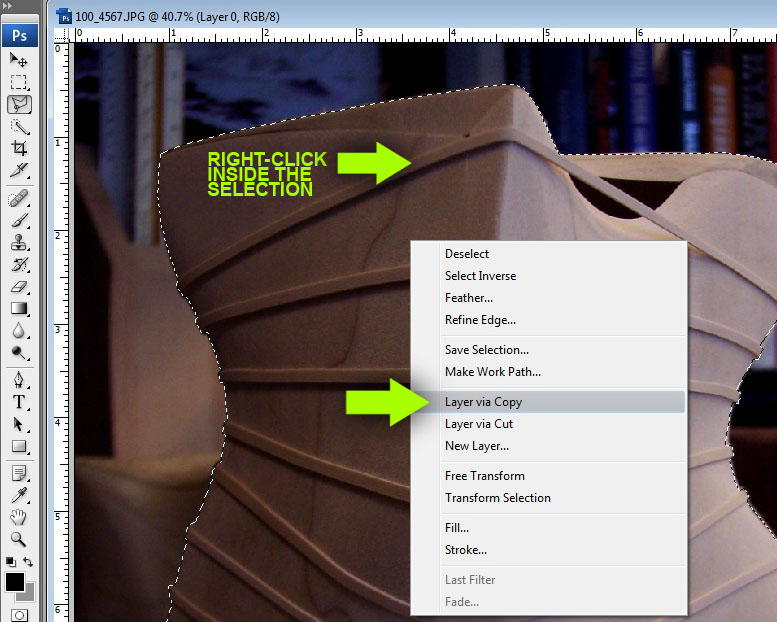
2. Once the selection is made, right-click inside of the selection and choose “Layer via Copy”. Now the selection will be copied to its own layer keeping the original image intact.
3. The object is now separated from its background and ready to be used in the illustration. This method is a little faster than the previous methods because less time is wasted erasing the background.
METHOD 4: LAYER BLEND MODES
Layer blend modes are the biggest time savers that I have found in Photoshop. Method 4 uses layer blend modes to “hide” certain areas of the image. This works best on images such as text or line work where there is a clear separation of foreground and background.
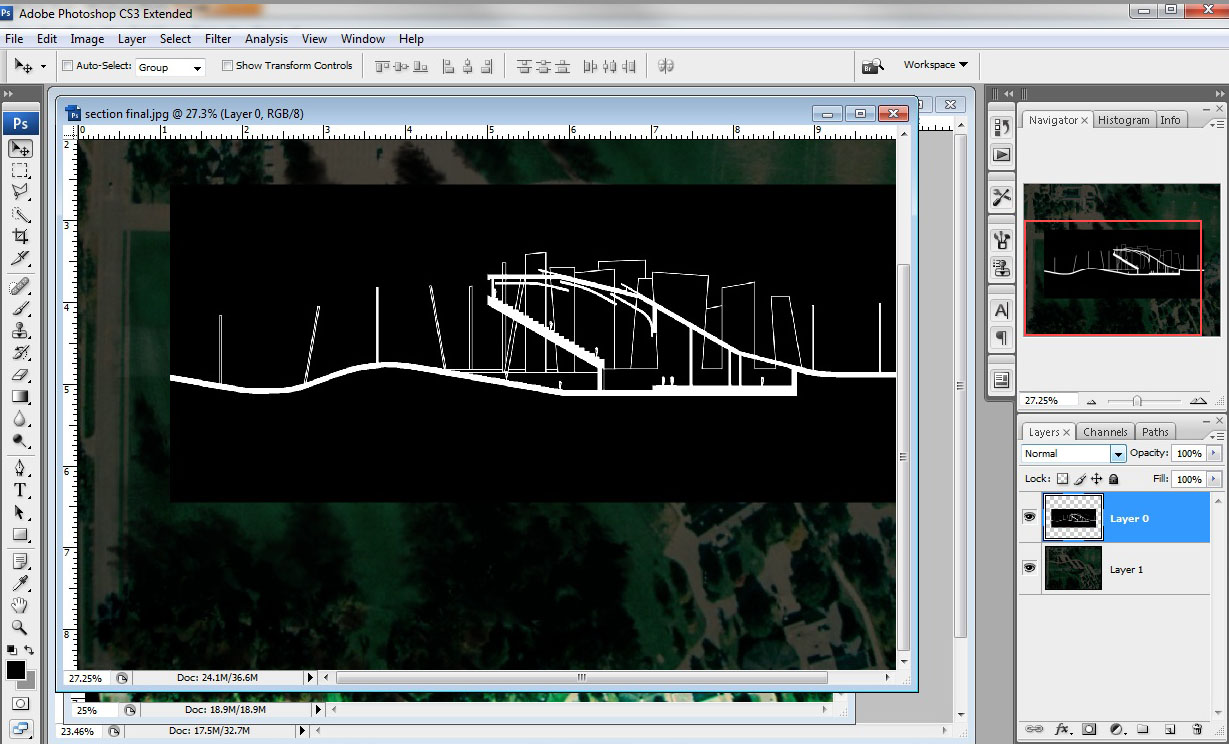
1. For this method, I want to remove the black background of the section so that I am just left with the line work and the green aerial image behind. It wouldn’t make sense to use a mask or polygonal tool because it would be too labor intensive to cut it out and probably wouldn’t look that great.
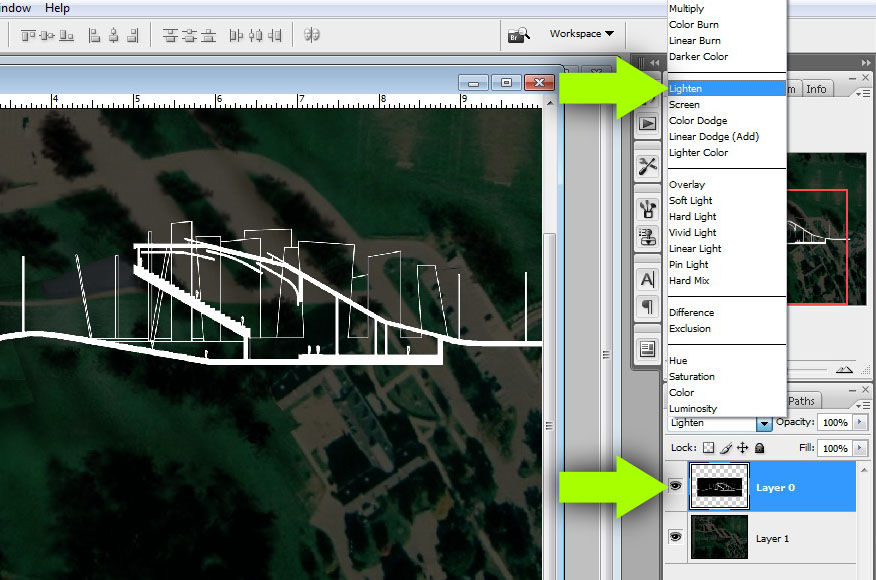
2. For images where you want to hide the dark areas and keep the light areas such as the line work in this example, set the layer blend mode to “Lighten”.
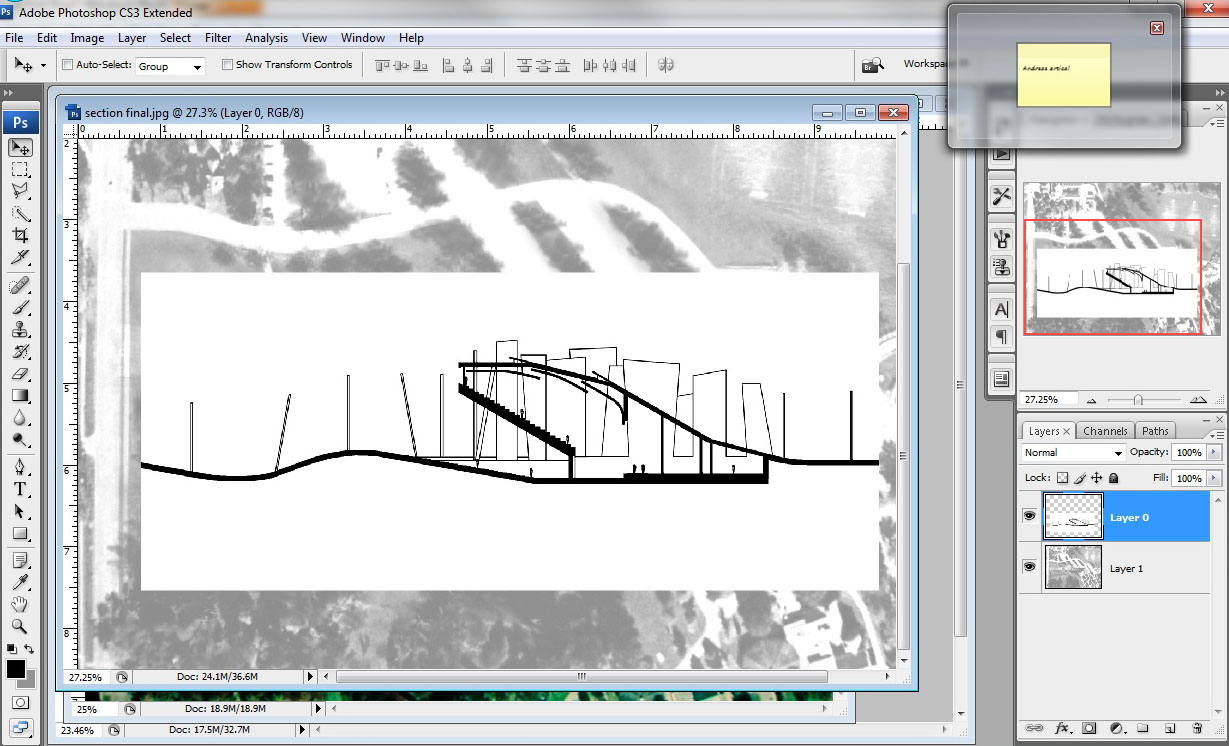
3. In seconds, the black background disappears and only the white line work remains. In the next example, I want to do the opposite. I want to remove the white background so that I am left with the black line work.
4. For images where you want to hide the light areas and only show the dark areas, set the layer blend mode to “Multiply”.
METHOD 5: LAYER STYLES
Not a lot of people know about this method and I will admit, I don’t use it that often. It’s a good way to show off your skills. It makes use of some options under Layer Styles.
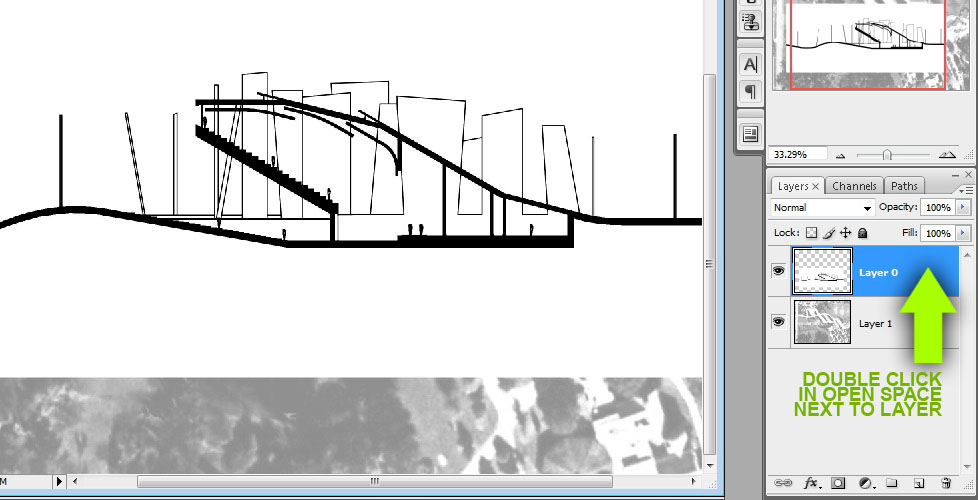
1. Open the image in Photoshop. Double-click in the space next to the layer name in the layers pallet. This will bring up a dialogue box.
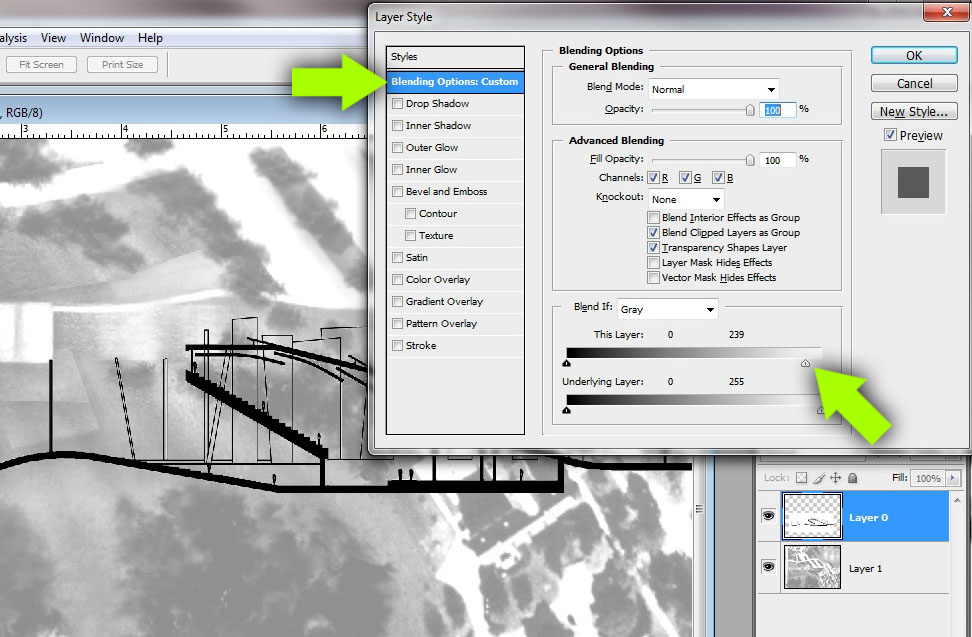
2. In the dialogue box, make sure that “Blending options: Custom” is highlighted. Then go down to the area named “Blend If” and start adjusting the sliders under “This Layer”. You will notice that dragging the white sliders will begin to hide the light areas of the image. The further you slide it, the more it will hide.
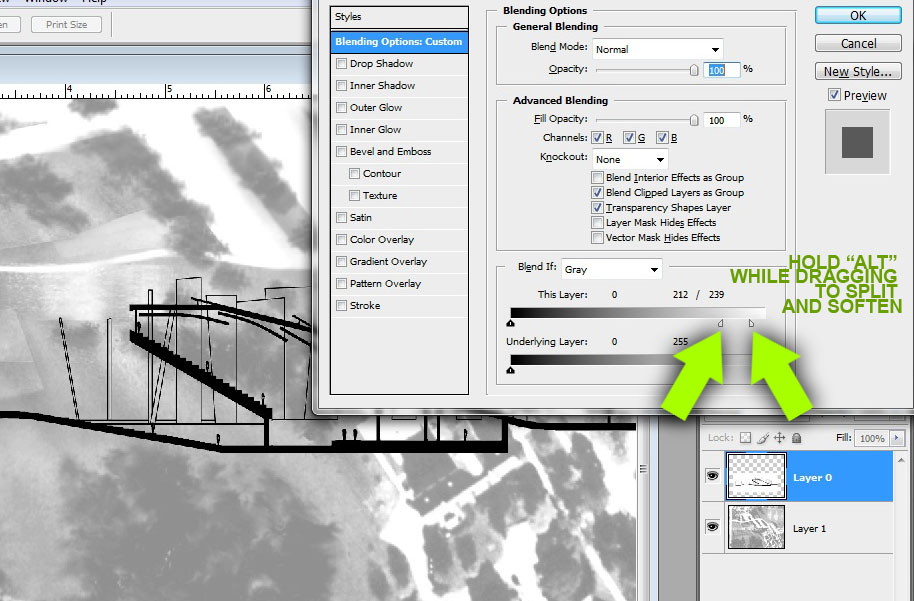
3. For even more control, hold “Ctrl” while dragging the sliders. The triangles will split which will allow you to feather out the parts of the image that are hidden.
METHOD 6: COLOR RANGE
Sometimes you may come across a situation where the background is a simple shade of color. However, the color may be a similar tone as the object you are cutting out, so blend modes won’t work. Also, the object being cut is so complicated, that manually selecting isn’t an option. Then using “Color range” to select the background my be a viable option.
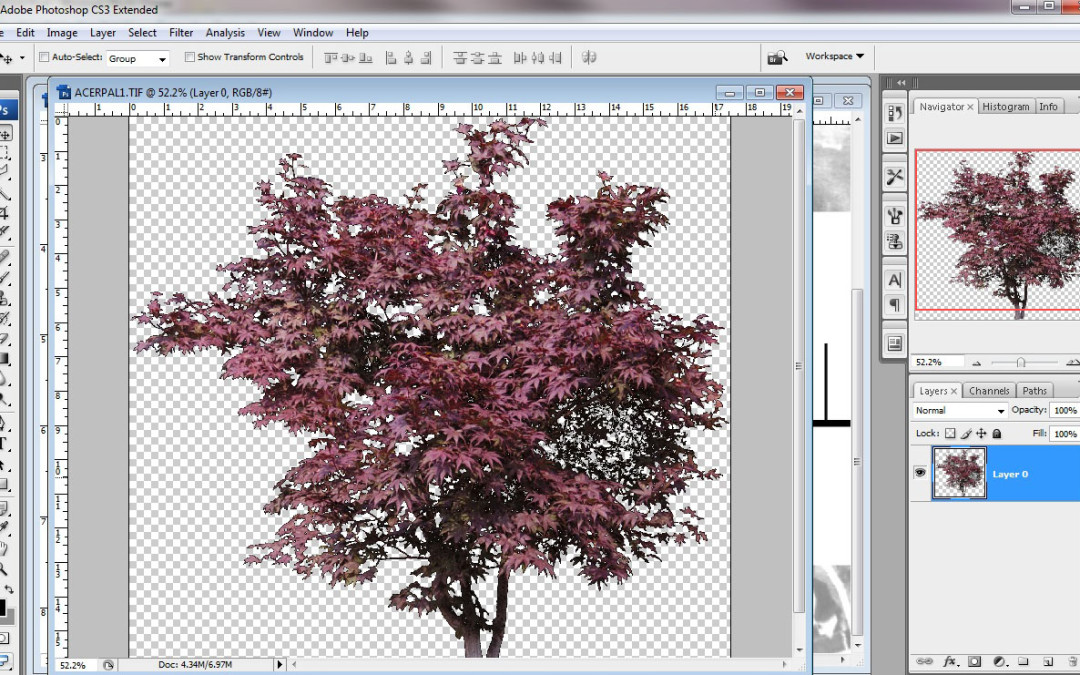
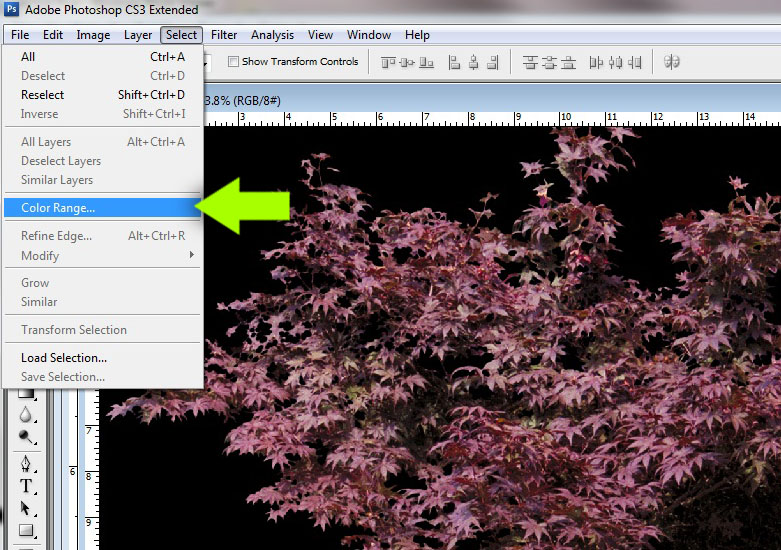
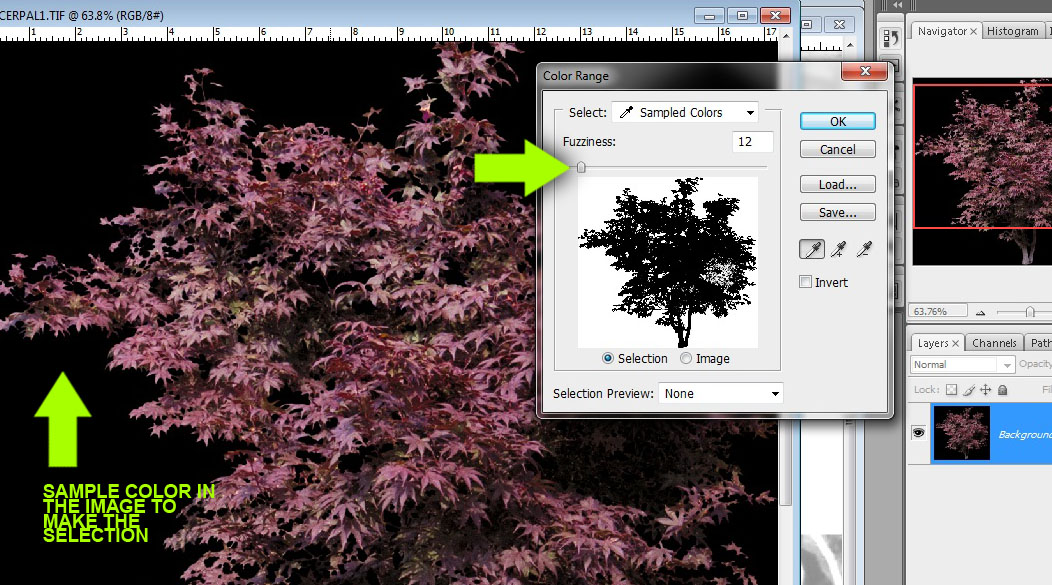
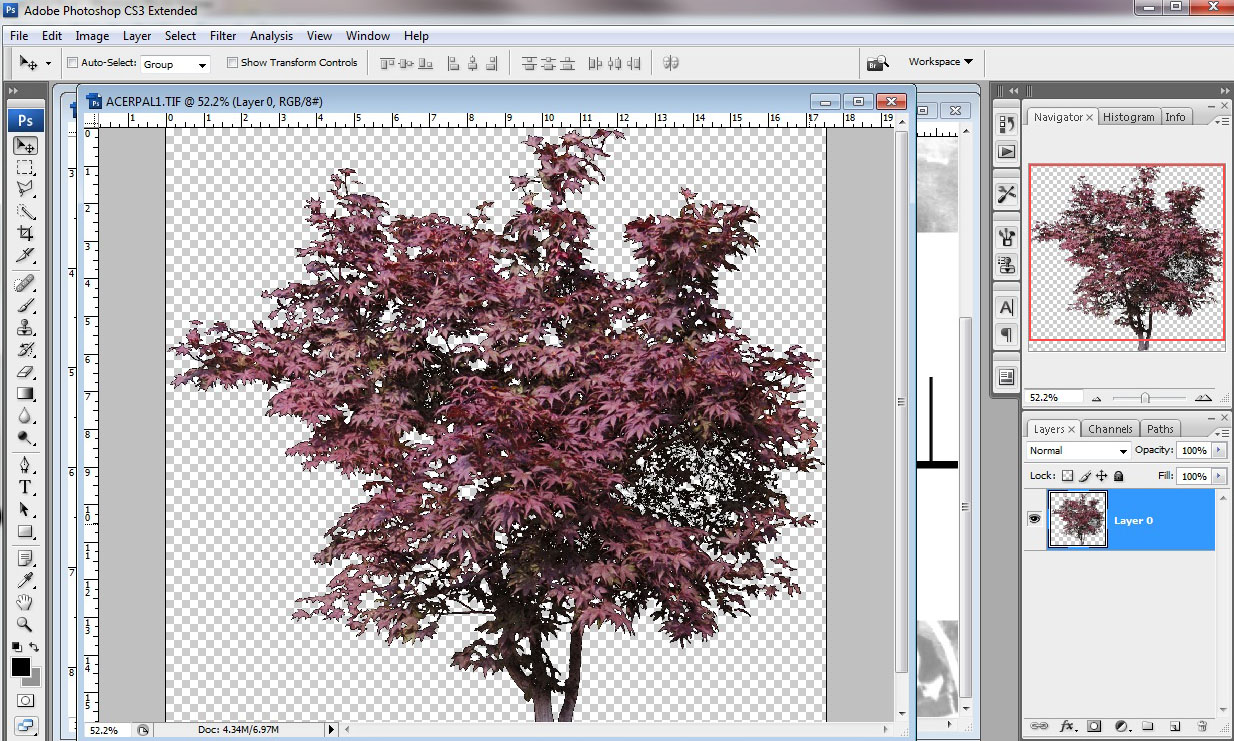
1. In this example, I want to remove the background of the tree. First, unlock the layer from the background. Next, go to “Select>Color Range”. A dialogue box will appear.
2. Sample a color in the background with the eyedropper, in this case, the black background. Next, adjust the Fuzziness by moving the slider which fine tunes the selection.
3. Click OK and the background will now be selected. From there, you can either delete the selection, or turn the selection in a mask allowing it to be edited later.
METHOD 7: MAGIC WAND
Last but not least, Method 7 describes the use of the Magic Wand tool. This tool seems to be popular with a lot of Photoshop users, but I don’t really use it too much. Only in certain situations have I found it really useful and time saving. Most of the time though, the selections are just too rough and I find myself spending too much time adjusting the tolerance. Anyway, here is how to use it.
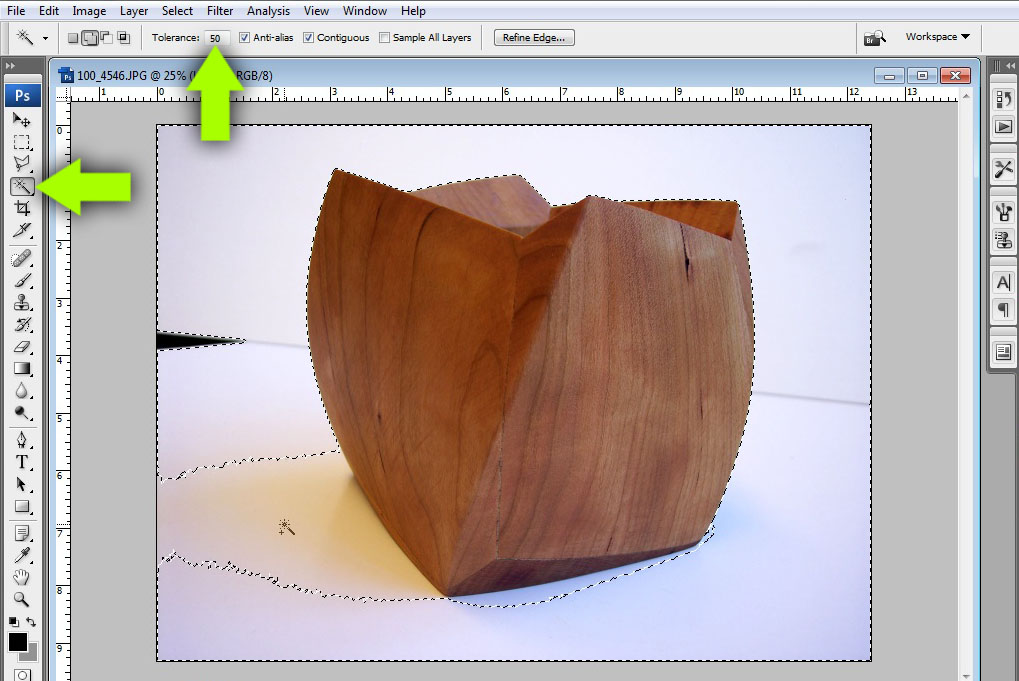
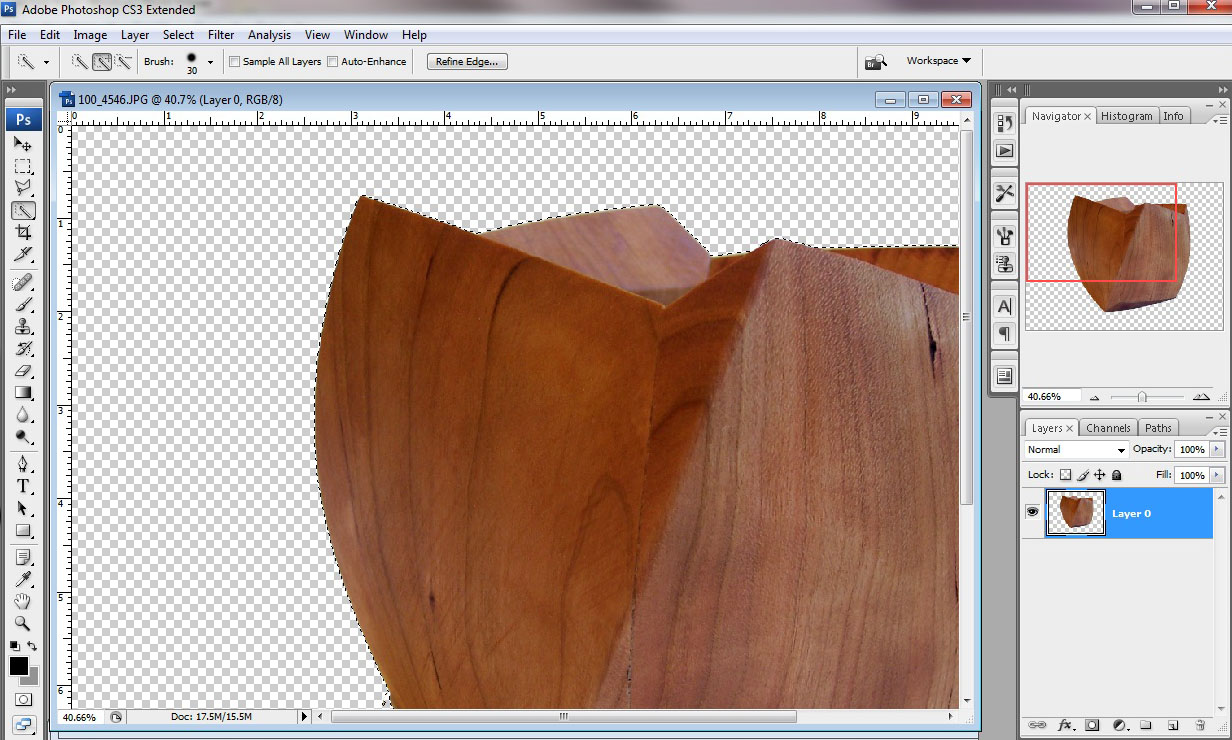
1. Open the image in Photoshop. Select the “Magic Wand” tool and set the tolerance. A higher tolerance will let you select a larger range of colors and a lower tolerance will only let you select colors very close to the original color.
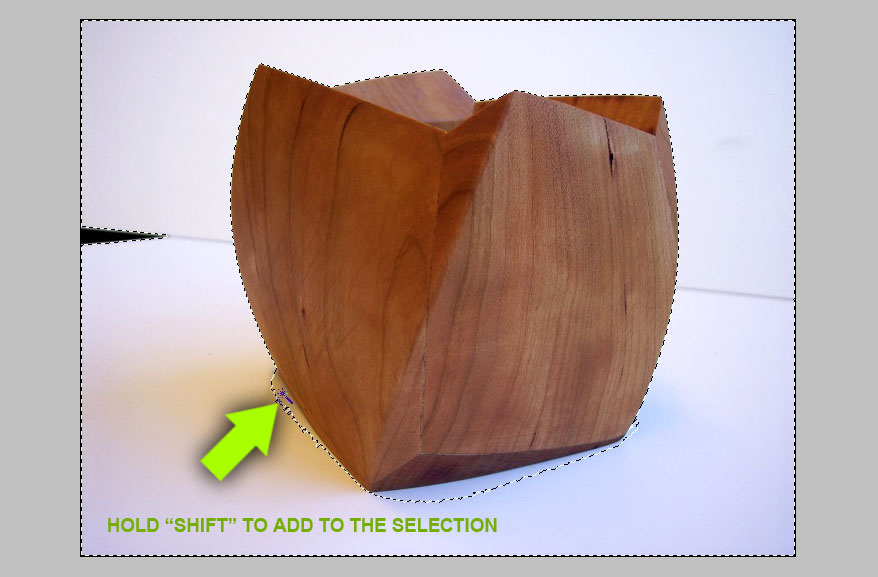
2. In this case, the first selection did not grab all of the background. By holding “shift”, I can add to the selection. Holding “Alt” allows me to remove parts of the selection. In a short amount of time, most of the background is selected and can be removed.




relly like your tuts, thanks alot
Hi,
I wanted to share a thank you and a link with Alex and the online community.
This is a link to a competition that my team and I have participated in.
It is a proposal for a recycling center in Nosara, Costa Rica.
I am posting it to Alex's blog because I would have not been able to complete our proposal without this tutorials, tips and inspiration.
This is a link to the facebook page, if anyone would like to vote.
http://www.facebook.com/NosaraDesignBuildStudioNYIT
Our project is called 'Poroso'. please show your support for young architects.
On the facebook page, click the questions tab to the left and please choose 'Poroso'
Thank you Alex and everyone who shows support!
HI Alex,
Where do you get your bushes textures from?
Habib
Hey Alex, Good Job Man
Just could you please briefly show us how you created the yellow light effects coming from the lughtn source on the walls and surrounding, in that work illustration. Please could you show use how you did this light effect. Please Please And Please. I can follow all of your steps and create wicked models but can't get the lighting right.
Thanks Alex U Da Man!
Habib
Great blog and post, Thank you for sharing. Id have to say I use the "Color Range" (Method 5) and "Layer Mask" (Method 2) the most.
Thank you Alex!! I am an architecture student from Romania, and I must admit, your tutorials are just perfect! keep it coming!! Awesome.!
I use polygonal tool or magic wand for selection, when click on mask icon to get mask from this selection on choosen layer.
There is one more interesting way to cut off an image. It’s about using a Focus area tool (Select-Focus area). This method is a bit complicated but provides significant quality.
Perhaps one more is to use the pen tool to outline objects. This allows you detailed control of anchor points and the ability to fully adjust the outline. Once you’ve got the shape you want, just right click and “Make Selection”. I often feather it a hint so the cutouts blend with their context. Not as fast as automated selections but great precision and you can fly once you get the hang of it.
I am architect and visualizer,
Back again here to read a little bit more about that ot that.
Thanks for post it.
Usefull
Greetings