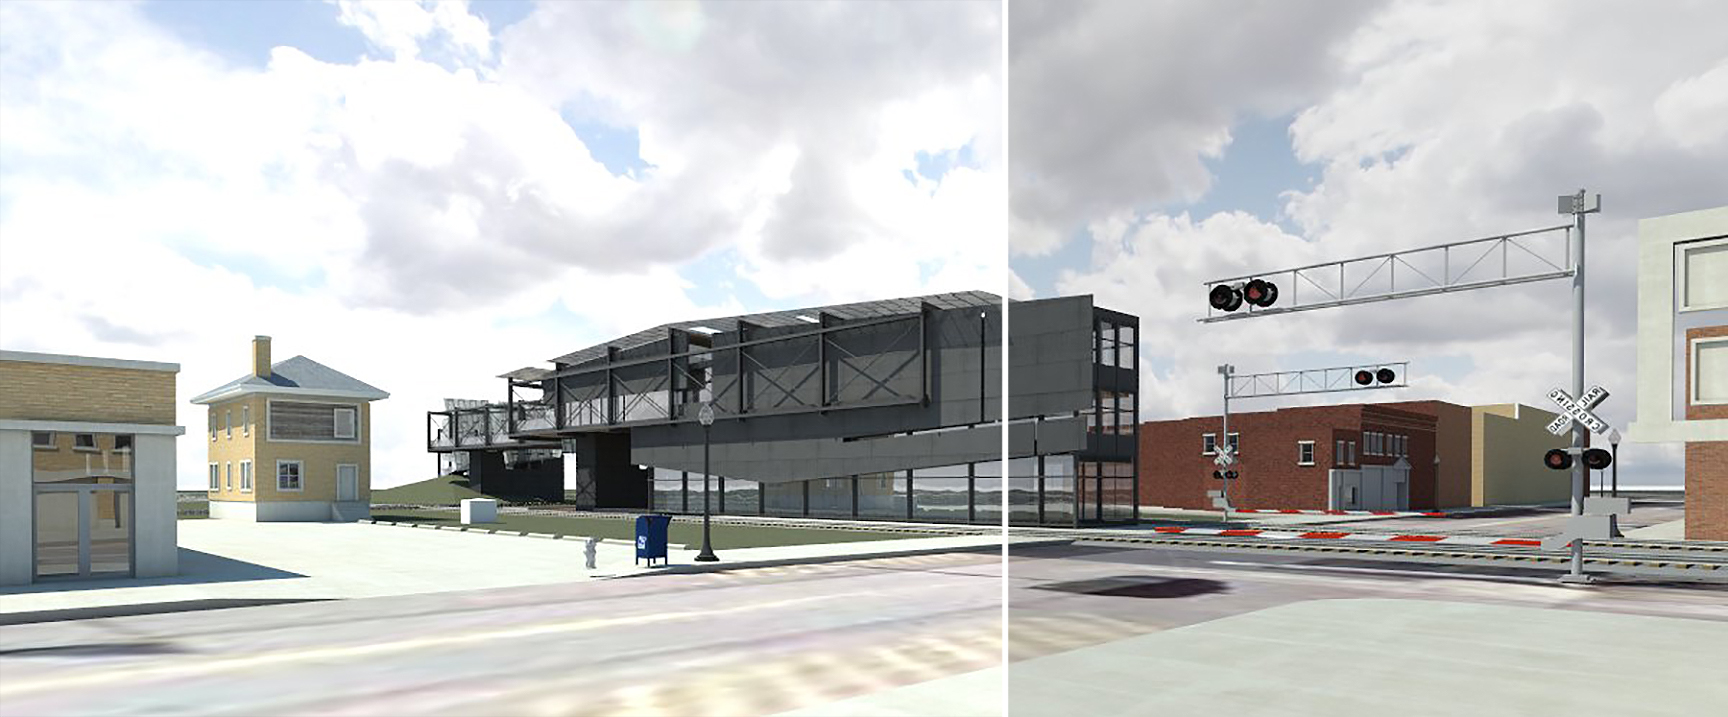
A lot of you have been asking for V-Ray settings and so I am going to spend a little time going over the settings that I used to create the base rendering of the main street perspective in the previous post. I have been using V-Ray for over a year now and I am in no way paid by V-Ray or affiliated with the company. I simply tried out a lot of different programs and found V-Ray was the best at meeting a lot of my needs. The most important of these were simplicity and flexibility. Right out of the box, V-Ray generates nice renderings. You will notice that I don’t vear too far from the default settings, but instead use settings that will provide the best ratio of fast rendering times and good outputs. Another very important point that I want to make is that I am not trying to produce the perfect V-Ray rendering each time. I am simply trying to get close to what I want and then refine the lighting and colors in Photoshop. This way of thinking maintains my sanity and minimizes the amount of test renderings and setting adjustments that need to be made.
Render settings are obviously a big topic to cover and there are many different rendering situations like interior shots, dusk shots, and daytime shots that require different setups. To keep things manageable, this first post will be an overview of the basic concepts that I use for setting up a daytime rendering scene. Things like material setup, AO passes, dusk and interior shot setup will come later.
Before getting into the settings, there are a few more notes. I am using V-Ray for Sketchup. This means the V-Ray interface is running inside of Sketchup. Things like the sun, cameras, and materials all speak to each other between the two programs. Changing the sun angle in Sketchup will change the sun angle in V-Ray. I typically adjust the sun angle in Sketchup to get the shadows exactly where I want them before moving to V-Ray. I also save the Sketchup scene that I plan to render in V-Ray by going to “View>Animation>Add Scene”. This is especially important if I am going to overlay Sketchup image exports on top of the V-Ray renderings or if I need to render the same view later on down the road.
V-Ray Dialogue Box
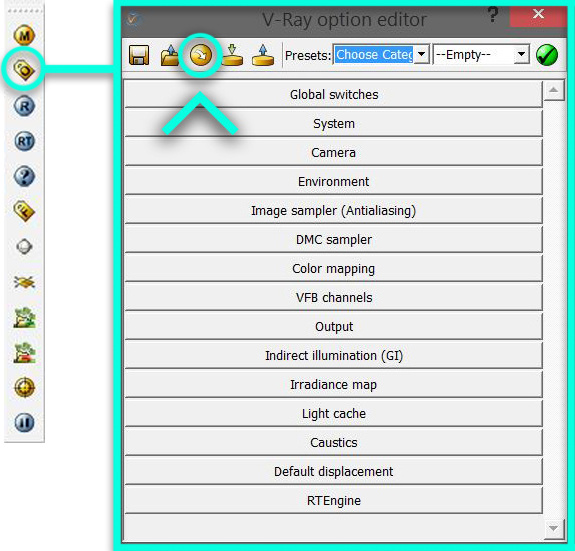
The V-Ray settings dialogue box uses tabs that expand and contract keeping the settings a little more manageable to navigate. An important button to be familiar with is the “Load Defaults” button. This will take everything to the default V-Ray settings when the program was first installed. If I have been experimenting with settings and things are getting weird with the outputs, I will often hit this button to start from scratch. Next to that is the “Load” button which allows you to load past settings which have become a big time saver in our studio.
Global Settings Tab
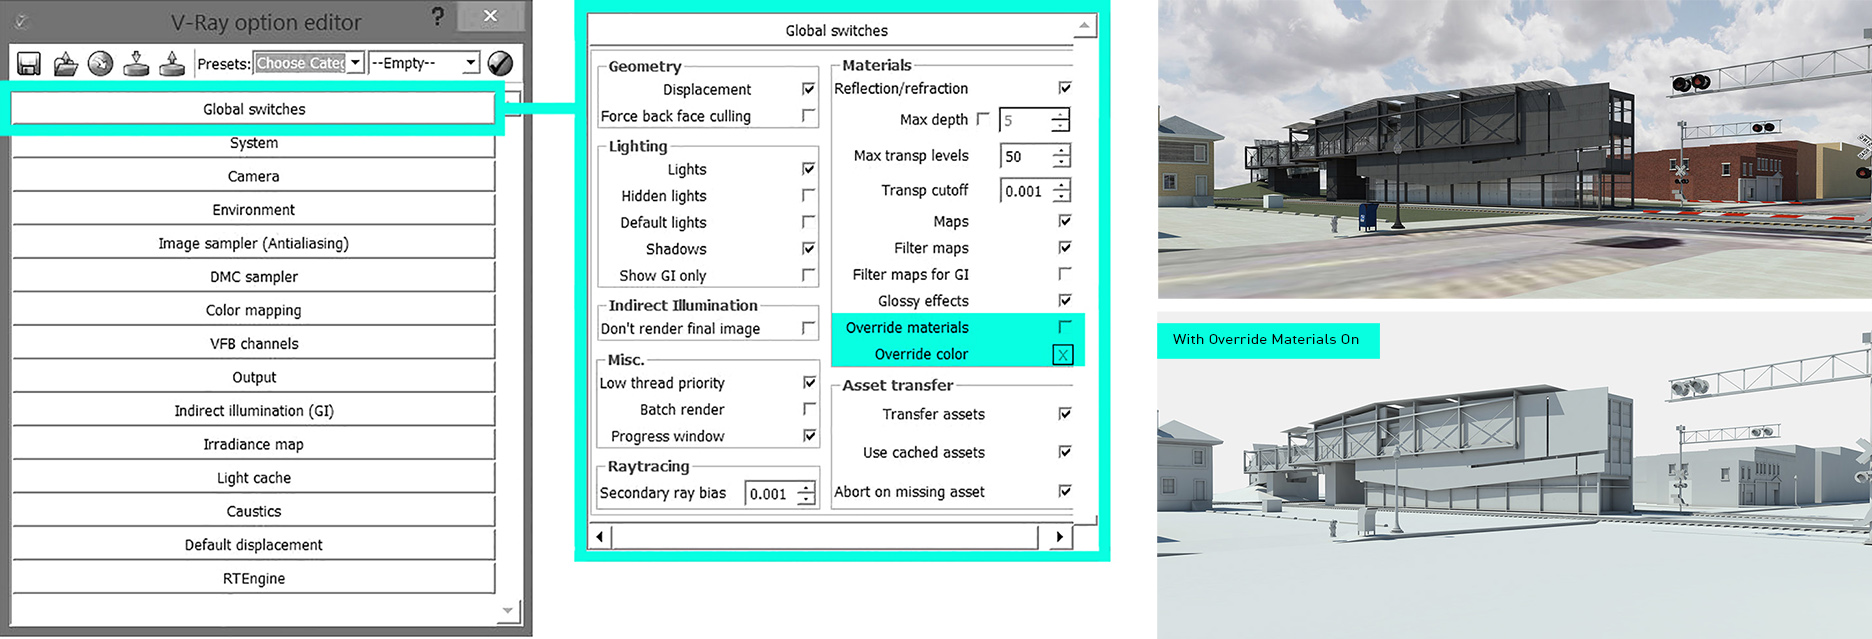
In this tab, I really only use the “Override Materials” check box. This will override all materials in the model and replace them with a single material color. This is the box I check when I create clay model renderings.
Camera Tab
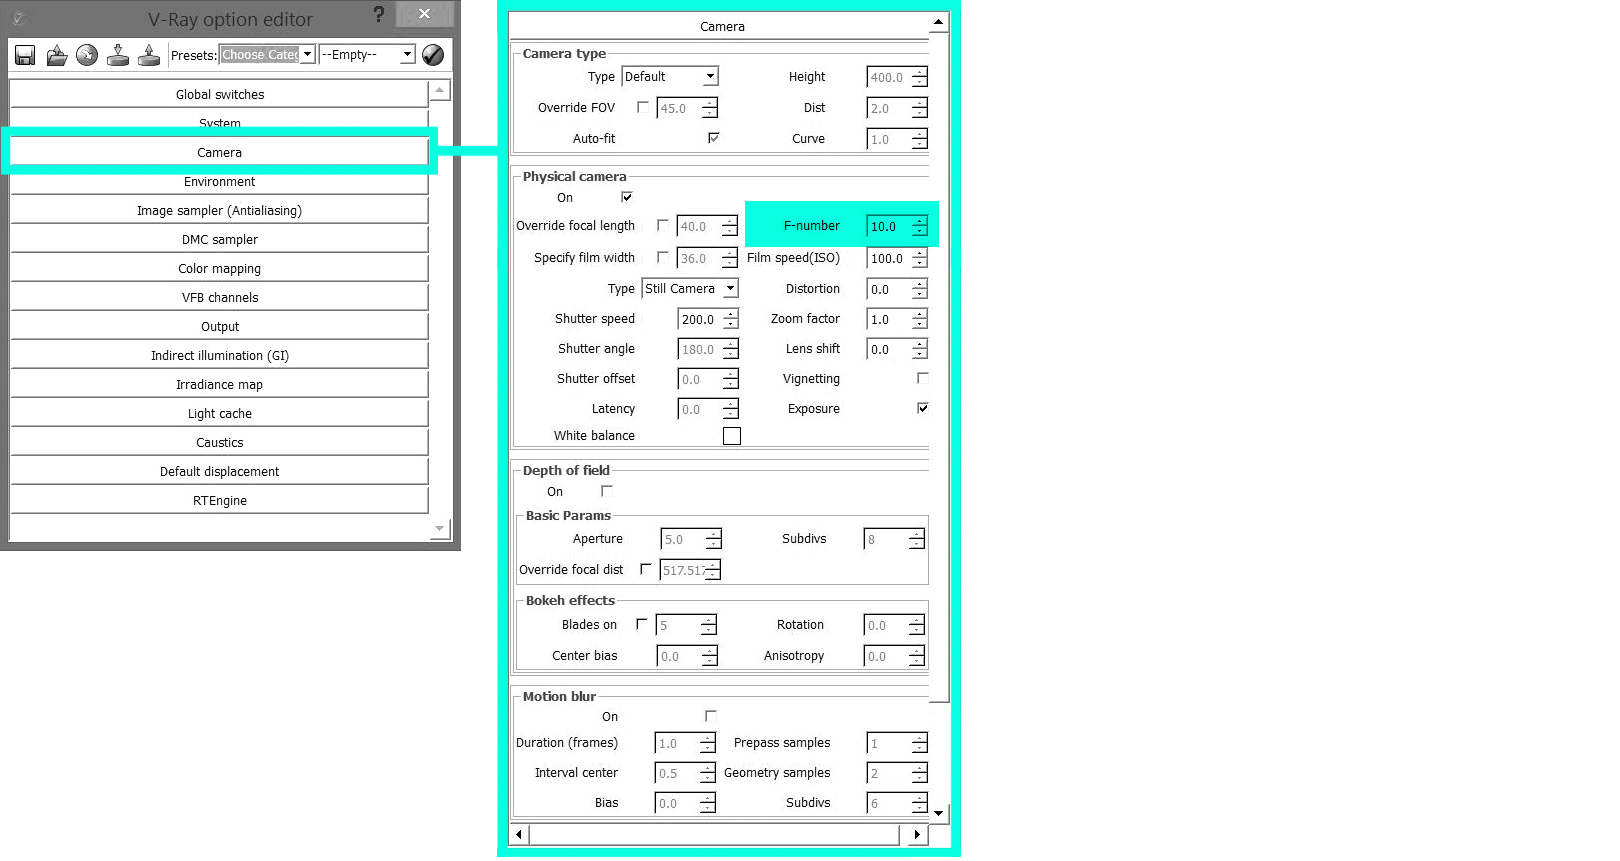
This tab controls things like exposure of the rendering similar to how an SLR camera works. I usually leave the default settings the same except for the F-number which I change from “8” to “10”. This slightly darkens the final output so that the white materials don’t get washed out. For interior shots or dusk scenes where there is low light, these settings will need to be adjusted accordingly.
Environment Tab
This tab controls the overall lighting of the scene. The GI (Skylight) box controls the sun specifically. Again, the default V-Ray settings are tied to the Sketchup sun. Therefore, changing the sun angle in Sketchup changes the sun angle here in V-Ray. If you have a dusk shot, then you can tweak the sun color or use an HDRI image to generate the light. For this daytime rendering, I left everything at the default settings.
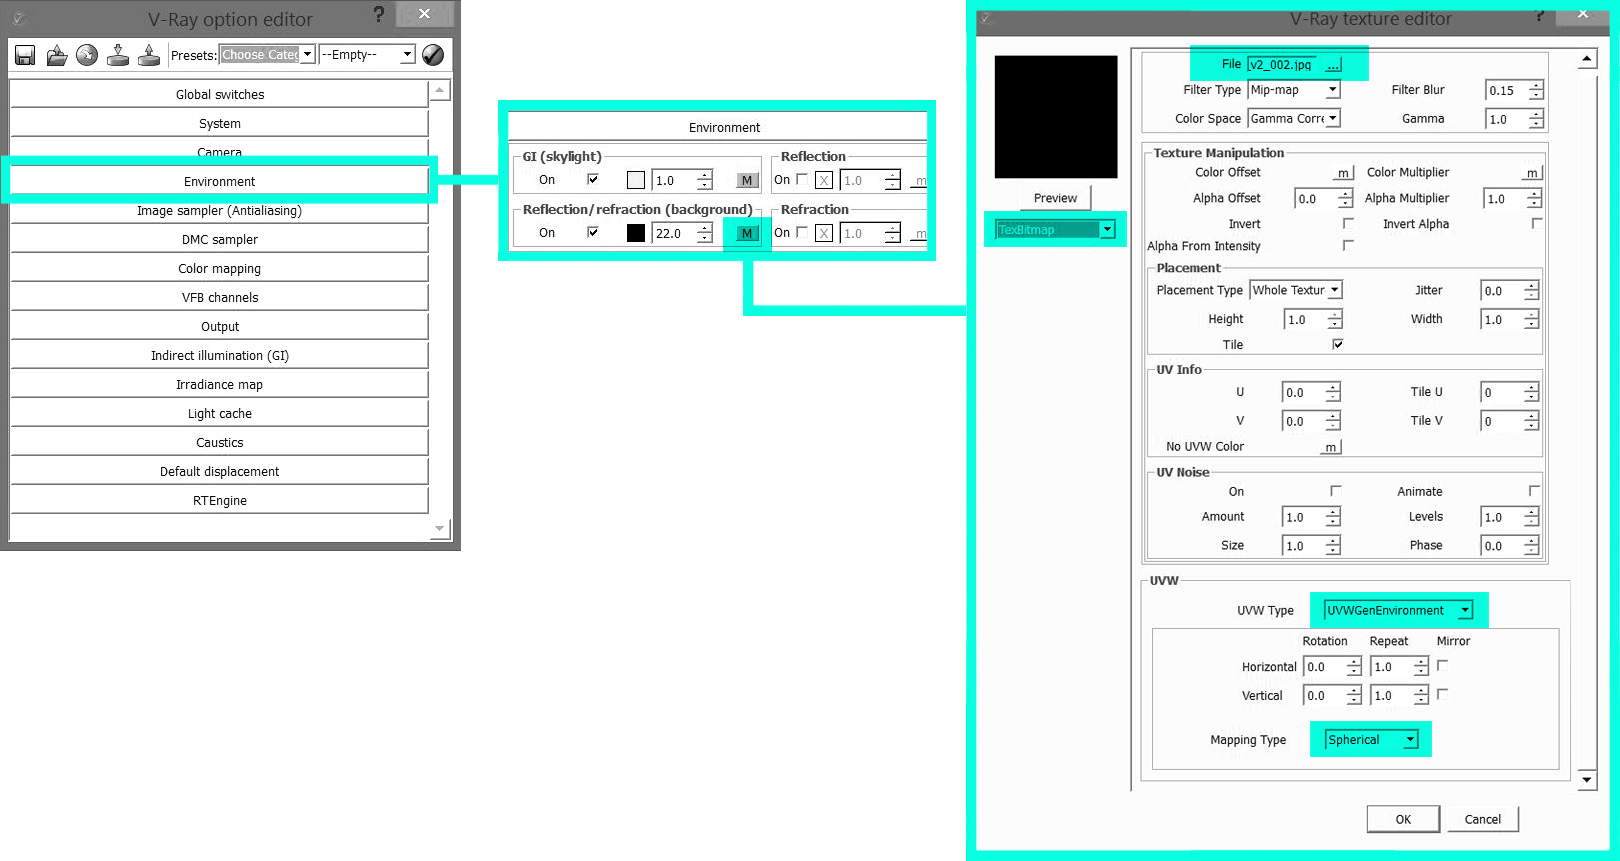
The “Reflection/Refraction (background)” controls what you see in the background/sky. Here, I often add a sky image so that it will be seen in the reflections of my model.
To add a sky, I choose the “M” in the “Reflection/Refraction(background)” box. In the drop down under the preview, I choose “TexBitmap”, and load a spherical sky image. I also make sure to choose “UVWGenEnvironment” in the drop down next to UVW Type. You can find spherical skies online and through Google image searches.
VFB Channels Tab
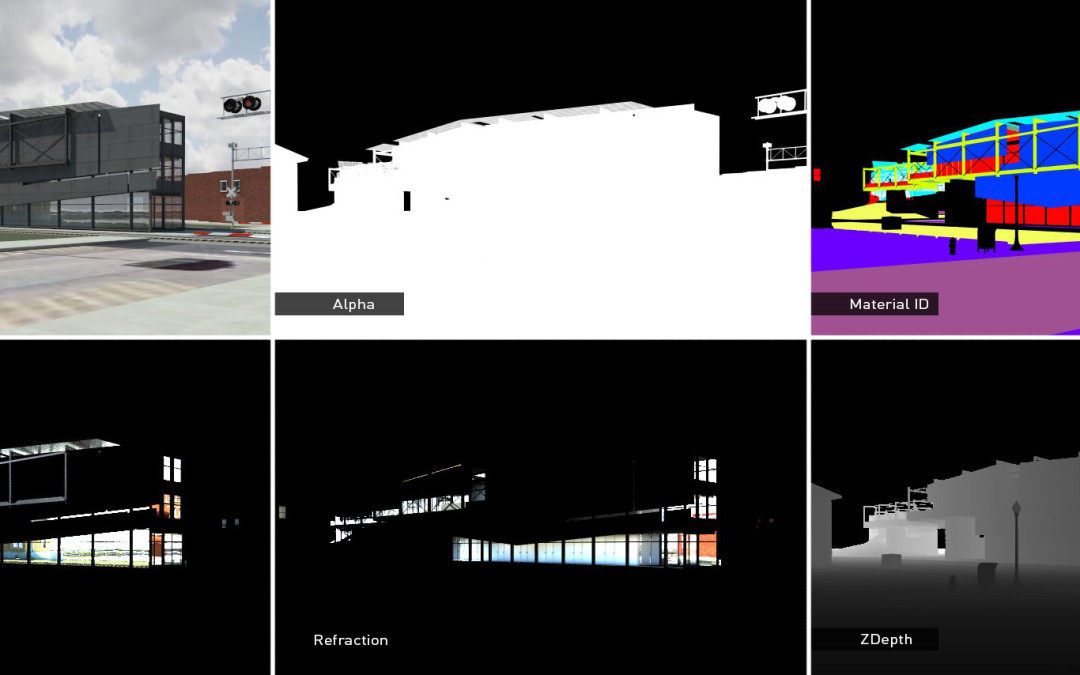
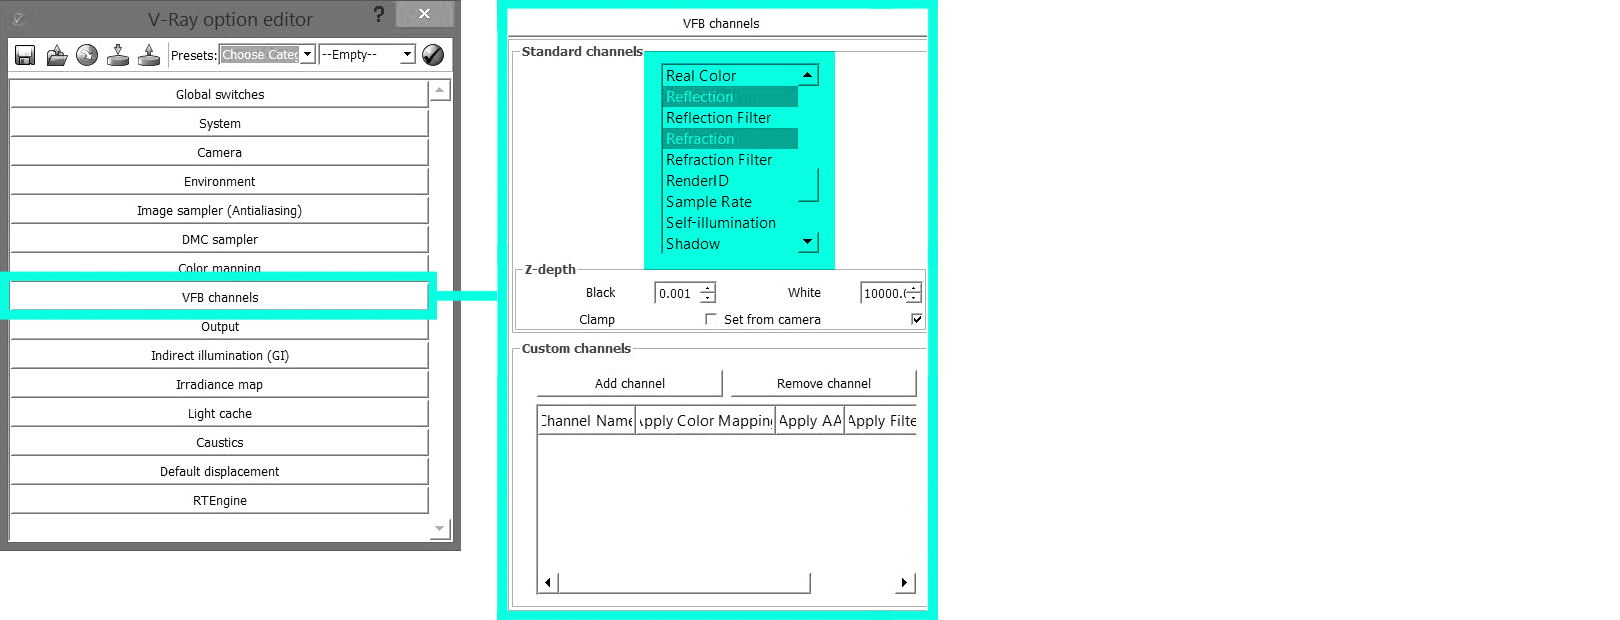
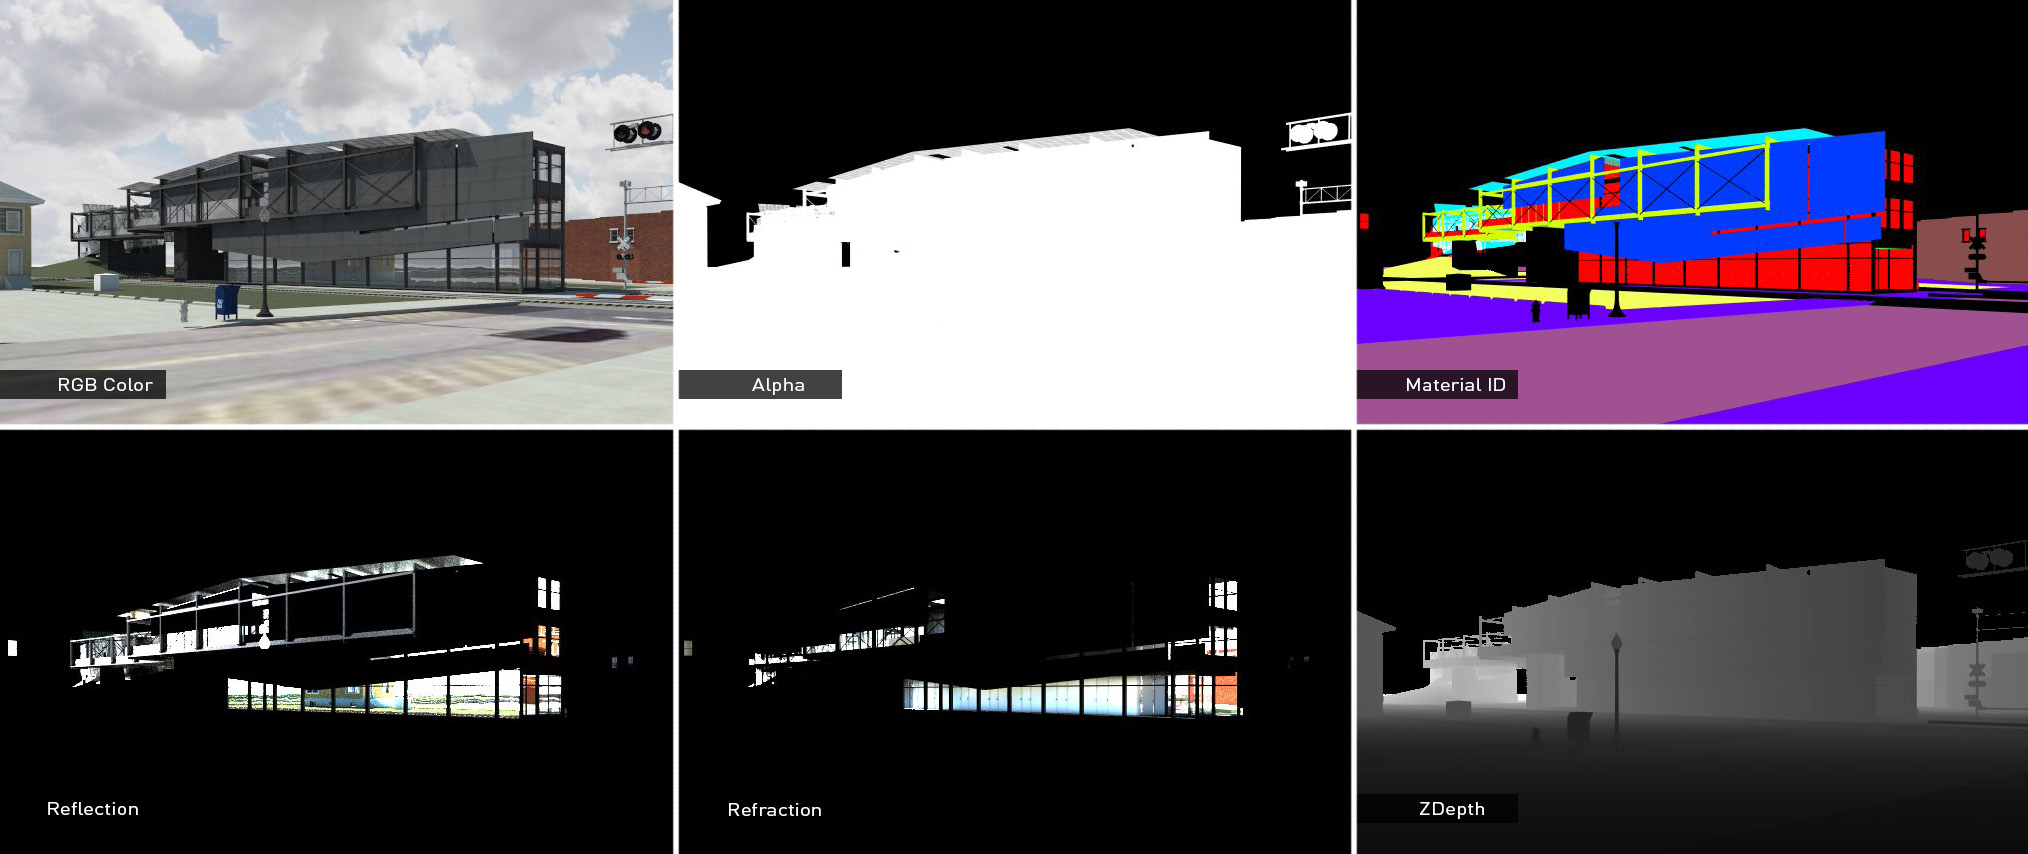
Here, you can set up extra channels to be generated along with the rgb color image. In other words, you create images that separate out information such as reflections, lighting, and shadows, which can then be used as separate layers in Photoshop. For example, I often select Reflection, Refraction, ZDepth, and Material ID for almost every rendering I do. The Material ID is especially helpful to make quick selections of materials.
Output Tab
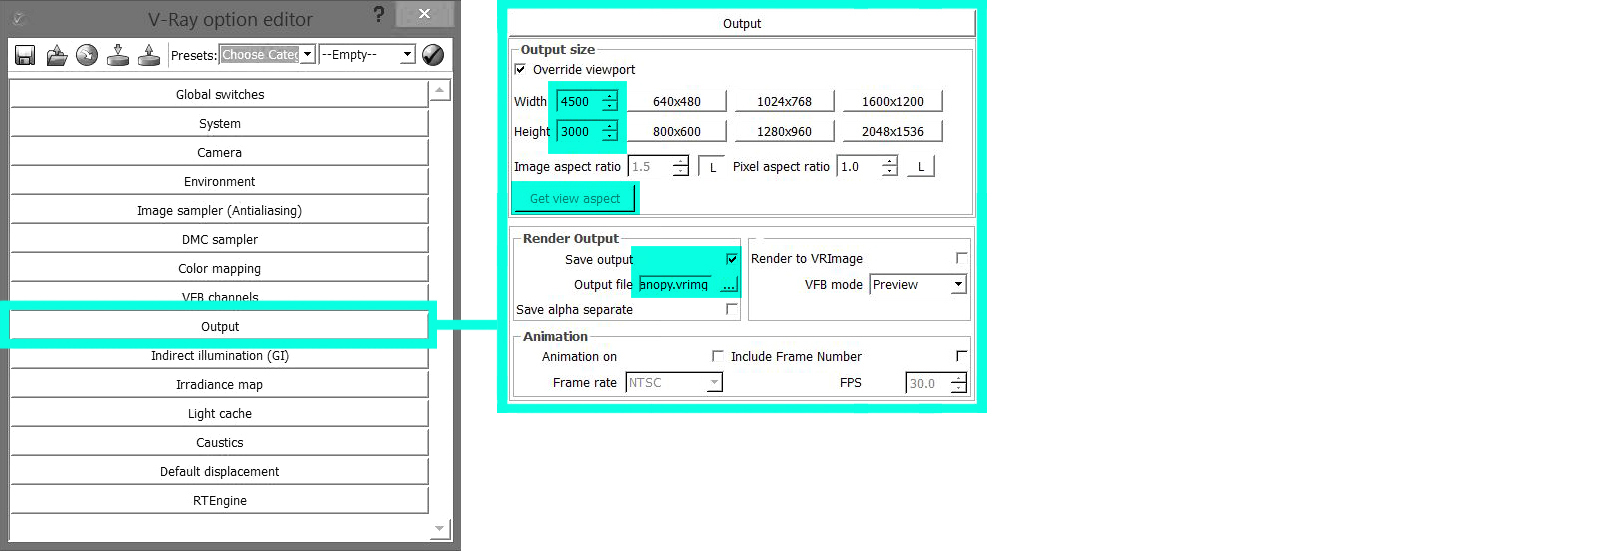
This is where the resolution is set and where I tell V-Ray to save the file. For quick test renderings, I set the resolution to 1200×800. For final renderings, I will bump up the resolution to somewhere between 4500 and 5000 px though I often suggest students can get away with 3000 px images to save time.
If I need the proportions of my renderings to exactly match my Sketchup window, I will select the “Get view aspect” button. This grabs the aspect ratio of the Sketchup model space and applies it to the V-Ray aspect ratio. This is useful if you are overlaying Sketchup line work exports over the V-Ray rendering and want things to match up perfectly.
Finally, under “Render Output”, I check the box next to “Save Output”. Under that, I browse to a location where I want the files to be saved and save them as Tiffs. By choosing these options, V-Ray will automatically save the final images along with the channels once everything is finished rendering.
Indirect Illumination GI
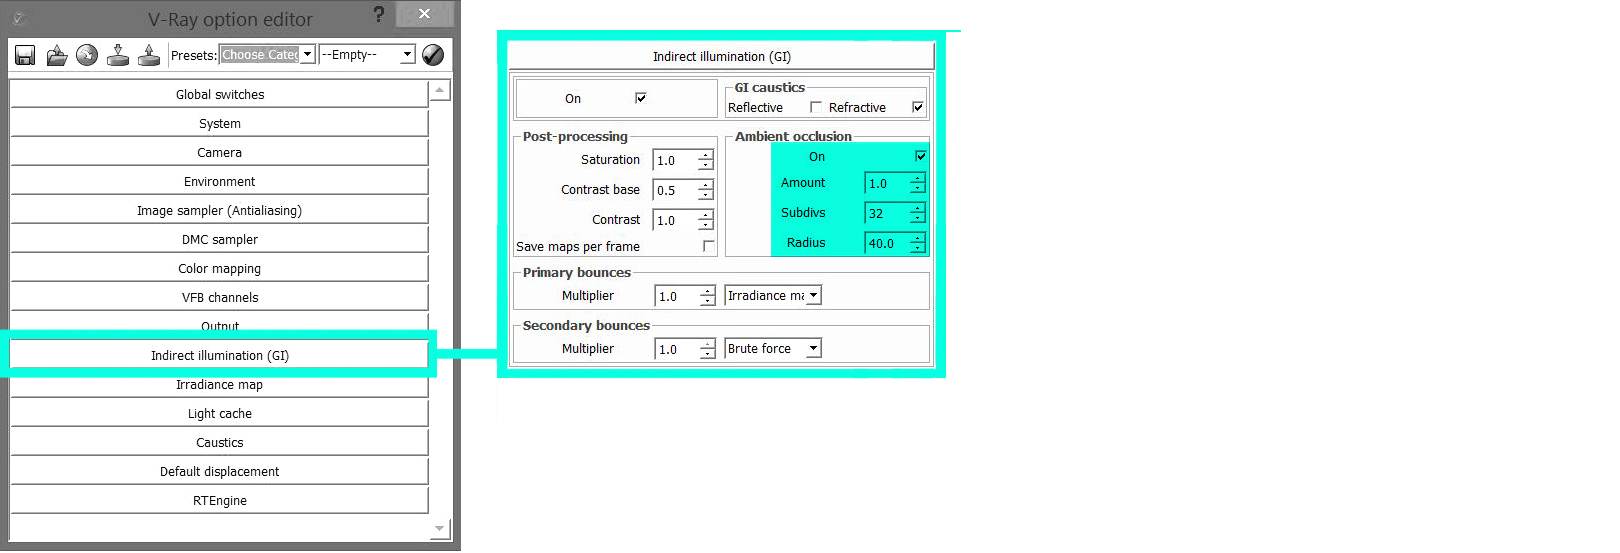
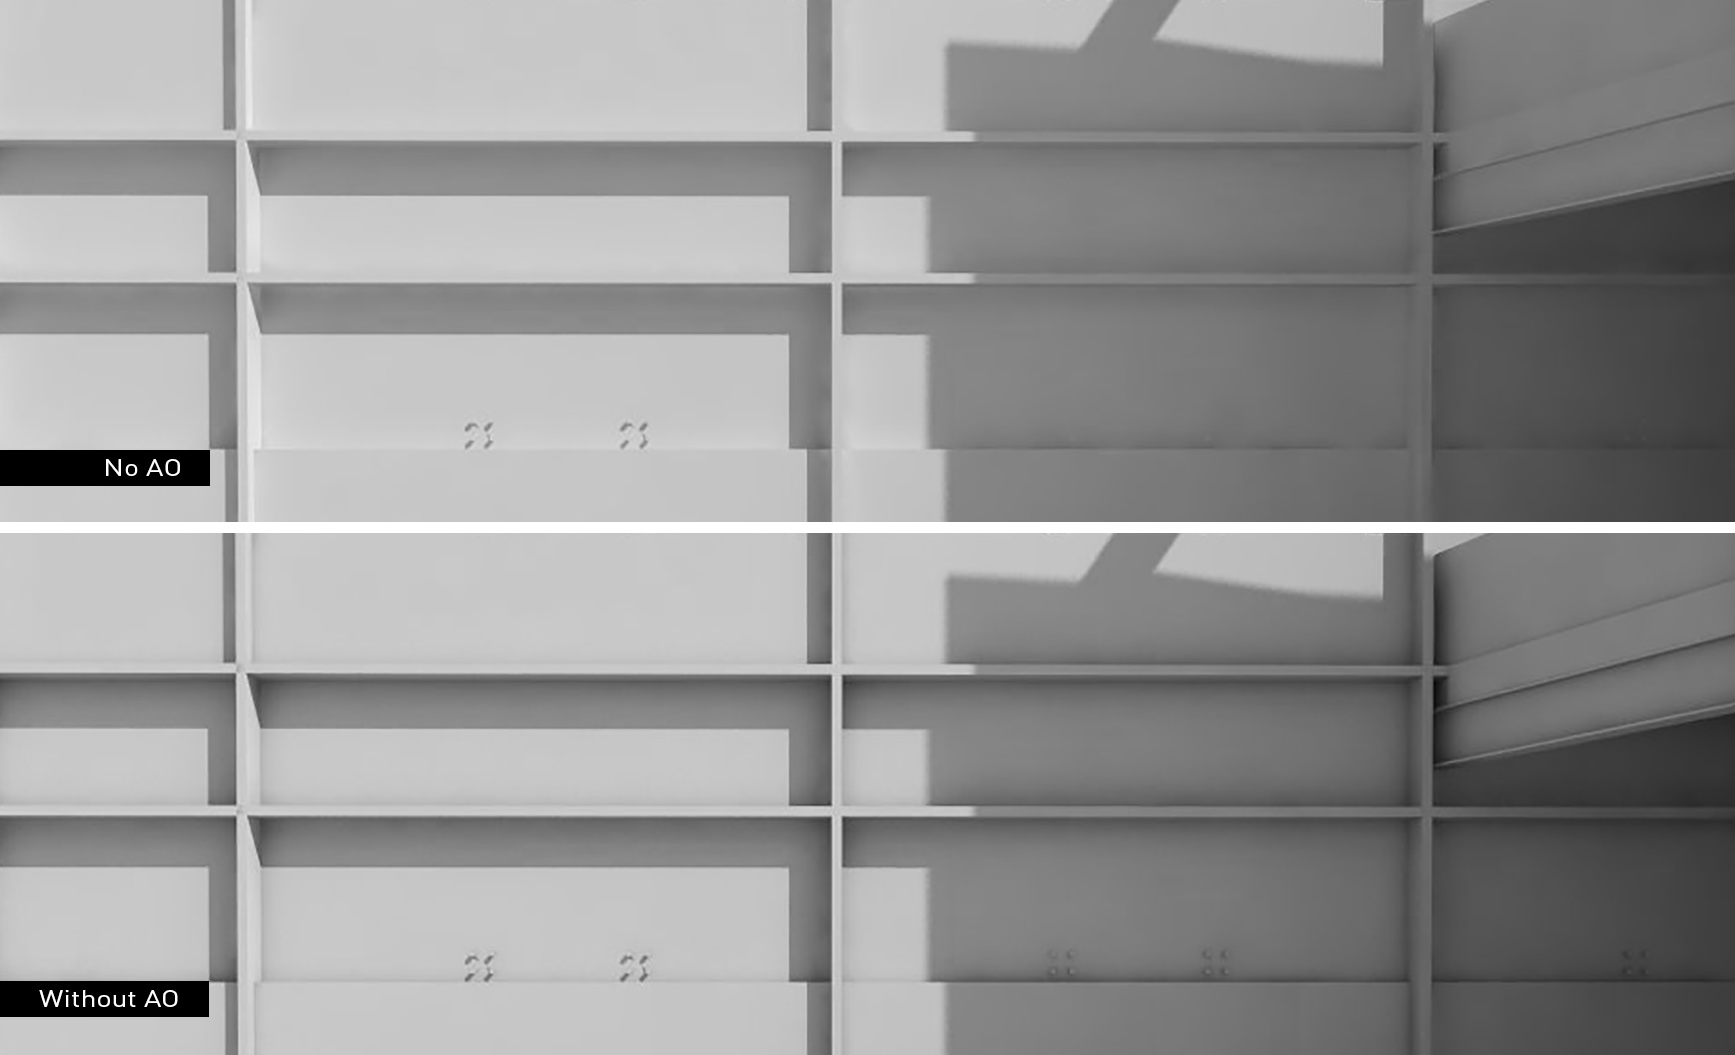
In this tab, the only thing I am concerned with is the “Ambient Occlusion” box. Ambient occlusion will add shadows into the corners of the geometry which adds realism and clarity to the renderings. This is one of the reasons why I moved to V-Ray. Here, I check the box next to “On”, set the “Amount” to 1 (controls how dark the shadows are), change “Subdivs” to 16 (controls how smooth the shadows are), and set the “Radius” to 35 (how much the geometry will influence the shadows).
As I mentioned above, this is meant to be a brief overview of a typical daytime scene setup that I use. Sometime in the future, I will go over more complex stuff like night scenes, interior scenes, AO passes, dome lights, HDRI, etc. I will try to update this post as the software evolves or if there is information that I forgot to include.


Thanks a lot Alex.
hi Alex,
LOVE from Malaysia.
holla holli kuberi nama cikibumbum
i love you alex
Hello Alex,
As far as I know, V-Ray Sketchup does not render 2-point perspective correctly. How do you overlay Sketchup image exports on top of the V-Ray renderings ( assuming the rendered image and exported image are using the same scene)? Because all of your renderings seems like rendered in 2-point perspective or did you adjust the vertical lines in Photoshop after overlay those images?
This issue was a big on the Sketchup side that was fixed in the 2015 release. Wesupport two point perspective views in V-Ray for Sketchup.
Hi Ted, thanks for your reply. Appreciate it. 🙂
I think change the ‘Lens shift’ value in Camera Tab could help you to fix this problem
how much lens shift that make it works well?
Help!!! The Windows on my rendering continue to turn yellow! What do I do?
Hi Alex, I always learned a lot from your blog and I appreciated everything you share with us. I’m a Rhino user but I know there’re lots of commons of V-ray in both software. Could you talk more about physical camera and light setting? Thank you!
Hi Jin, Maybe I can help. The Vray physical camera replicates the typical SLR or DSLR cameras which are controlled by 3 elements. Aperture size (the hole which allows light into the camera) Shutter speed (the duration the aperture is open) and ISO (the sensitivity of the film or now the sensor on digital cameras). These 3 elements are used to create the perfect exposure and they all trade off each other. The larger the Fstop value the smaller the aperture size. Typically Fstop of 1.8 would allow loads of light into the camera so you would need a faster shutter speed to correctly expose your shot possibly 1/1000 of a second on a bright day. On a dull day when there is less daylight you may need to open it up for 1/500 sec to get the same exposure. In reality F1.8 would also gives a limited depth of field, so only a small section of the depth of the shot is in focus the foreground and background are often blurred, which can be useful. This is a trade off for lots of light and fast shutter speed to capture action. So when you step down your aperture (check fstop values on line) you are halving the amount of light and increasing the depth of field. So as Alex says, increasing from 8 to 10 is letting in less light for the same shutter speed and therefore darkening the scene. The iso value can increase the sensitivity of the plate or film, so that ISO 200 is twice as sensitive as ISO 100, so requires half the light to correctly expose the shot. Trade off for higher iso is a grainier image. Some cameras these days offer an ISO value of 64,000 which whilst requiring much less light to expose the film, you get a very poor quality image. In Vray for SketchUp depending on the time of day the sun is set for, play around with the shutter speed and or Fstop values to see the effect it has on the images exposure, for an evening shot take Fstop to 22 and leave the shutter speed to 100 and see what happens, this may be too dark so either stop up to F18 or increase shutter speed to 50. Finally regarding shadows in Vray, increasing the sun size in makes for softer shadows providing the Shadow subdivisions are set to a reasonable value. 16 or 24 Smoother shadows = Longer rendering. Its always a trade off.
Hope that helps.
Hi Alex,
for my architectural models I use Blender and Cyclers render engine, but these general information are even very useful for me.
Many thanks again, Alex.
Regards
Umberto
Hi Alex,
Just wondering if you were looking into doing another round of printing for your latest portfolio?
I will be setting up print-on-demand through blurb shortly
simple and helpful
as always
thank you SO much dear alex
and please, keep it up! 😉
Thank you for this. Very helpful. Also, any future plans for tutorials to set up basic HDRI and baisc Materials?
Eventually. Hopefully this summer sometime.
Thanks a lot..
I hope that you will talk much more about VFB channels.. Thinks again..
good one thank you!
You should definitely try Artlantis 6, it’s way more simple, faster and the end result is great.
Sky not showing…any ideas?
you are the man!
Iv’e been waiting for this one. Thanks Alex.
I hope you talk about material in vray. Thanks
Love you, man!
Don’t get me wrong, I don’t want to be greedy, but would it be possible to share the interior settings as well? I’d be really grateful.
thank you Alex, perfect timing for me.
Amazing V-Ray overview! Now if only I could figure out a way to purchase both it and a sketch-up pro license without breaking the bank…someday! lol
Thanks again for another awesome tutorial!
Hey alex, first of all thank you very much for share
your knowledge with us, and secondly I was wondering if you could tell me what
version of Sketchup are you using, because i have the 2014 and the VFB
Chanels doesn t work.
Regards,
We are using 2015 in the office, and I can tell you that the VFB channels work much better in 2015 than they do in 2013 which is what I use at home. They channels work in both versions, but the quality of output is much better in 2015 for some reason.
Thanks so much Alex, I really love your rendering as well as your architectural designs
Hey,Alex.Thanks for your sharing.Your tutorials are always amazing.
And I have a question.In VFB channels tab,we rarely use ZDepth,but it looks really cool.
Could you plz introduce some ways to use ZDepth in post process.It must be interesting.^ ^
Alex I would appreciate very much if you could do this same tutorial for Kerkythea, thanks a lot!
Come over the “Greatwall” To learn,Thank you anyway.
great Alex. This is clearest vray settings discussion/post. Thank you!
Hey Alex, really helpful. Thanks for sharing.
can u plz explain how to adjust materials in rendering
hi alex and congrats for ur work..do you know how we create a material channel in vray for rhino?
hi alex i always like your work, can i ask if you also edit your materials in vray materials editor?
Alex, thanks again for the great tutorials. One question:
Have you ever had a problem with your IES lights showing in the RT rendering, but not your final one?
Thanks again for all the help!
Great!
thank’s allex what a nice toturial and usefull information
Thank you. Really useful information
can i also apply it for interior scene as well??
thanks for the great information 🙂
Thanks for a great post Alex! Looking forward to read more about night scenes, interior scenes, dome lights and HDRI.
Thanks for the time you invest in this blog, as an arquitecture student, I find it very helpfull, keep the good work, grettings from Quito ,Ecuador
King Alex, thank you
Thaank you!!
Hi Alex,
First of all thank you for good and simple advice. I follow your configuration but there is a mistake that the render remained incomplete. There are some errors saying can’t upload many JPG file that include texture. So haow can I fix it?
thank alot …help me alot
Thanks a lot , this help me out very much. My renders are looking better thanks to you.
Hi Alex, I always learned a lot from your blog and I appreciated everything you share with us. Thanks a lot
Thank you so much
Hi! Alex!
I really watching your posts well.
These days I’m watching your sketchup posts, and I want to see how you make a model.
Like the procedure of your modeling, grouping, layers… etc
If you capable I really want to see your modeling post!!
Thank you!
JINHO from KOREA
Alex,
I’m in my final year and just sad that I’ve never found your site before.
Thank you very much for sharing, we need this.
am fan of your work, i also work same as you work, base v ray render and do what ever i want on photoshop…
anyway I wish that you always do more v ray settings..
Thank you so much!
I don’t know a lot about architectural visualisation, but I felt that you did a great job of explaining V-Ray with Sketchup in a very simple and understandable way. The step by step process was super helpful. I’m hoping to learn more about general architectural visualisation. It can be so helpful in so many different parts of life. Thanks again for sharing!
He, thanks for info.
please visit my blog https://linkstudiodesign.blogspot.co.id
Tutorial Sketchup & Vray
thx a lot 🙂
Thank you Mr.
Would be awesome if you could do a more in depth and thorough VRAY setting tutorial!!
Hello admin, i must say you have hi quality content here.
Your blog should go viral. You need initial traffic only.
How to get it? Search for; Mertiso’s tips
go viral
Thanx Alex bro
hey Alex, i wanted to ask since u use vray quite often now, do you still use diffrent images for rendering in photoshop…. like diffrent image for shadows , base render, …. if so… can you please tell me the settings for a plane base render without hard shadows so that i can control the shadows later by diffrent layer in ps….???
very useful sir…
Thanks Alex
My v ray rendering in sketchup 2015 couldn’t complete rendering from yesterday , even it shows 100% in v ray progress window
Hi Alex! I was wondering if you plan on doing an updated vray settings tutorial with the new Sketch Vray 3.6?
Amazing sir.
Thanks for sharing your valuable post for us i enjoy this website – its so useful and helpful.
Wow! Great information, its really amazing post, thanks for sharing.
Nice information, thanks for sharing.