
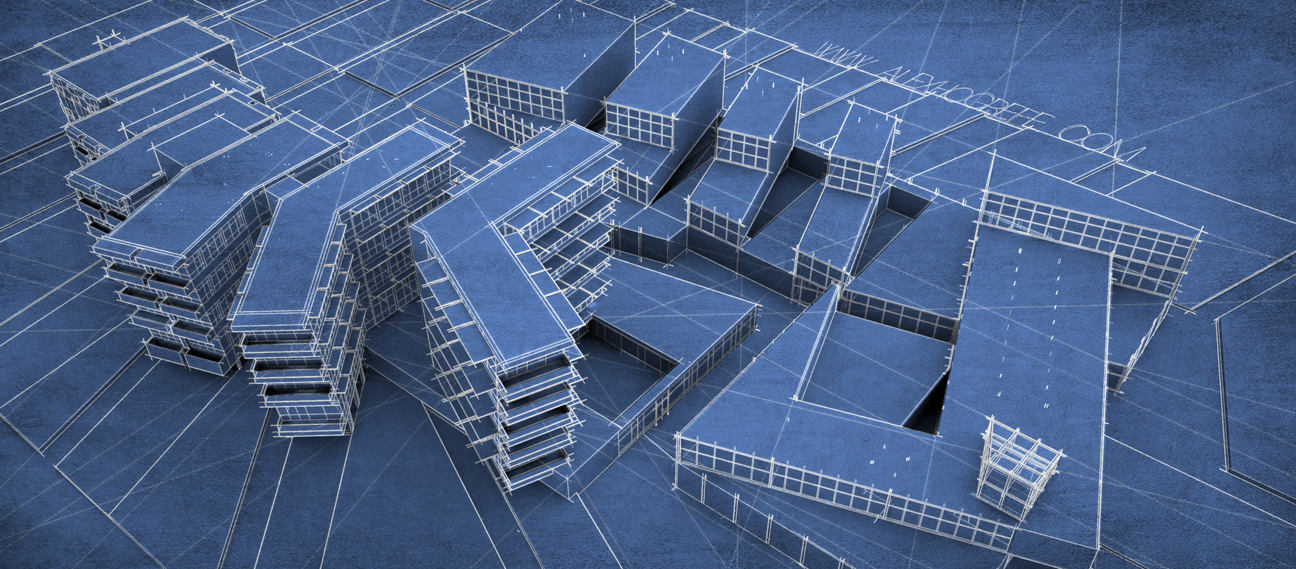
Yesterday, while watching golf, I saw a commercial that folded paper out of a book into buildings that turned into a town which then grew into a city, etc. The commercial caught my attention not only because of its execution and concept, but also because the illustration style was simple and clean using only paper as the material. This inspired me to experiment with a blueprint style that maintains some of the great qualities of blueprint drawings, but also gives the appearance of the design projecting off the page 3-dimensionally. There are many subtle things going on with this image such as faded guidelines similar to what you would see on a hand drafted drawing as well as textures meant to appear as imperfections left on the paper from the blueprint chemical processes.
To get started, 3 images will be generated which will be used in Photoshop. Two of them will be exports from Sketchup, and one will be a basic rendering from Kerkythea
IMAGE 1- BASE IMAGE
1. In Sketchup, save a view/scene that you want to use for the illustration that way you can get back to the same view later if need be.
2. Switch the Face Style to “HIDDEN LINE.” Under View>Edge Style, check “DISPLAY EDGES” and “PROFILES.”
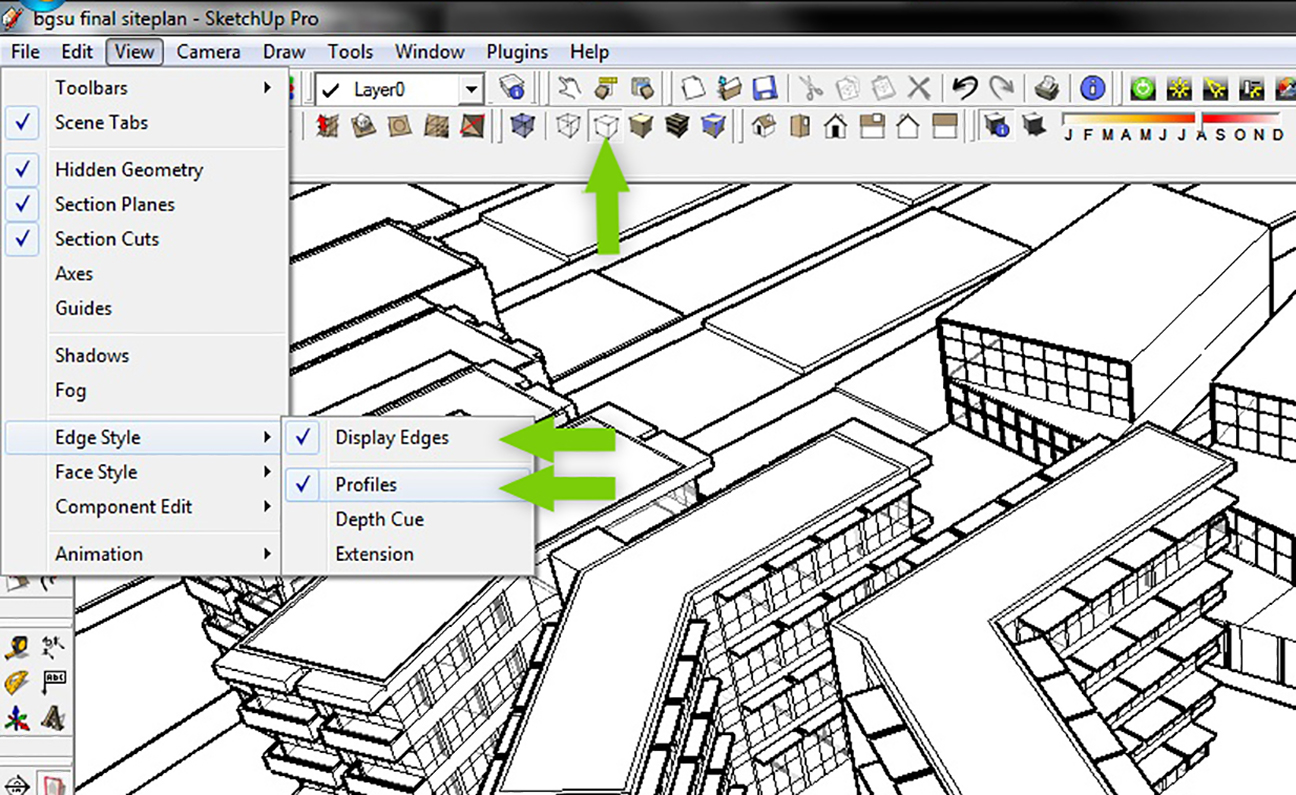
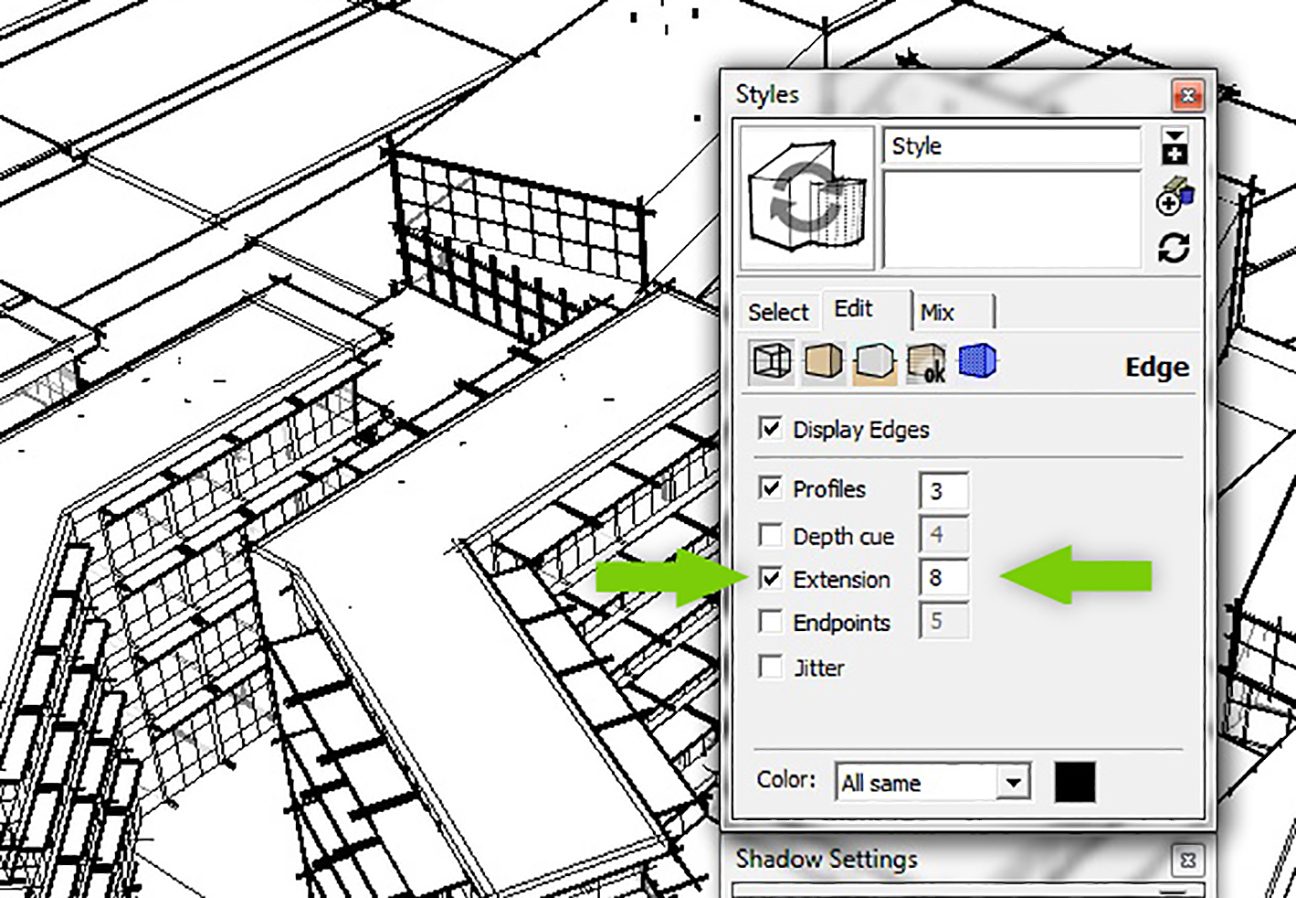
3. In the Styles dialogue box, select the “EDIT” tab, choose the “EDGE STYLES” icon, and check “EXTENSIONS.” Set the length to 8 pixels.
4. EXPORT the image as a JPEG, “FILE>EXPORT>2D GRAPHIC.”
IMAGE 2- GUIDES.
The point of this second export will be to imitate guidelines seen in hand drafted illustrations back in the good old days.
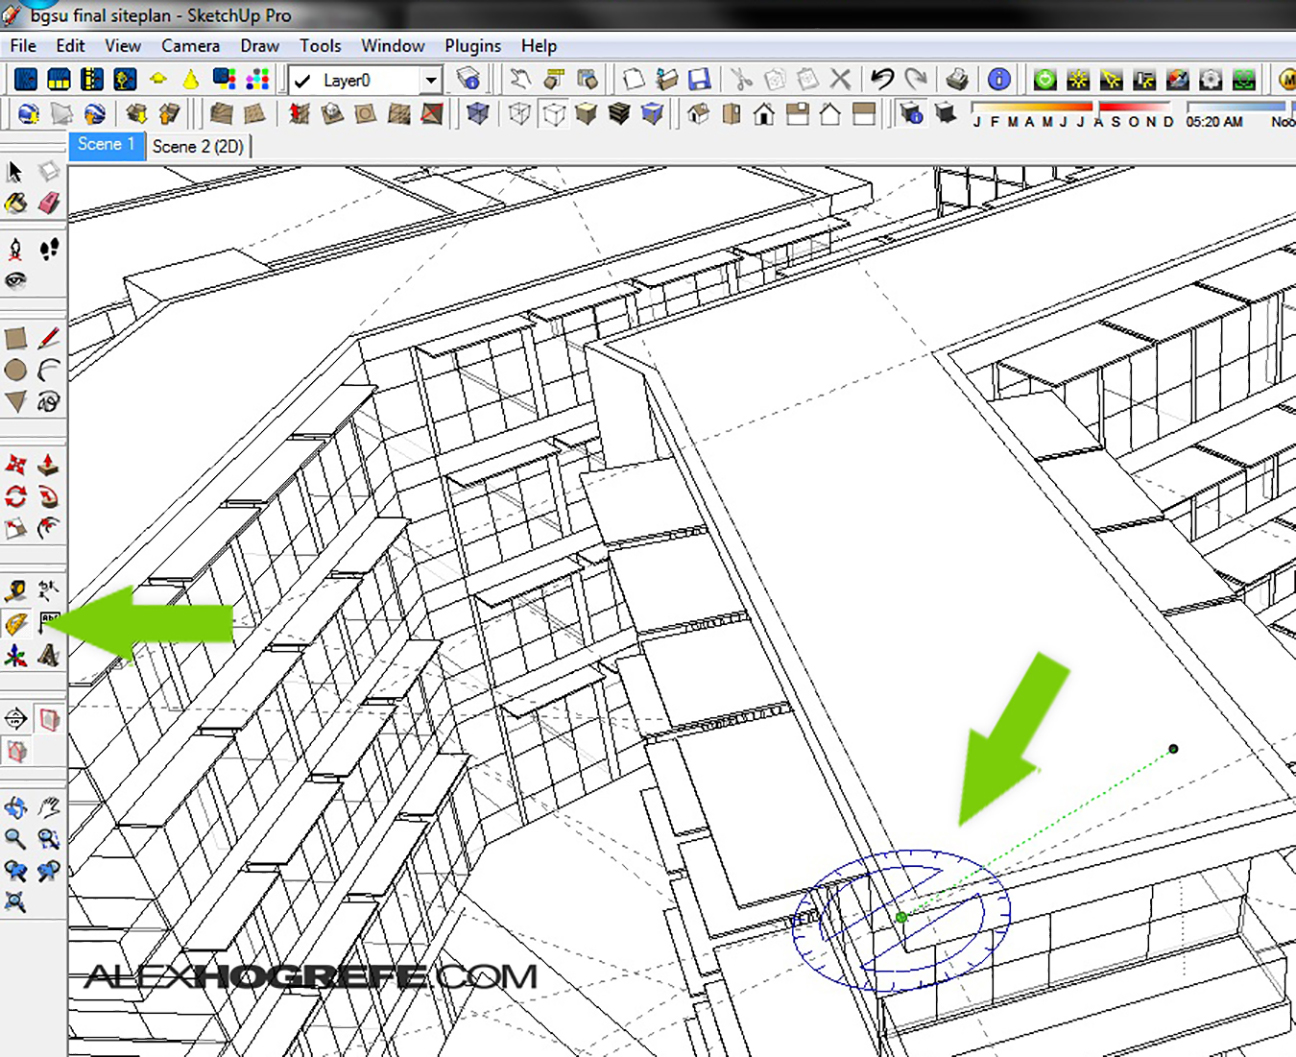
5. Select “VIEW,” and check “GUIDES.”
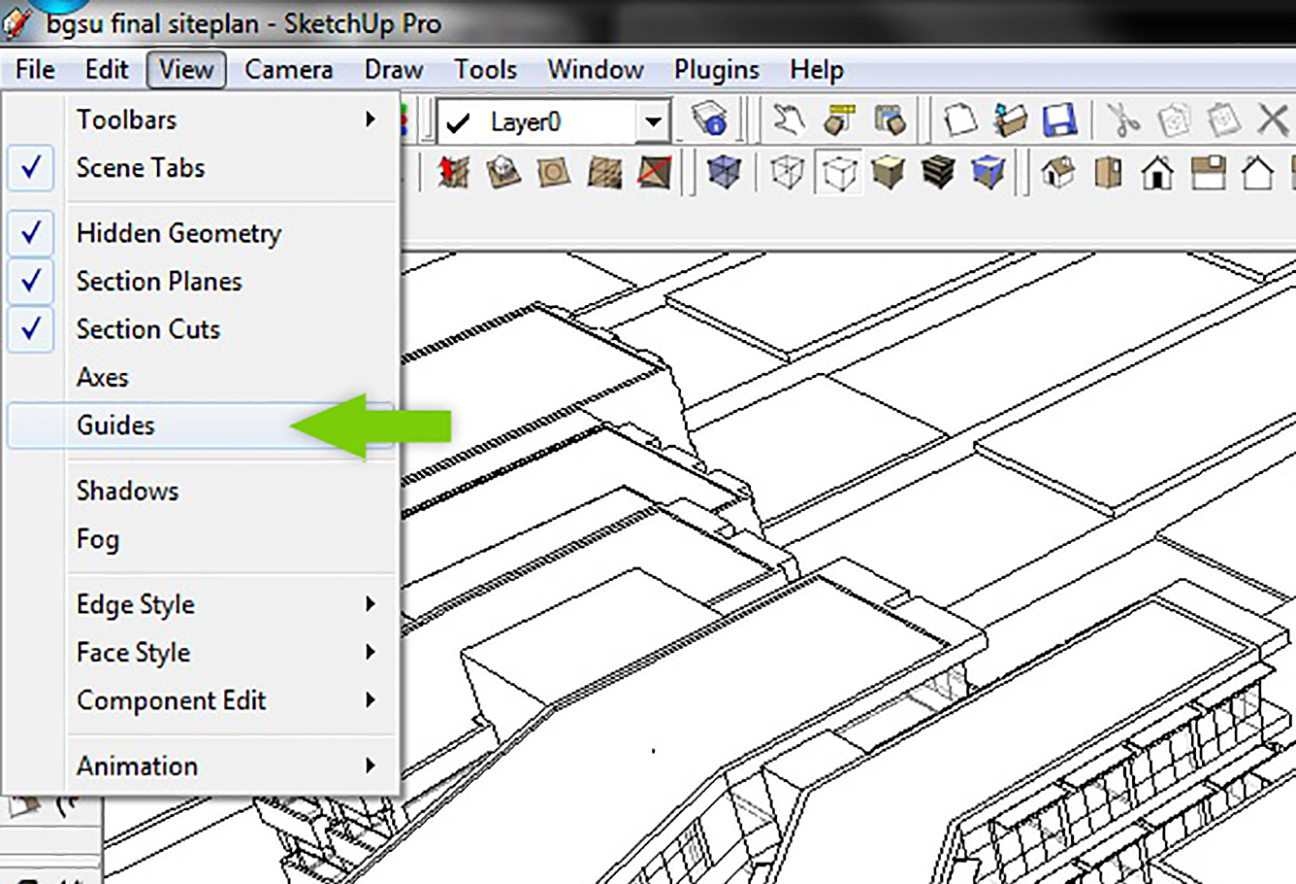
6. With guides turned on, begin creating guides that accentuate important axis or angles in the image. To create guides, measure something with either the ruler or the protractor. Whatever is measured will then turn into a guideline.
7. With the guides in place, go to FILE>EXPORT>2D GRAPHIC and save the image as a JPEG. Again, use the face style “HIDDEN LINE” and leave only “DISPLAY EDGES” checked for the edge style.
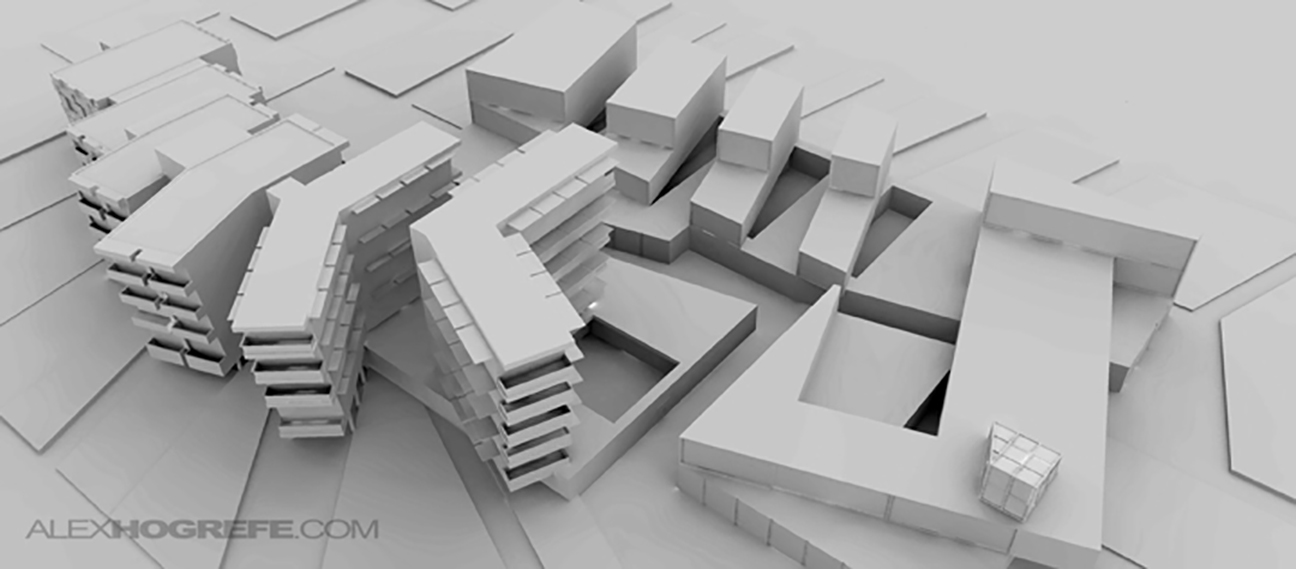
IMAGE 3– BASIC KERKYTHEA RENDERING.
This Kerkythea rendering is very basic with minimal setting changes. The rendering itself only took 10 or 15 minutes to finish because of the limited use of materials.
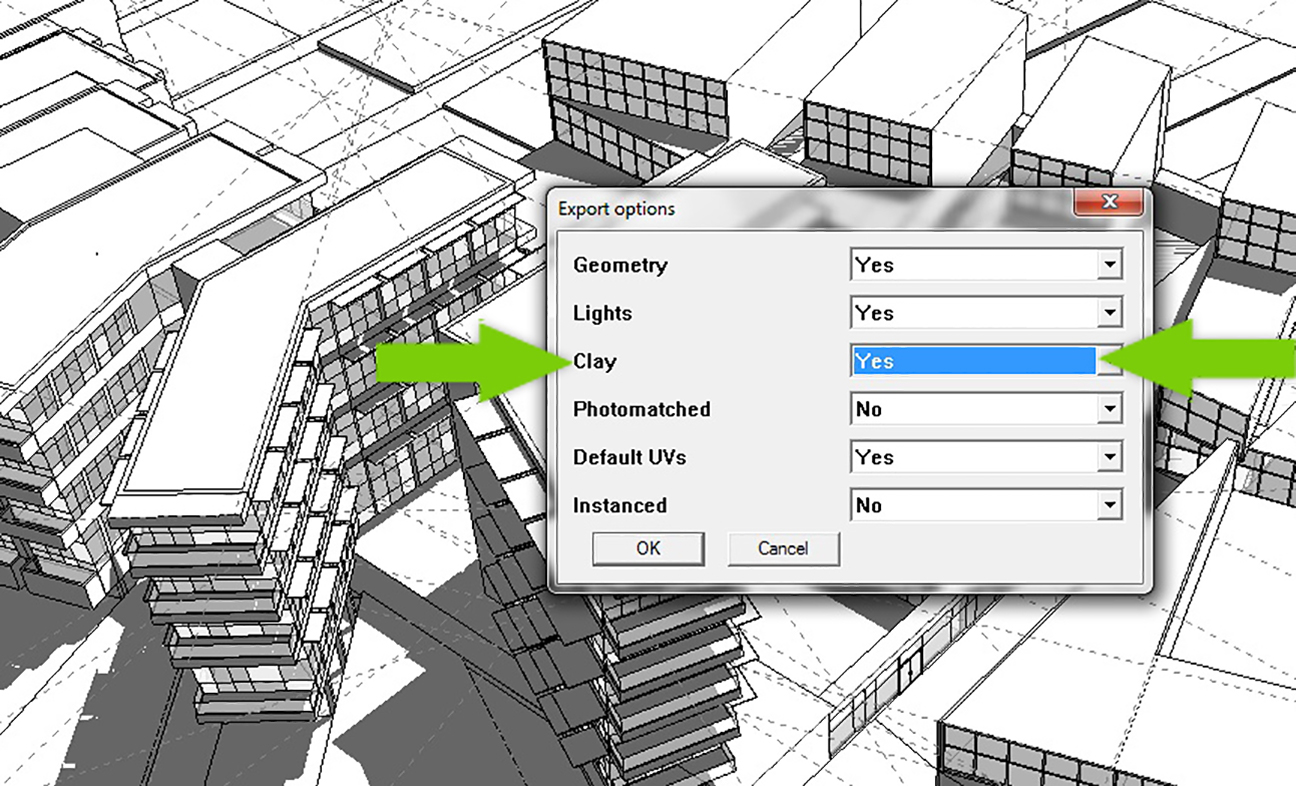
8. To begin, export the model from Sketchup using the Kerkythea plugin. Be sure that shadows are on and that the view you want is set. In the export options, follow the settings below double checking that “CLAY” is set to “YES.”
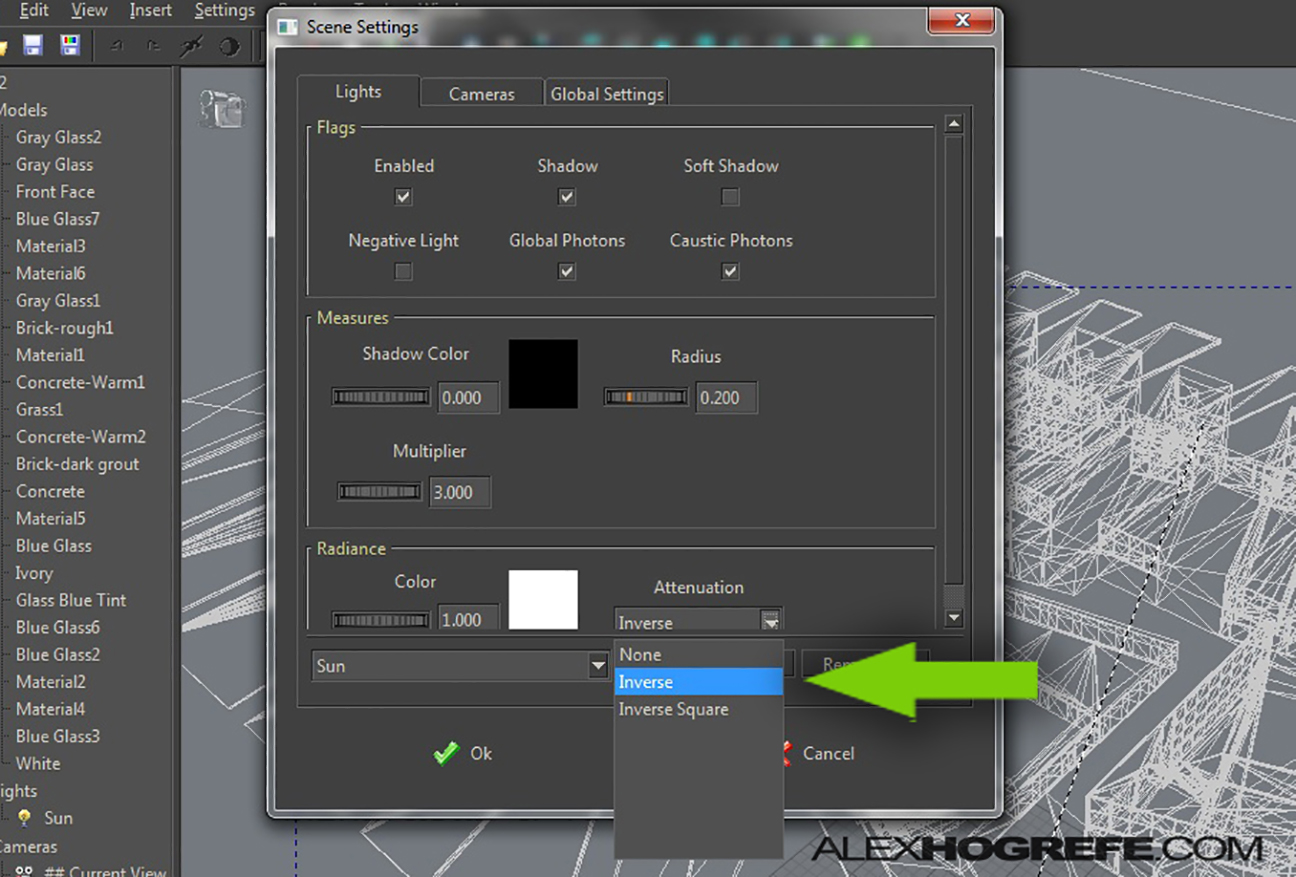
9. Open exported model in Kerkythea. At the top, select “SETTINGS>SCENE.” In the scene settings dialogue box, choose “INVERSE” in the attenuation drop-down box. The setting will give you soft shadows similar to what you would get on a cloudy day.
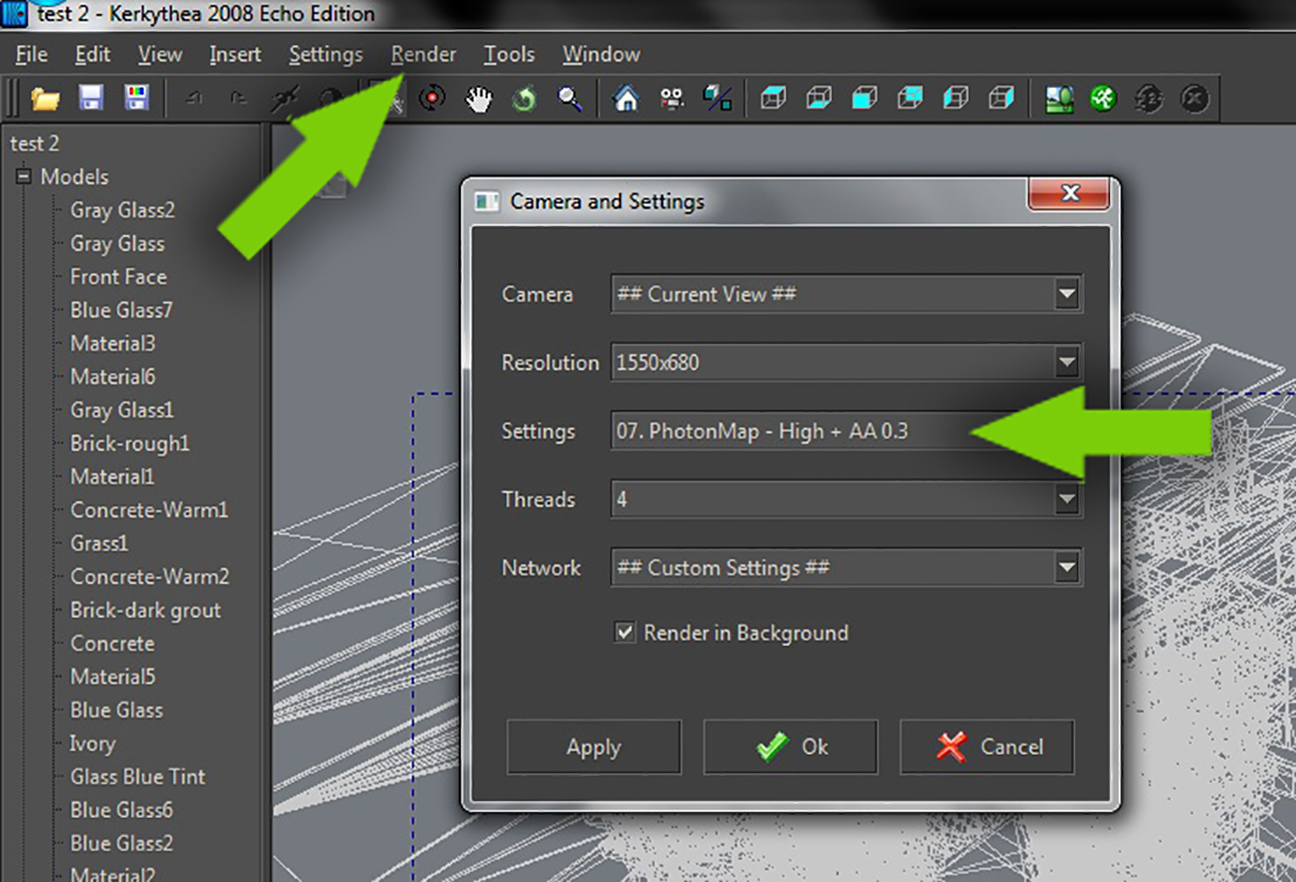
10. That’s the only setting that needs to be changed. Time to render. At the top, select “RENDER>START.” In the dialogue box, DO NOT change the resolution. However, do change the “SETTINGS” to “07 PHOTONMAP -HIGH+AA03.”
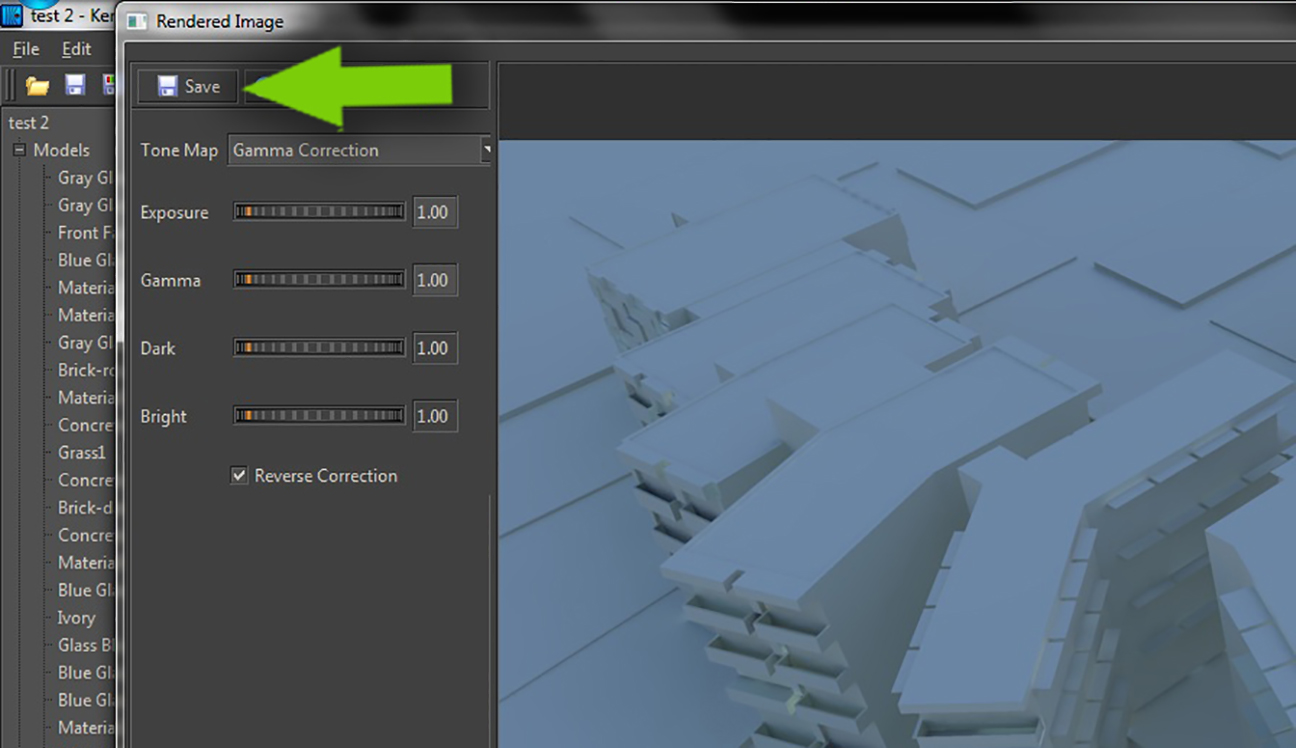
11. Let the rendering cook for a few minutes. To preview and save the final rendering, choose “WINDOW” at the top and check “RENDERED IMAGE.” With the preview box open, select the “SAVE” button to save the image to your hard drive.
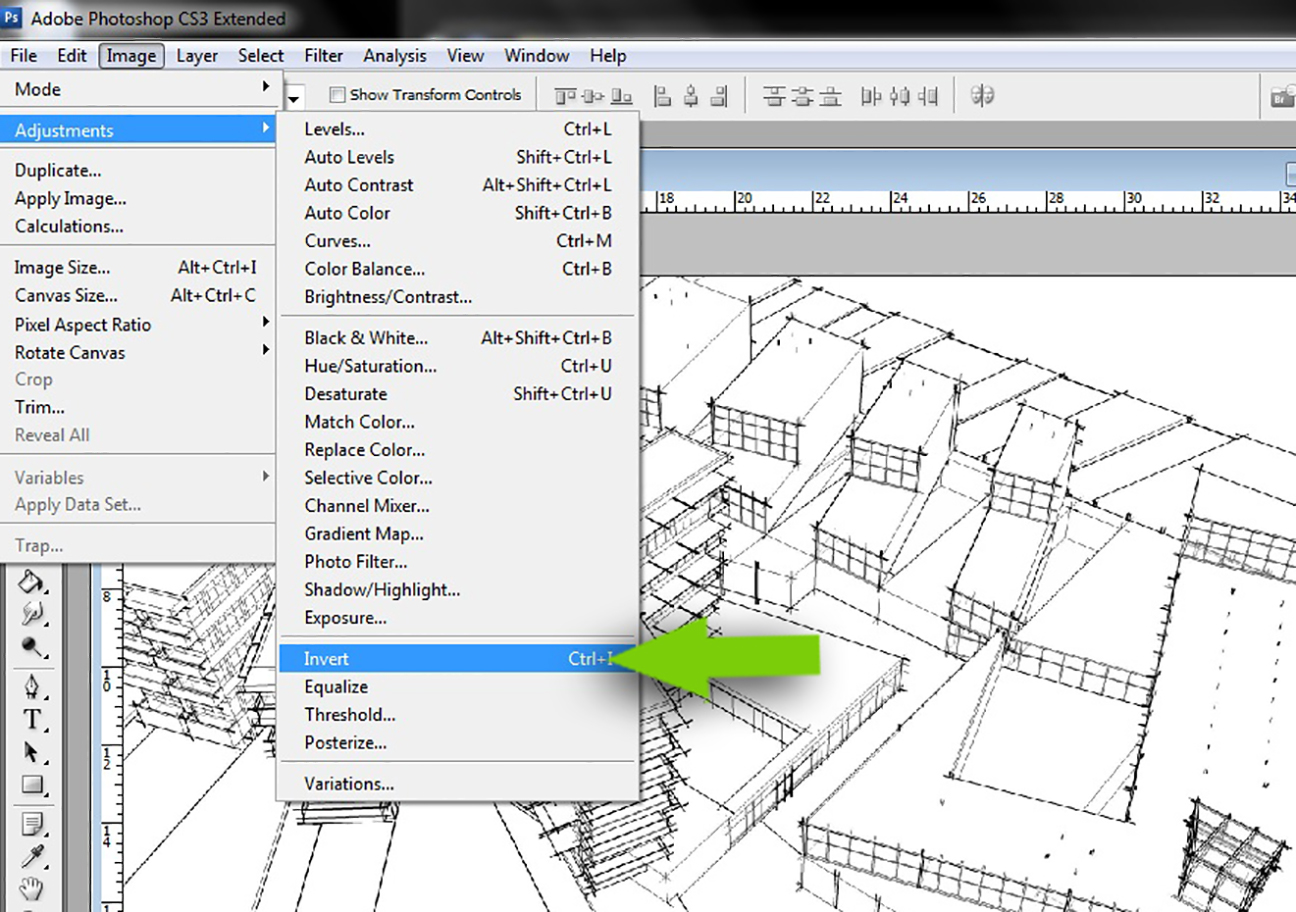
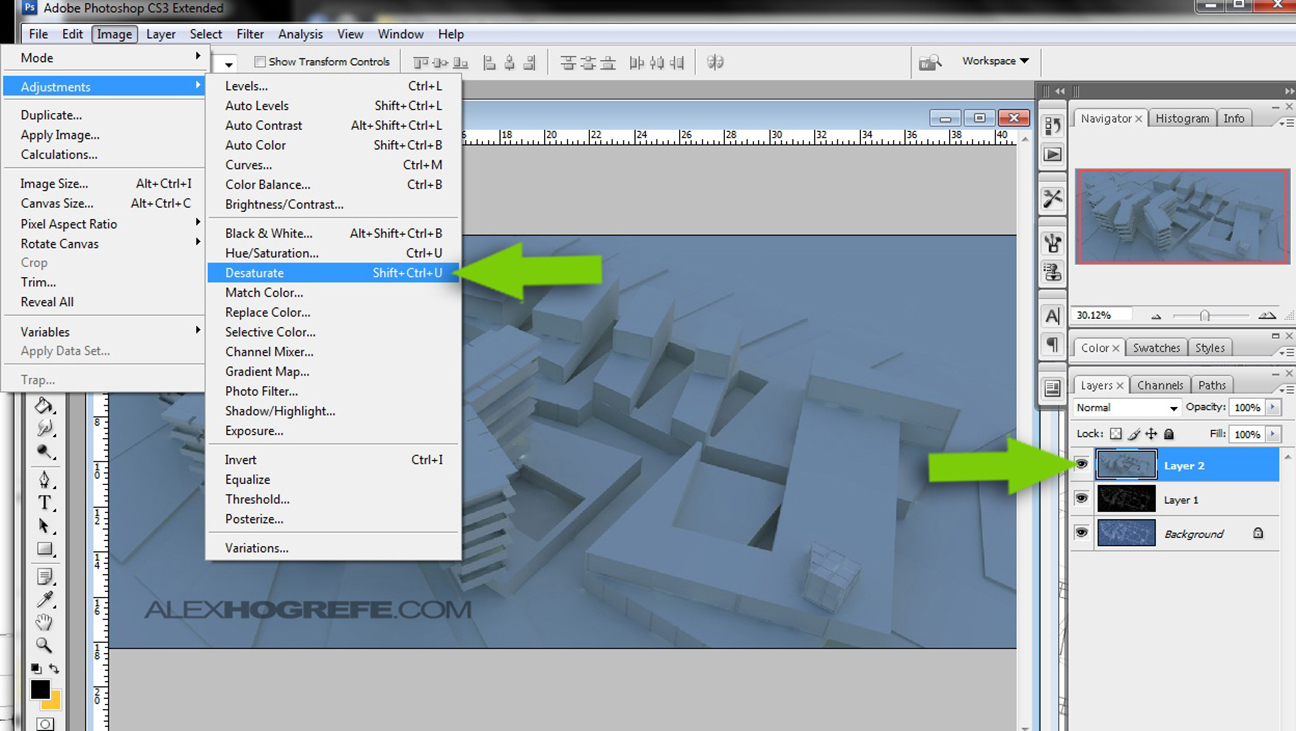
11. With the 3 images complete, it’s time to combine them in Photoshop. Begin by opening the first image (Sketchup export with extended lines) in Photoshop. Choose “IMAGE> ADJUSTMENTS>INVERT.”
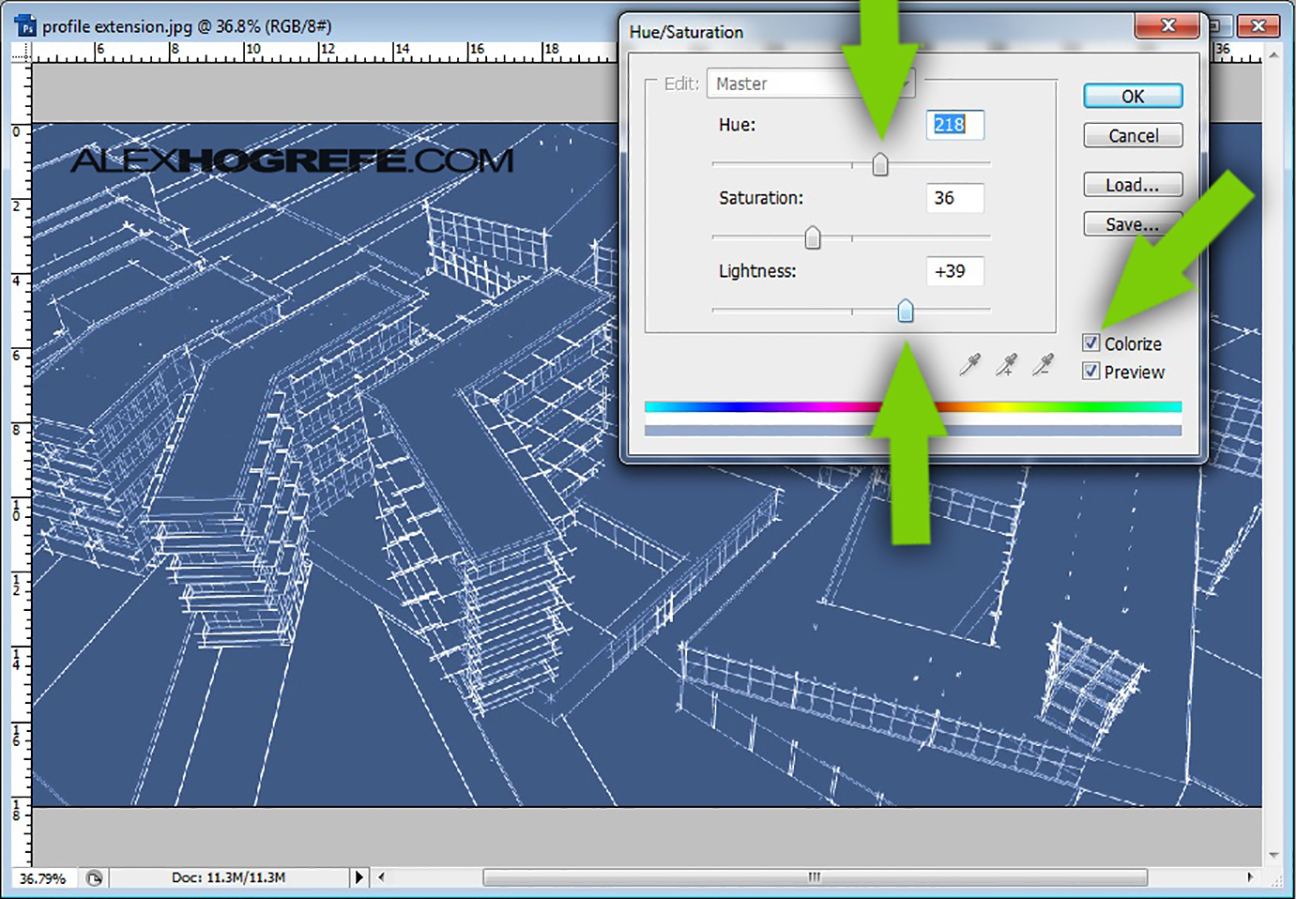
12. Next, open the Hue/Saturation dialogue box by going to “IMAGE>ADJUSTMENTS>HUE/SATURATION.” In the dialogue box, first check “COLORIZE.” Shift the “LIGHTNESS” slider to the right to lighten the black background to a grey color. Next, move the “HUE” slider till you end up with a good blueprint color.
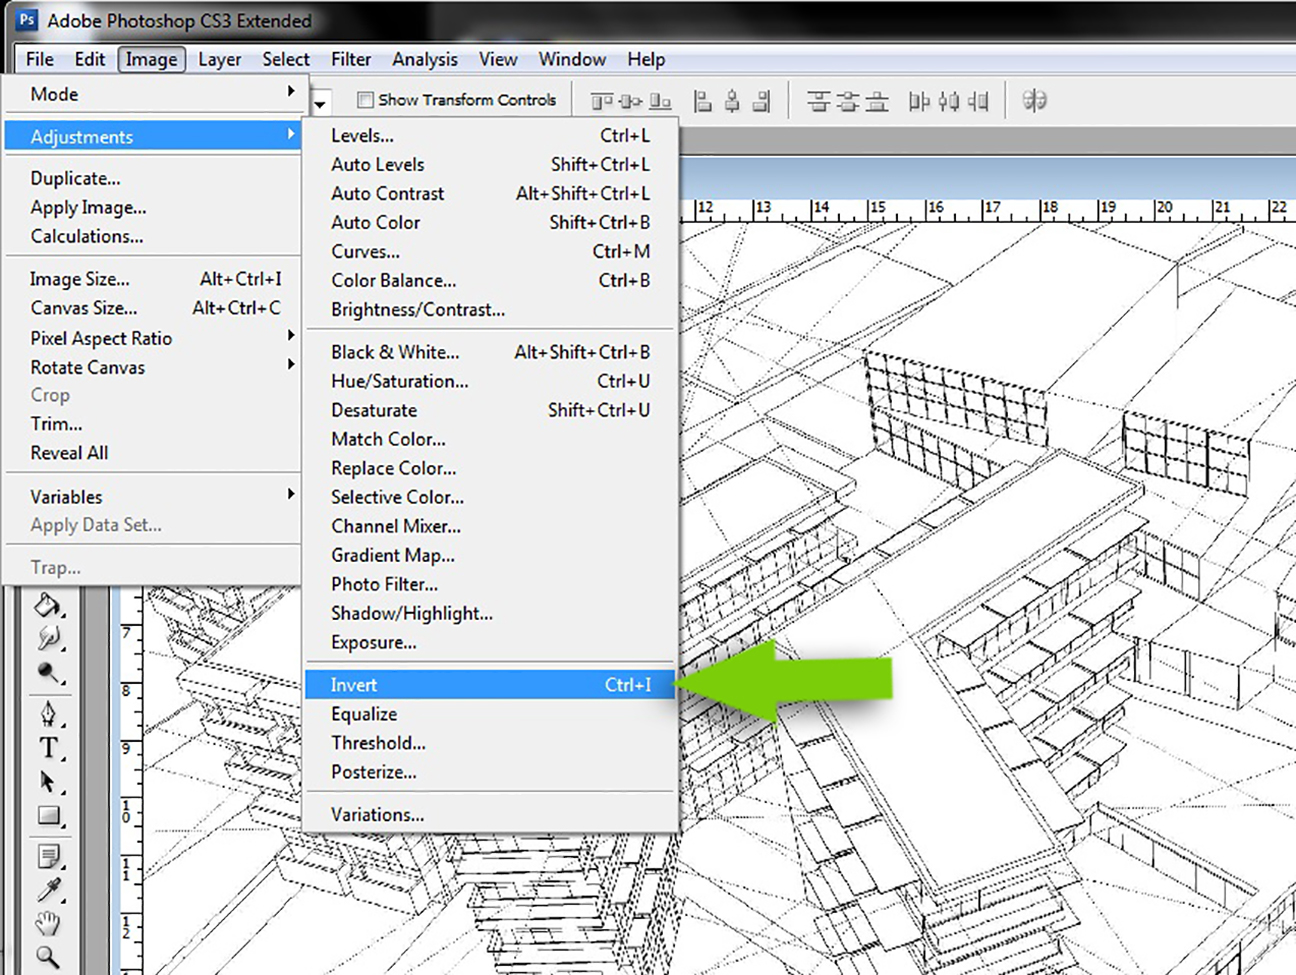
13. Drag in the other Sketchup exported image of the guides and move this layer to the top. Again, INVERT the image so that the line work becomes white on a black background.
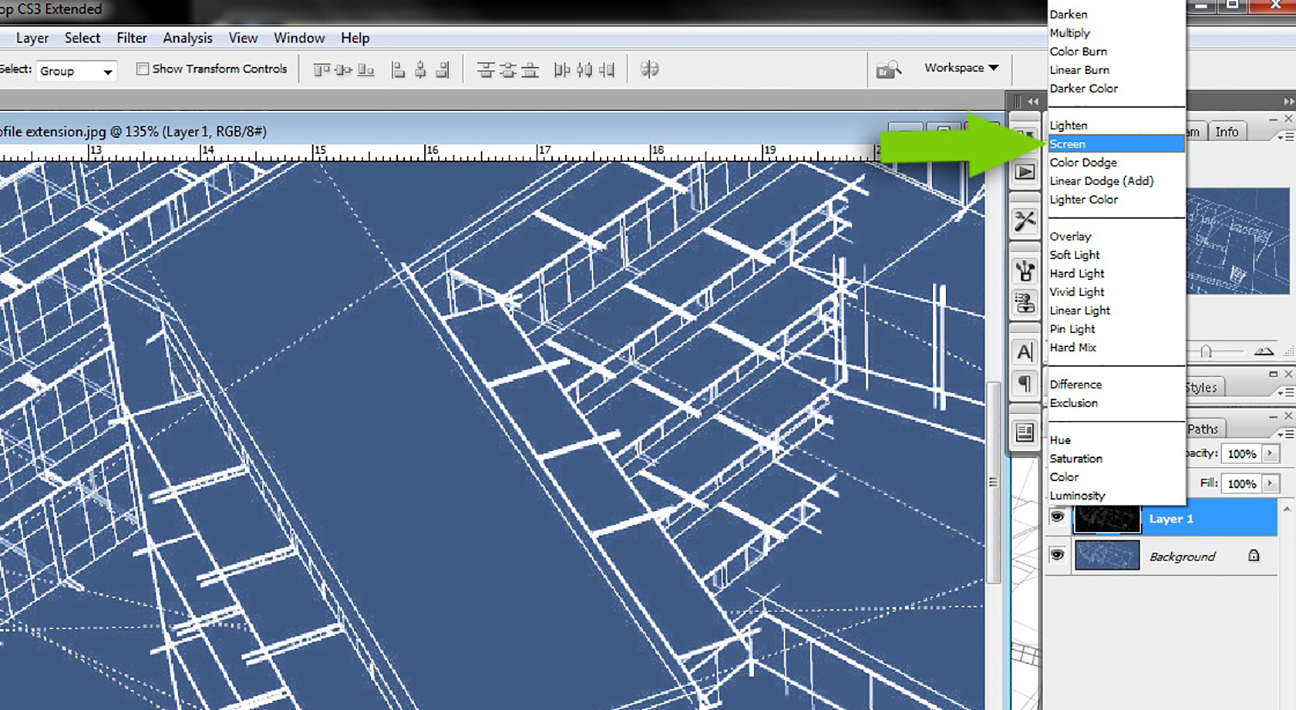
14. With this guide layer still selected, change the “LAYER BLEND MODE” (drop down box in the layers pallete) to “SCREEN.”
15. Open the Kerkythea rendering and drag it to the top layer. Desaturate the image by choosing “IMAGE> ADJUSTMENTS> DESATURATE.”
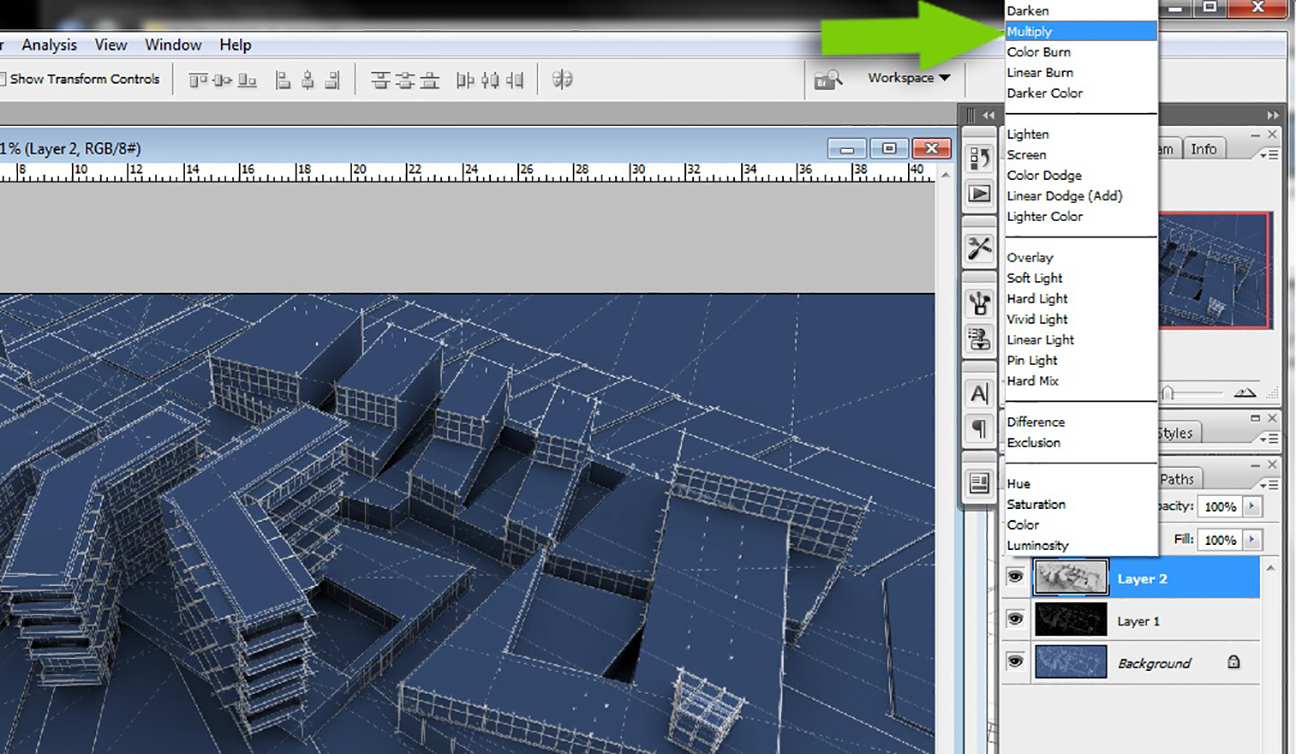
16. The image is a little flat. Adjusting the levels will fix that. Adjusting the contrast would also work, but I prefer levels because of the added control. Choose “IMAGE>ADJUSTMENTS>LEVELS,” and move the sliders until you end up with lighter and darker tones similar to the second image below.

17. Making sure the Kerkythea rendering layer is on top, set the “LAYER BLEND MODE” to “MULTIPLY.”
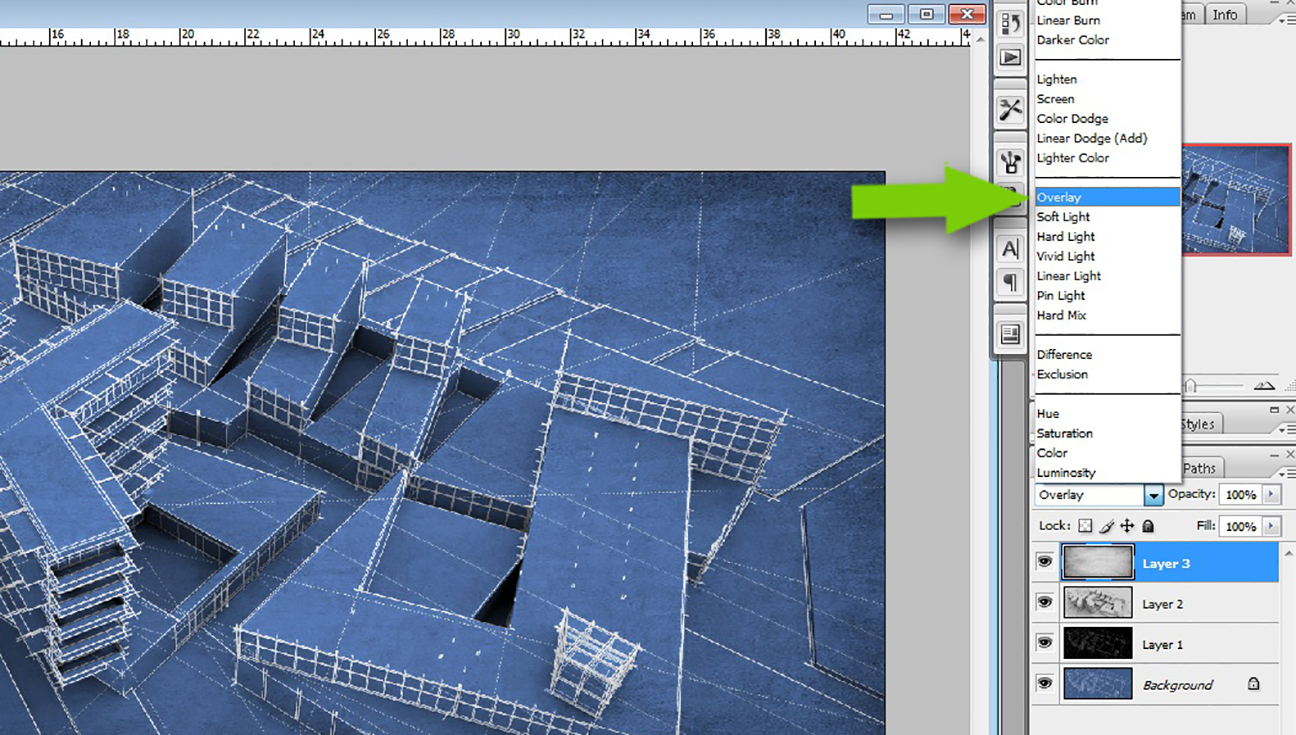
18. The illustration is almost finished. The last step is to add some texture to imitate the texture created from the blueprint chemical process. To do this, I just went online and found a “grunge” texture similar to the one below. Open the texture in Photoshop and move the layer to the top.

19. Finally, set the “LAYER BLEND MODE” of the grunge texture to “OVERLAY.”
That’s it. The first time I created this illustration, it took me about 1 1/2 hours to make including testing different settings and waiting for Kerkythea to render. Now that I have the workflow down, I’m guessing it would take about 30 minutes to create subsequent illustrations. The techniques are pretty basic, but it’s finding the right combination of layer blend modes and textures that give the final illustration a unique character.


hi,ur work is amazing.how do you make three pictures from the exactly the same angle and blend exactly well together?
i mean when i tried to blend them together ,the three images are not from the exact the same angle….how to solve this?
just keep the scene same. learn how to add a scene in sketch up.
sorry for the disturb,i just found how to do it
Alex,
Thanks for another great tutorial. I have a request. Could you please make a tuto about how you combined ecotect with grasshopper. I have been trying to learn that for 3 months without being successful.
Thanks
Excellent tutorial again. Your work is appreciated!
This tutorial is excellent, I have tried and looks very nice! Thank you so much, great work!
Thanks for all the positive feedback. I will try to keep them coming
This is such a creative technique! There is a style in Sketchup called Blue Print… I wonder if that could be edited and improved to save some time in Photoshop. Also, I wonder if there is an automated process that can be configured in Photoshop for subsequent images.
Thanks for your tutorials and for sharing your knowledge and talent, very unusual to see someone so talented and skilled sharing any information.
Cheers
S.
Teas in the listener's eyes are the finest possible reward for any singer.-Hermes watches in uk
Hey Alex, Great stuff! One question I have for you is, are these renderings more of a hobby for you than used in the professional world of architecture? I'm only asking because I'm curious how you maintain this work billable with a firm.
Presentations, marketing, branding. All those are 'billable'. Sometimes you can also make a rendering for a developer who is seeking for a project's approval and needs to entice the investors with imagery. We do this all the time at our office, and it's very profitable. I had a smaller firm when I was younger, and we used to do all that for architectural firms as our main business. In any case, even if you can't bill this work directly, it will entice potential clients to choose your firm over others, that's when it becomes profitable as well…
Half of what you see on this site is from school and techniques I developed in school. However a lot of the images I post are illustrations created for the firm I office I work at. A lot of what I post is based on speed. I usually only have 3 or 4 hours to produce illustrations. As Salvador stated, much of it is for marketing and presentations pursuing a possible job. Other times, it is to show a client where we are at with the design and to give them confidence that the design is going in the right direction. As long as the images are done well, it is always worth the investment
Hi Alex, since i discover your website i make a visit all days since that…! 🙂
I always find something very very useful for my presentation evolution.
You could see a result of this tutorial in my webpage http://www.azeromais.com. Did i made a good job?!
Many thank's and keep the good work….more tut's pleaseeeeeeeeeeeee! 🙂
PS.: Like i said in your Facebook page, "welcome to my club…….married men's club" 🙂
really nice. Your website looks amazing. What did you use to build it?
Married men's club is a great club to be in
Alex architecture is without doubt my greatest passion along with my wife!
She would kill me if I did not say it 🙂
But among other things always enjoyed web design and oddly enough my site is being developed in Joomla! It is a magnificent platform and on top of that is free, but surely you've already heard with WordPress and other platforms of its kind. The one I chose and I feel more comfortable is the joomla. Coupled with a template that I found to be beautiful is good or at least I think so.
The site is still being updated content, but already the next day you should be able to view a sample of my work (architecture / design / design Motosports / naming / branding /).
Thank you for your words and wait impatiently for your new tutorial …! 🙂
I love what you are doing Alex this is what i have being looking for for such a long time "Architecture & Graphics" thanks
Wow Alex, this is really impressive! and it's all very interesting. Just what I've been looking for.
perfect tut, but i still have a problem: at part 11: i can not take a kerky render at the same angle of the sketchup model, my kerky model always zooms out, and the angles either open wider or close! how can i adjust the kerkythea camera with that of the sketchup?
When you open the SU model in Kerkythea, do not move around in the scene or change the render resolution. Also, are you using the SU exporter?
thanks for your quick reply,but
no, i do not move around in the model and do not change the resolution, and yes, i am using the su exporter:-(
my model still zooms out in kerky, but if i mark my scene number in the render window instead of "current view" it works fine! thanks again for the tut.
Muchas Gracias por el Tutorial le quedo eternamente agradecido
Hi Alex..
Your work is amazing buddy. I'm an interior architect and im very interested in presentation techniques so u can imagine how much i love your website. it's like heaven.
So thank you so much for sharing your knowledge. you have inspired me to create my own website too and share the things that i know with everyone. but im sure it won't be as half awesome as urs.
keep it up and may God bless you buddy : ).
H. Jamous
Thanks Jamous
alex you are so cool. thx for your tuterial
I've been experimenting with a lot of your tutorials for the final drawings of my architecture project this year. I am in my last year of high school in New Zealand and going to university for Architecture next year.
Thought you might be interested to see the results of your work 🙂 I really enjoy your tutorials and the ideas in them.
http://mouseluva.deviantart.com/gallery/39702864
@Bec,
Good luck in Architecture school. Your off to a good start and thanks for posting your illustration.
Alex thank you so much for all your great tips and tutorials! I especially love the non-realistic ones, like this one, I think they provide a more "artistic" result! Keep up the good work, all the best!
dam dude, you have talent ! dont know how you learn all that but… seems to have alot of work behind that ! really appreciate the fact that more over that, you share your work and tips.
Thanks for sharing the best posts they amazing and very help us. You made a good site and giving us such a good information on this topic it’s very interesting one. I am very impressed by your site and your posts they amazing